
Automations send emails or in-app Notifications when something happens in CoreBridge EVO, such as an Order being created, a status changing, or a scheduled date arriving. Every Automation uses the same structure: a Trigger, optional Conditions, and an Action. This article explains how Automations work and walks through four real-world examples.
Table of Contents
- Important Information
- How Automations Work
- Starting a New Automation
- Example: Monthly Statements
- Example: Automatic Invoices
- Example: Proof Approved
- Example: New Order Created
- Frequently Asked Questions
- Related Articles
Important Information
Note: Creating and editing Automations requires the Access Workflow Settings permission. For more information, see Employee Roles and Permissions in Settings.
Note: Email actions require an authorized Email From Address. For more information, see Adding Email From Addresses.
Note: For Card View, List View, and managing existing Automations, see Automations Overview. For in-app Notifications in more detail, see Creating and Managing Notifications.
How Automations Work
Each Automation follows the same pattern:
- Trigger - The event or schedule that starts the Automation.
- Condition (optional) - Additional rules that must be true before the action runs.
- Action - What CoreBridge does, such as sending an email or an in-app Notification.
Starting a New Automation
Navigate to System Settings / Workflow / Automations.
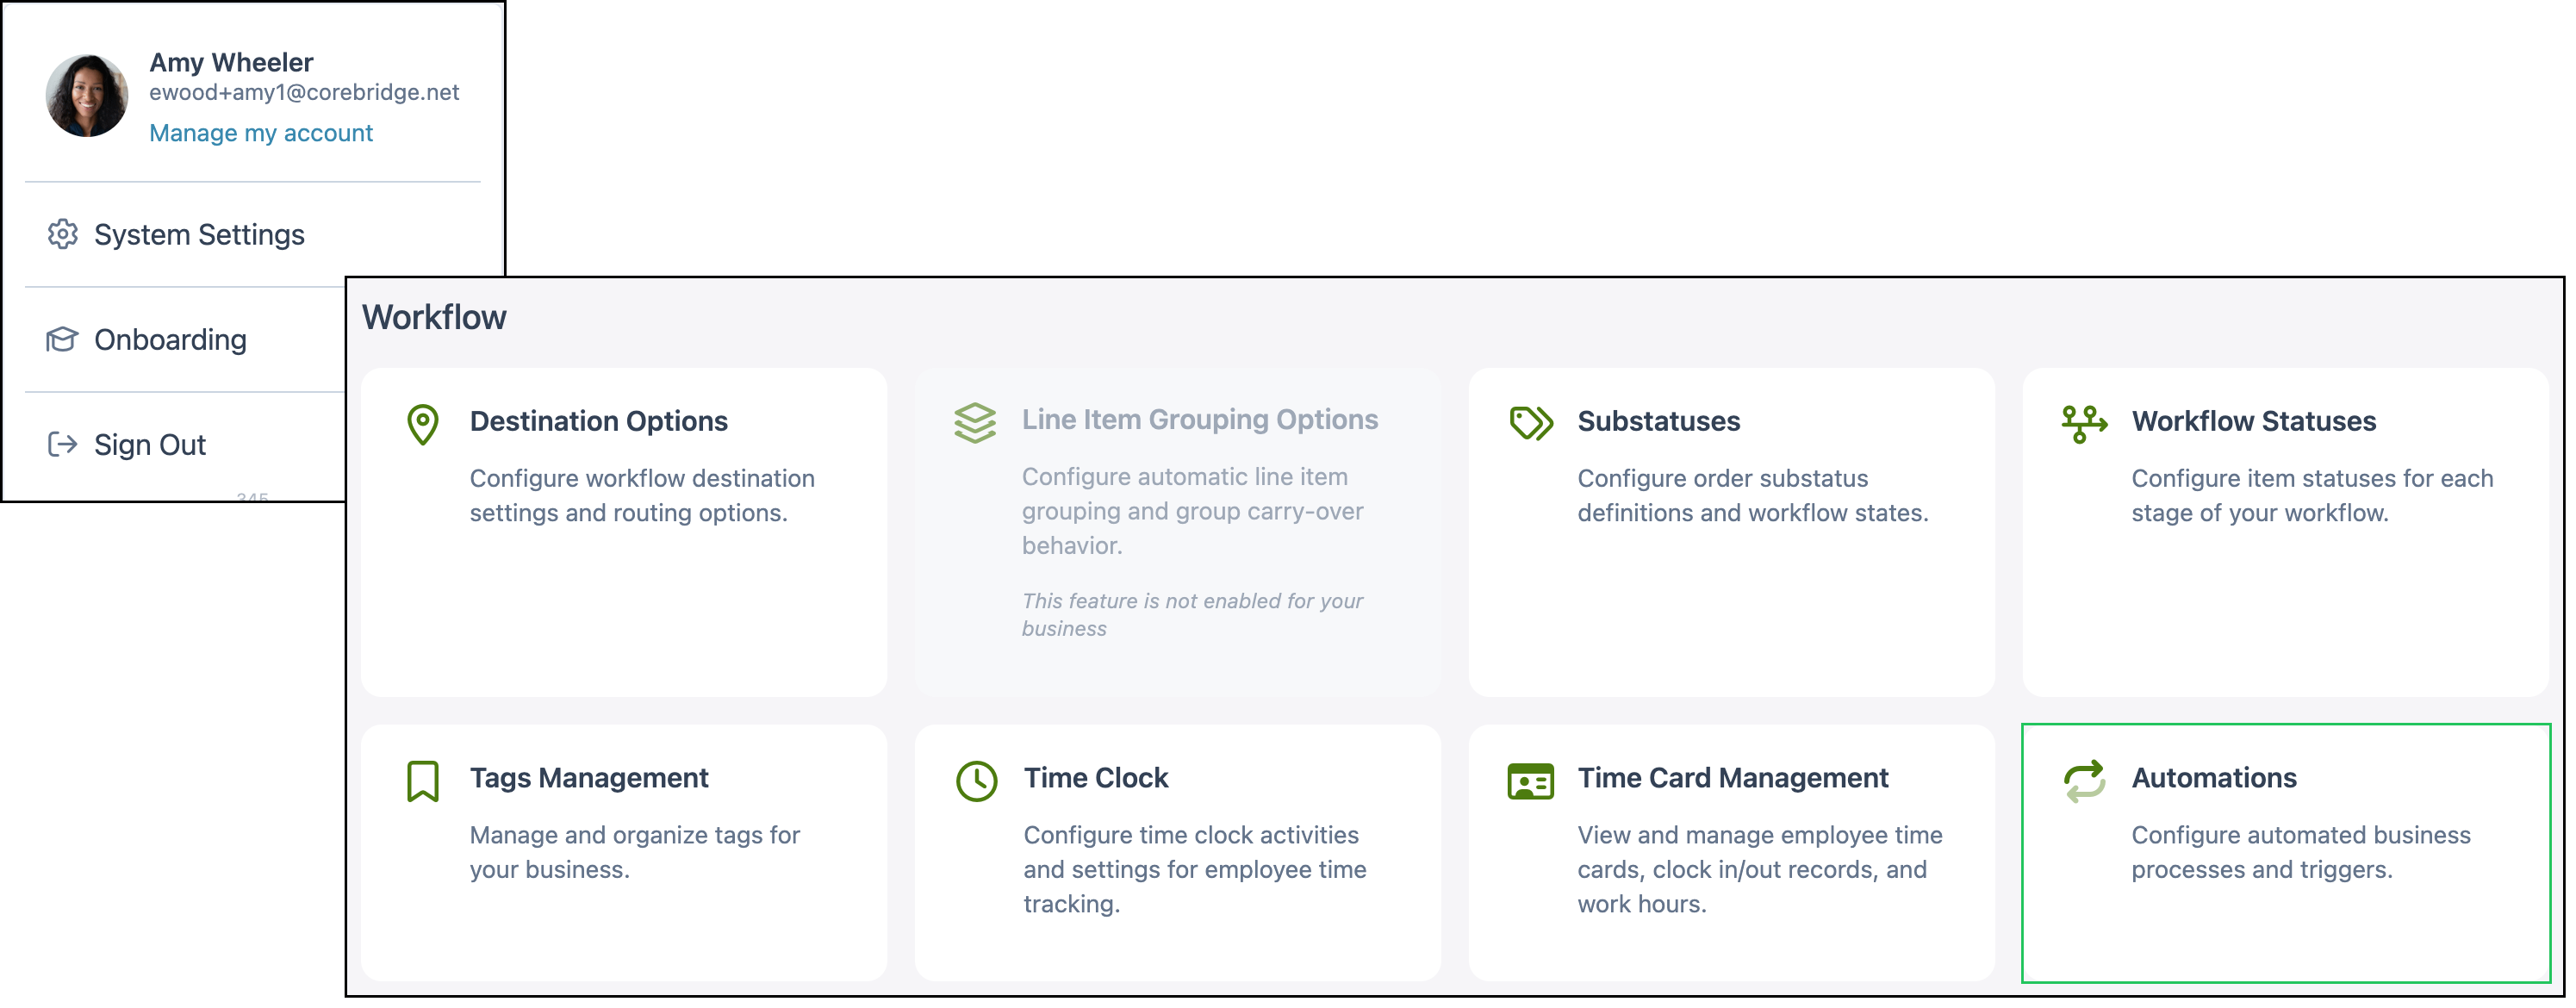
1. Click Automation.

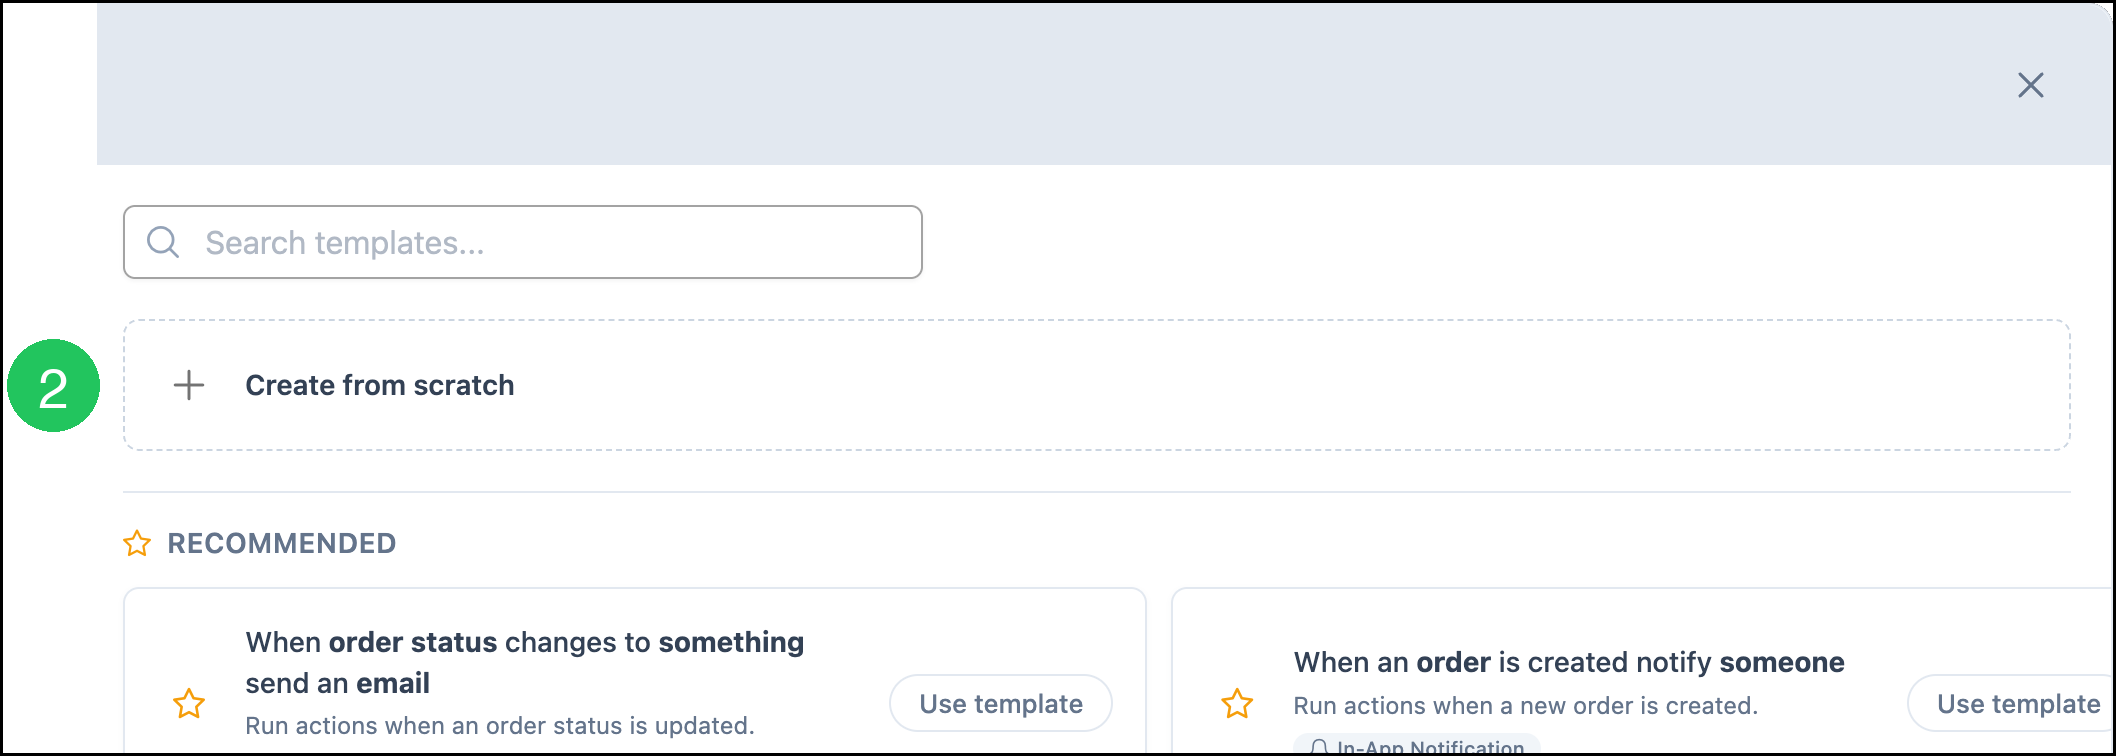
2. Select Create from scratch, or choose a template.
Note: The Automation Library includes templates organized by category and object. Use Search templates to locate a specific template.
Example: Monthly Statements
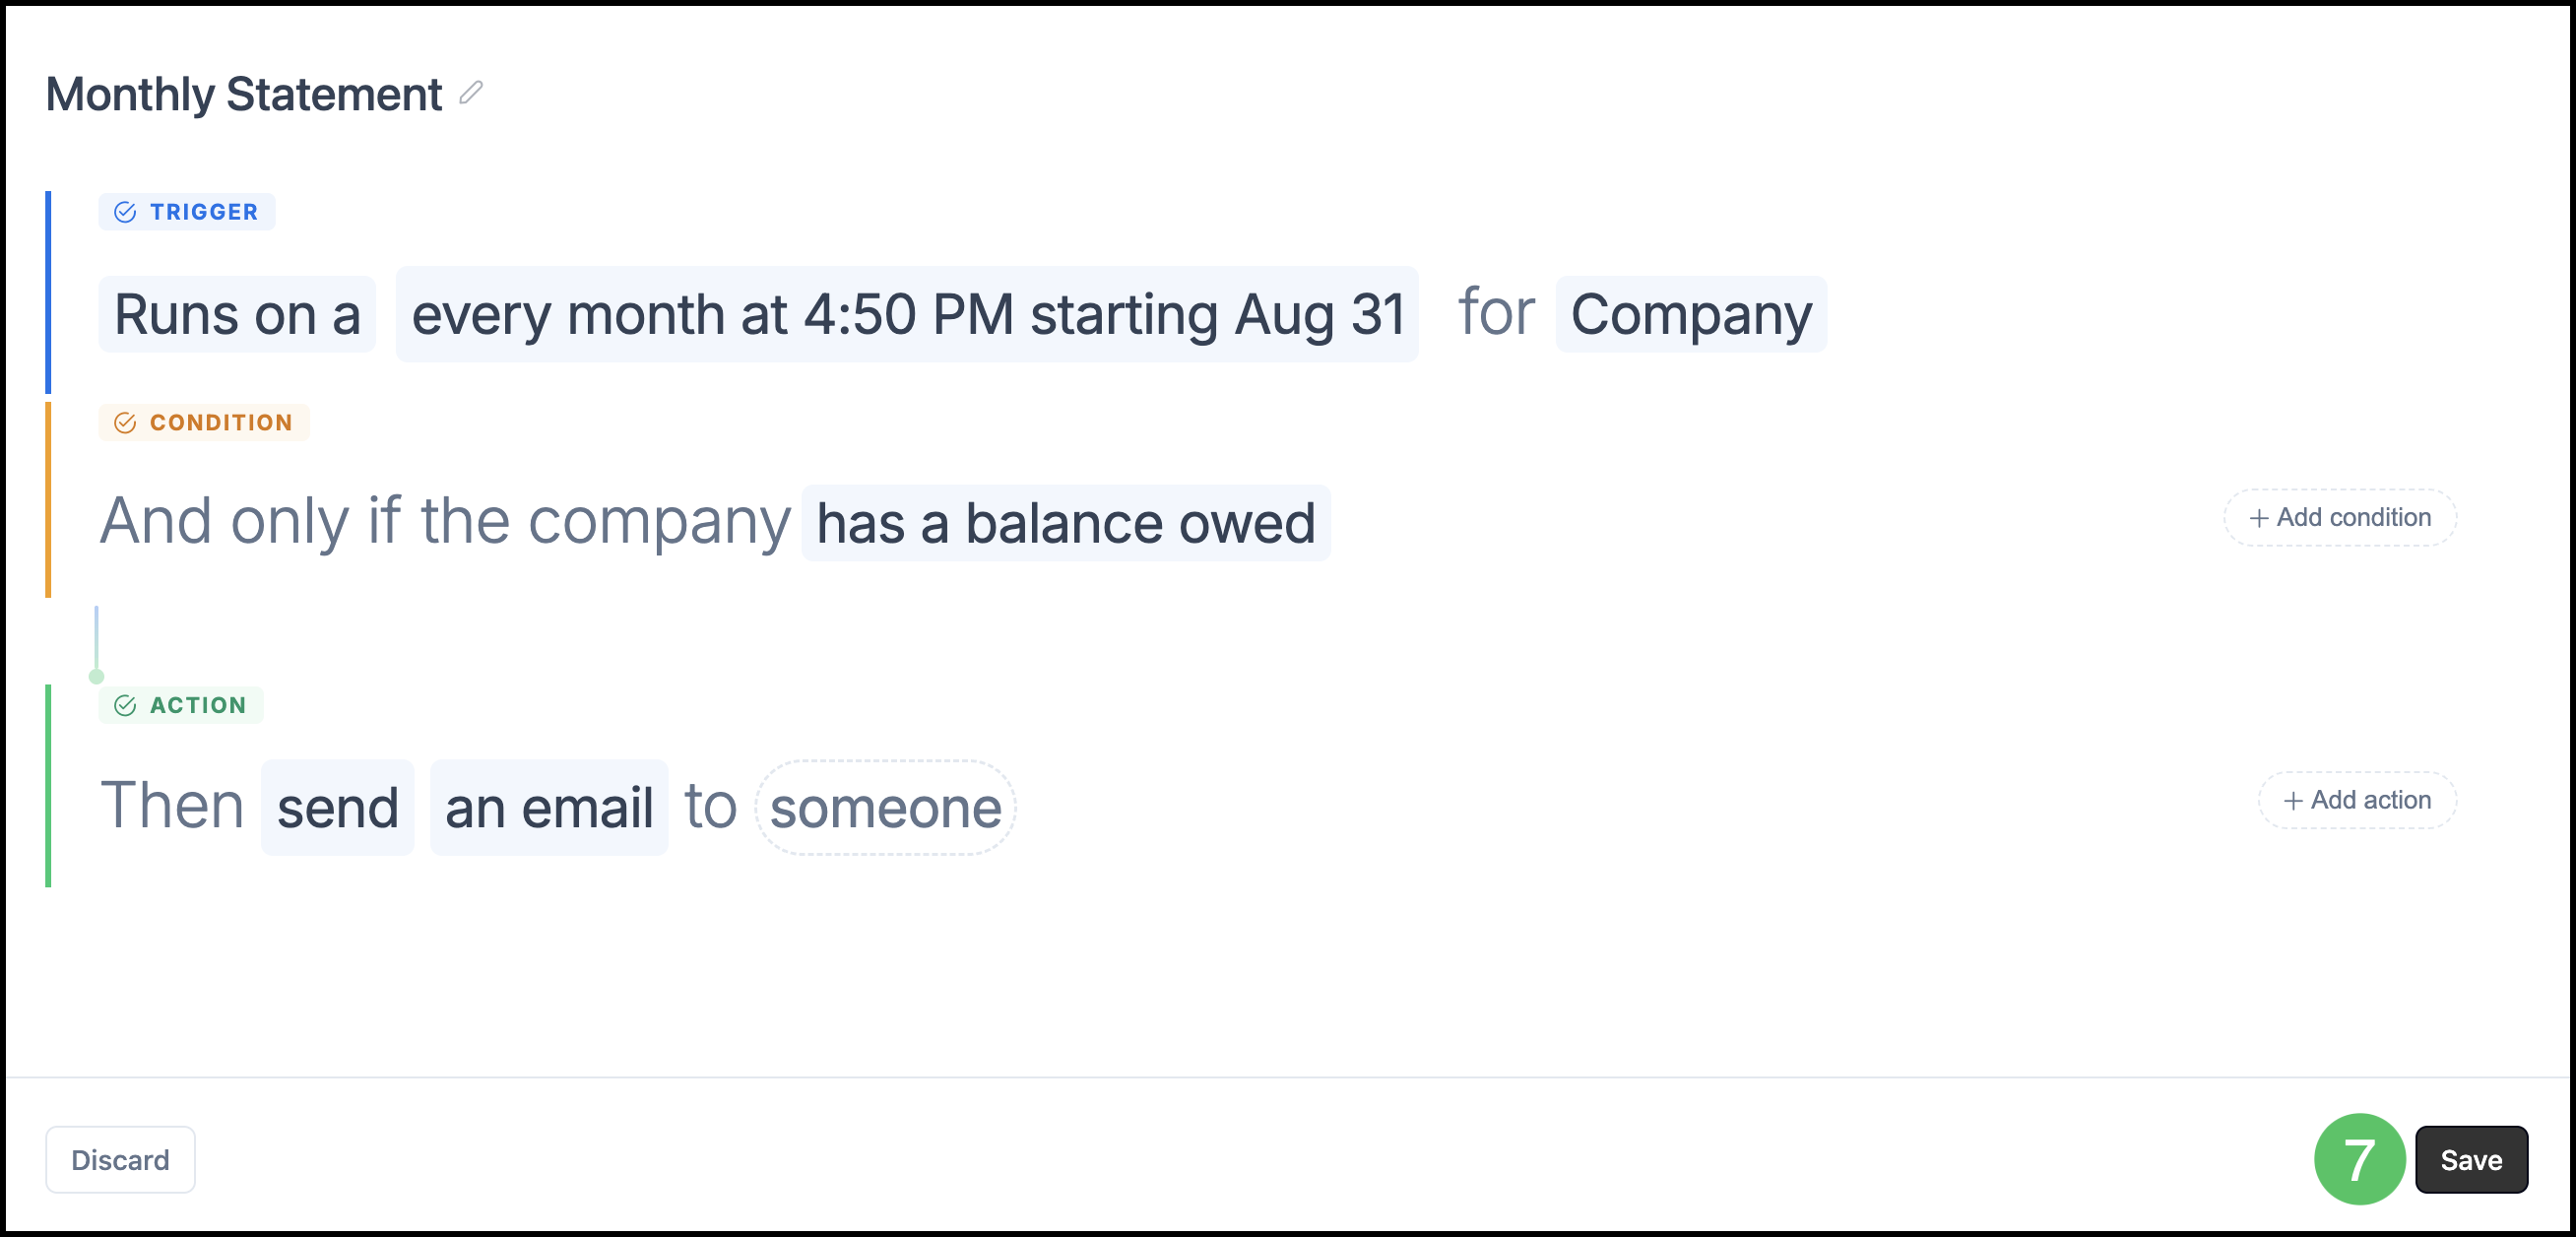
Use a scheduled Automation to email monthly statements to Companies that still have a balance owed.
After you select Create from scratch:
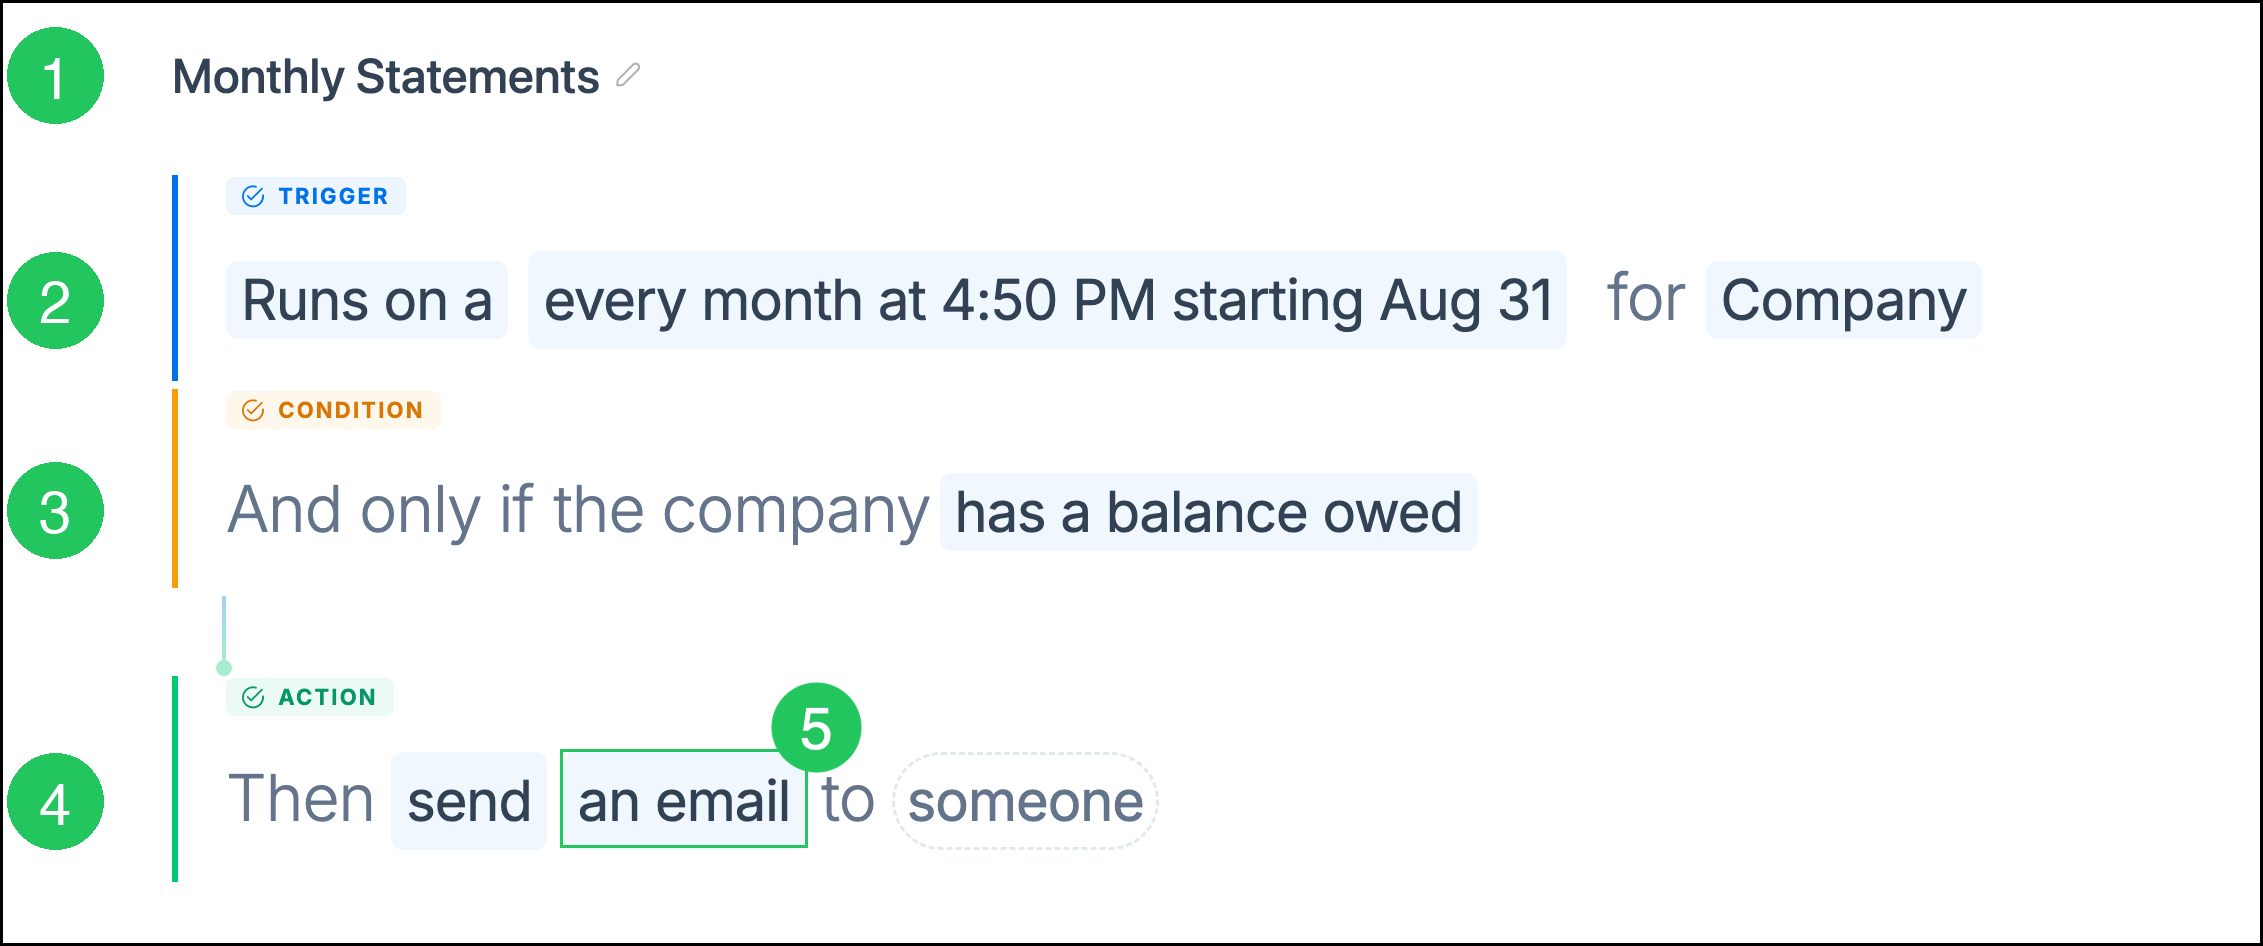
1. Enter a name, such as Monthly Statements.
2. Set the Trigger to Run on a schedule. Configure the schedule to run every month (for example, at the end of the month), then select Company as the entity.
3. Click Add condition and select Has Balance Owed so the Automation runs only when the company has a balance owed.
4. Click Add action and select send an email.
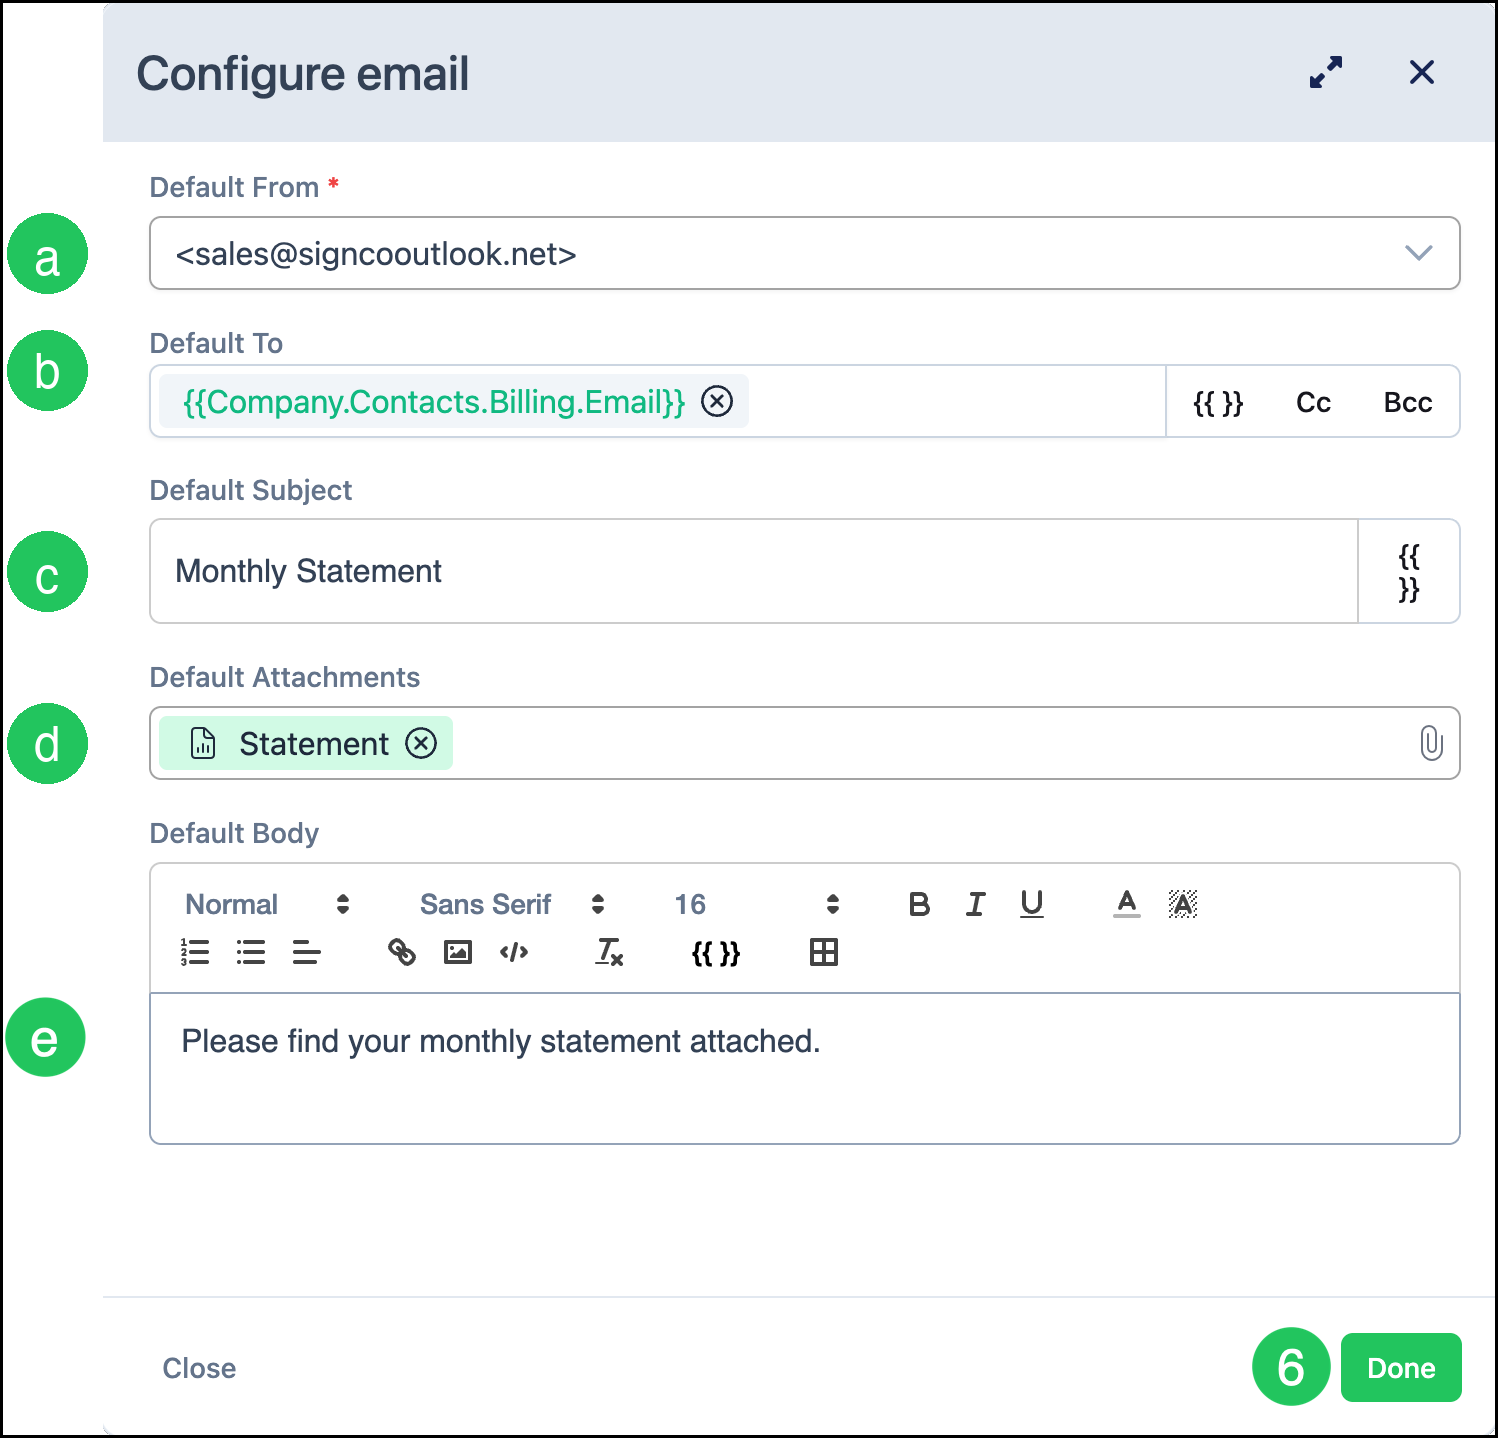
5. Click an email to open the Configure email dialog.
a. Default From - Specifies the authorized email account used to send the email. This field is required.
b. Default To - Specifies the default email recipient. A merge field can be used to automatically populate the billing contact email, such as Company / Contacts / Billing / Email.
c. Default Subject - Specifies the default subject line for the email, such as Monthly Statement.
d. Default Attachments - Specifies the document automatically included with the email. Select the Statement document.
e. Default Body - Specifies the default content that appears in the body of the email.
6. Click Done.
7. Click Save.
Example: Automatic Invoices
Use this Automation to email an invoice when an Order moves to Invoiced on Account, but only when the Company still has a balance owed.
After you select Create from scratch:
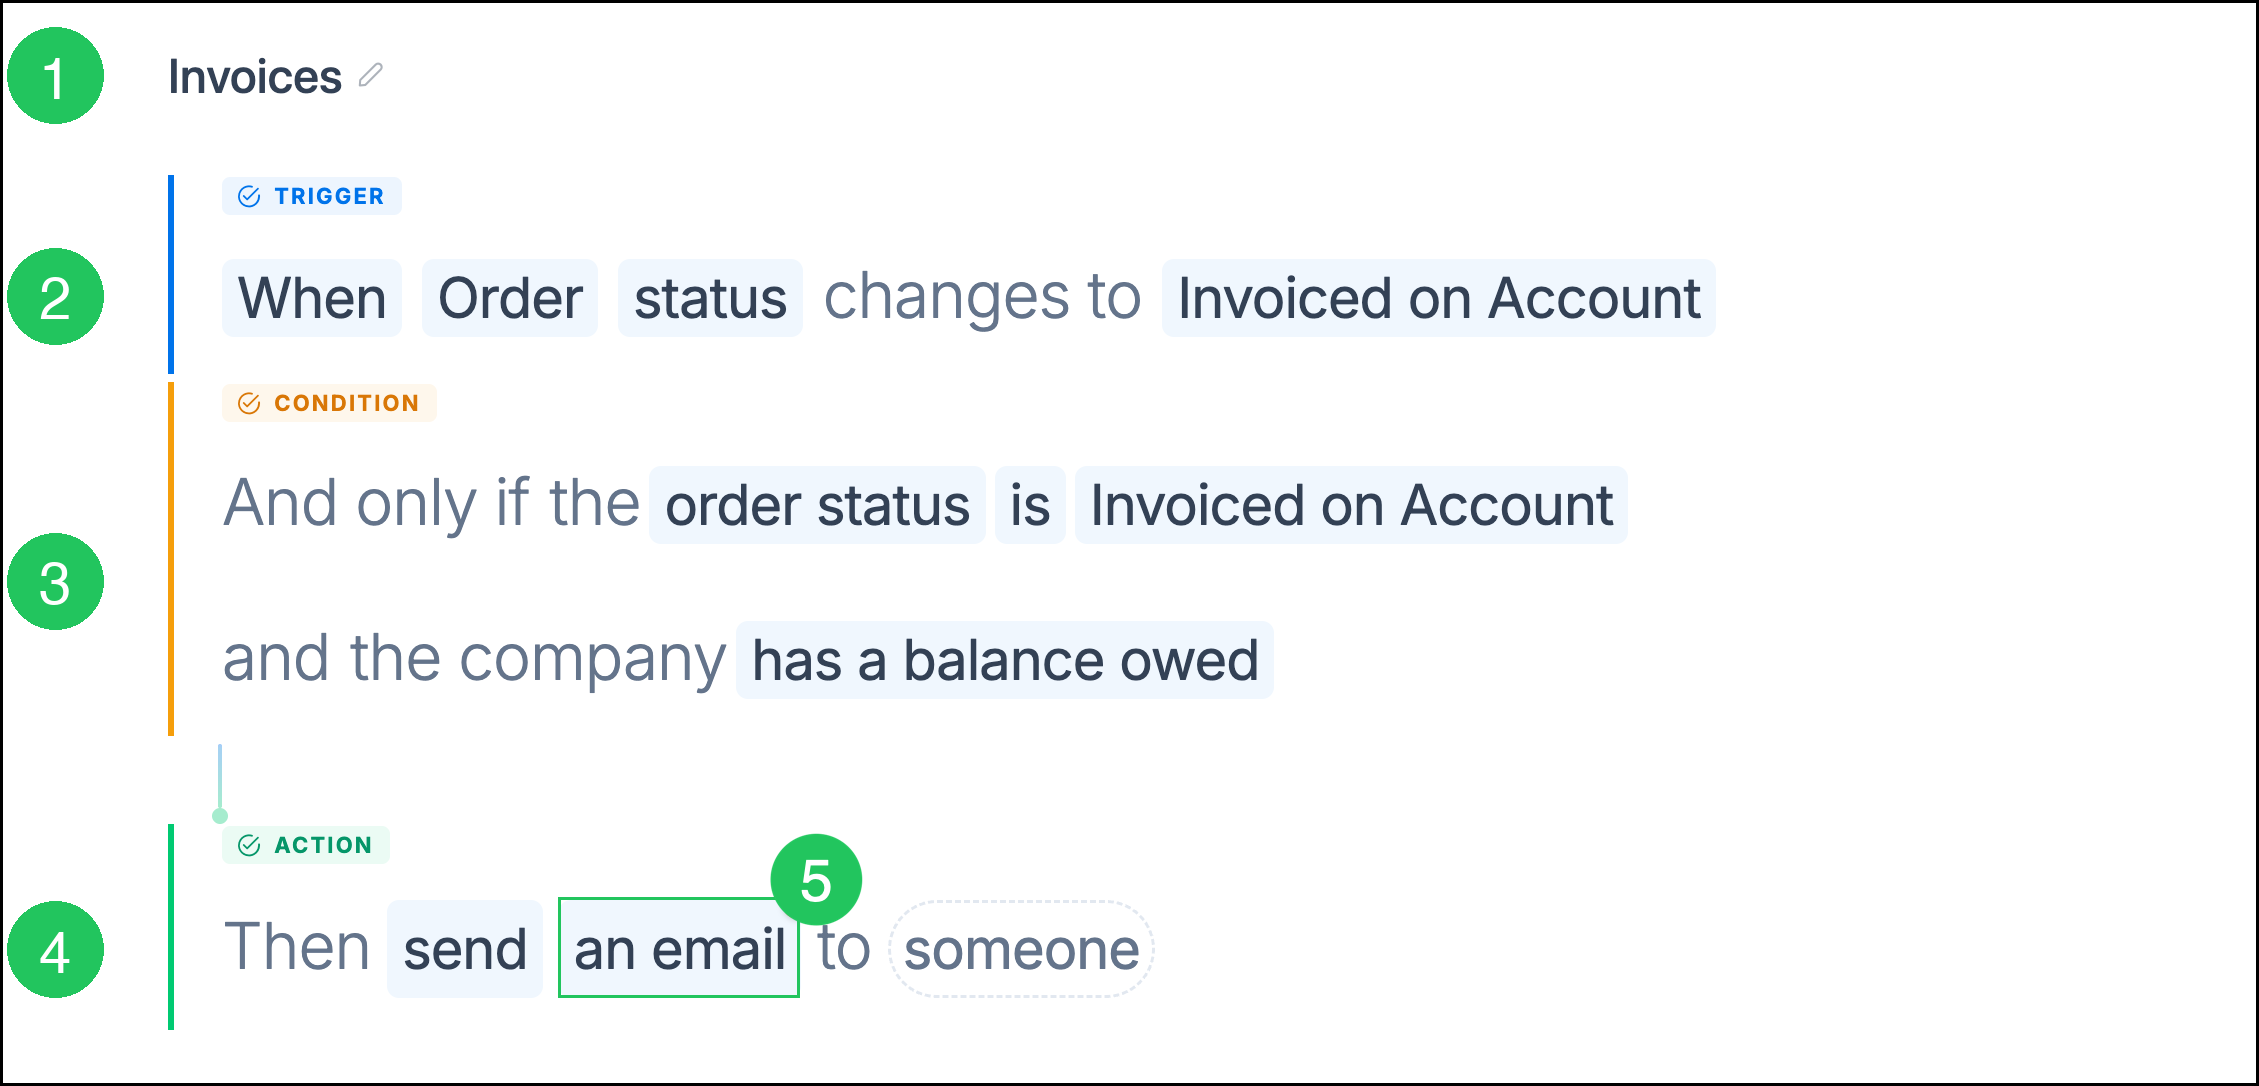
1. Enter a name, such as Invoices.
2. Set the Trigger to When order status changes, then select Invoiced on Account.
3. Add conditions so the Automation runs only if the order status is Invoiced on Account and the company has a balance owed.
4. Set the Action to send an email.
5. Click an email to open the Configure email dialog.
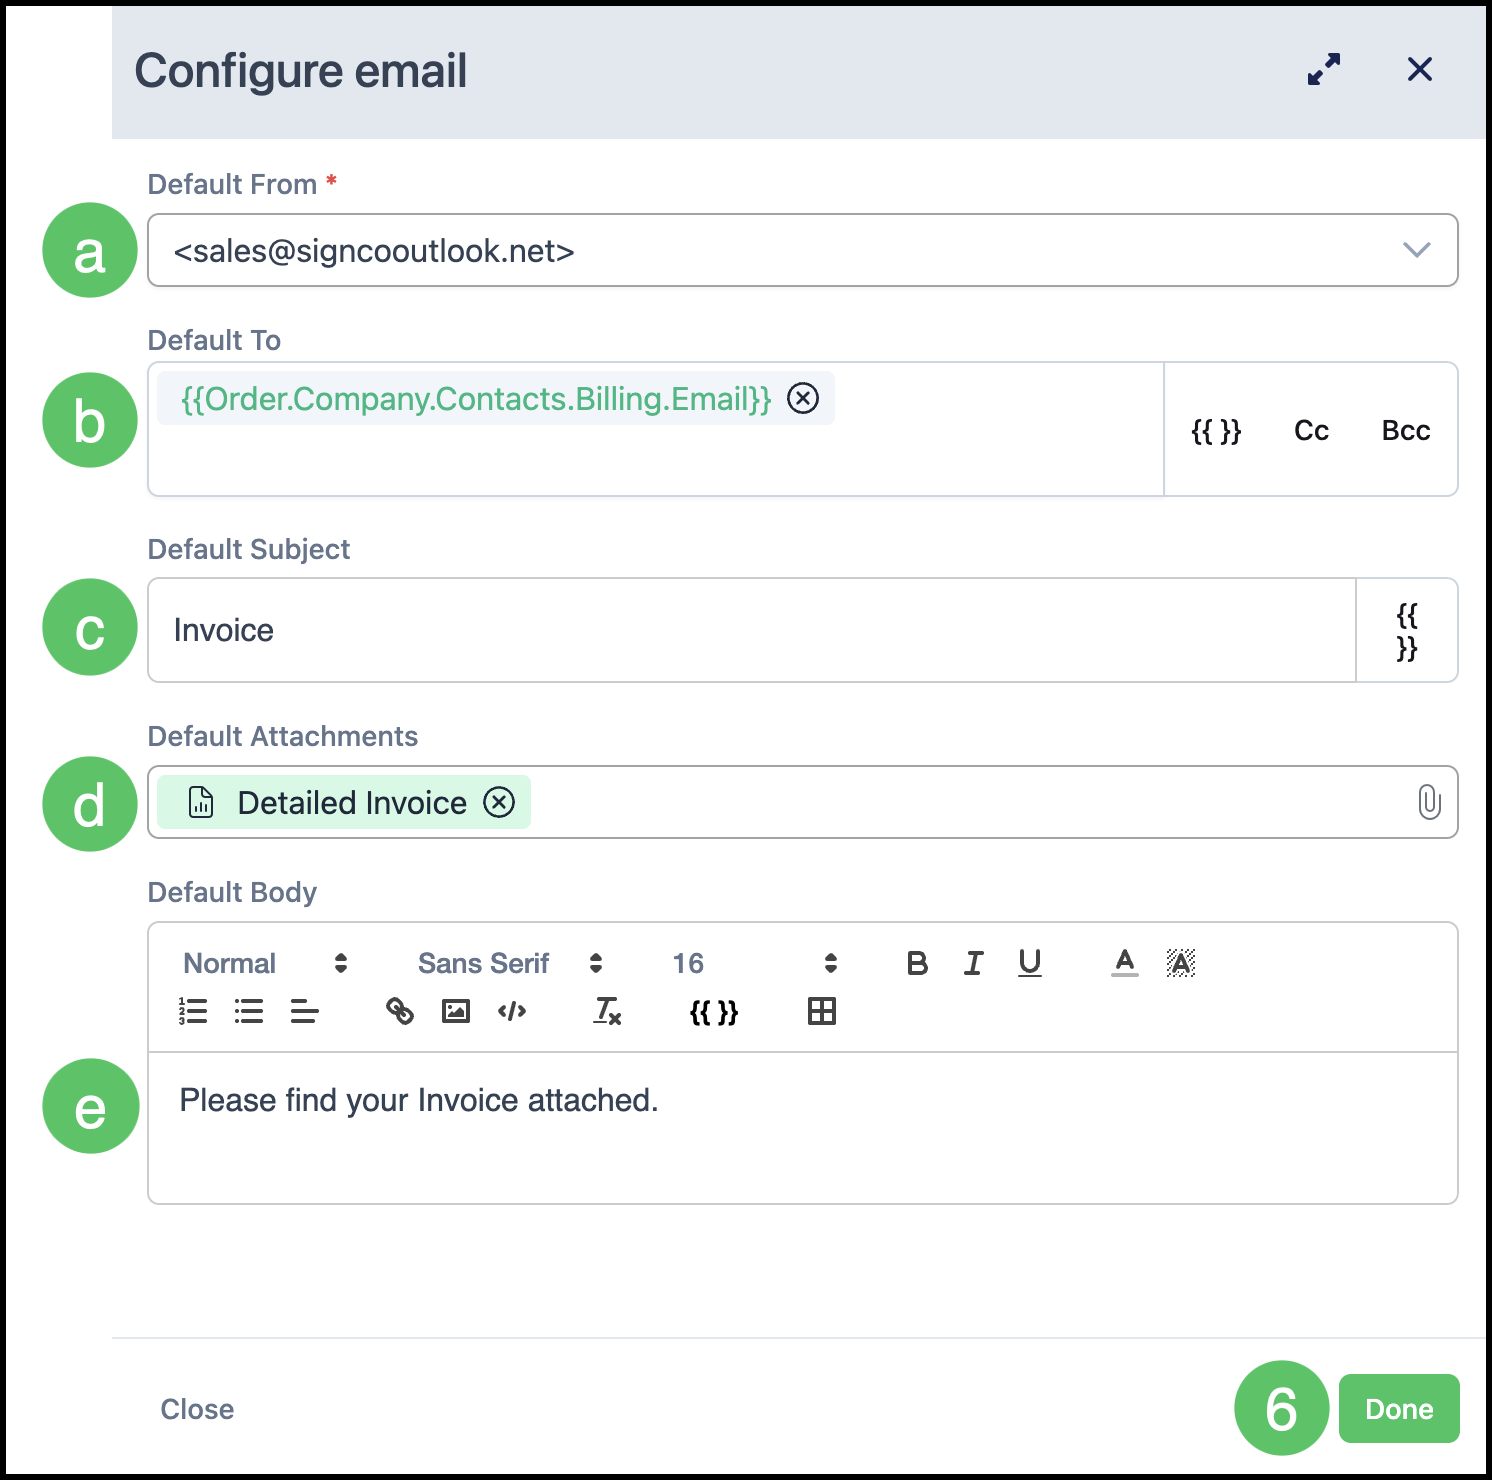
a. Default From - Specifies the authorized email account used to send the email. This field is required.
b. Default To - Specifies the default email recipient. A merge field can be used to automatically populate the billing contact email, such as Order / Company / Contacts / Billing / Email.
c. Default Subject - Specifies the default subject line for the email, such as Invoice.
d. Default Attachments - Specifies the document automatically included with the email. Select the appropriate Invoice document.
e. Default Body - Specifies the default content that appears in the body of the email.
6. Click Done.
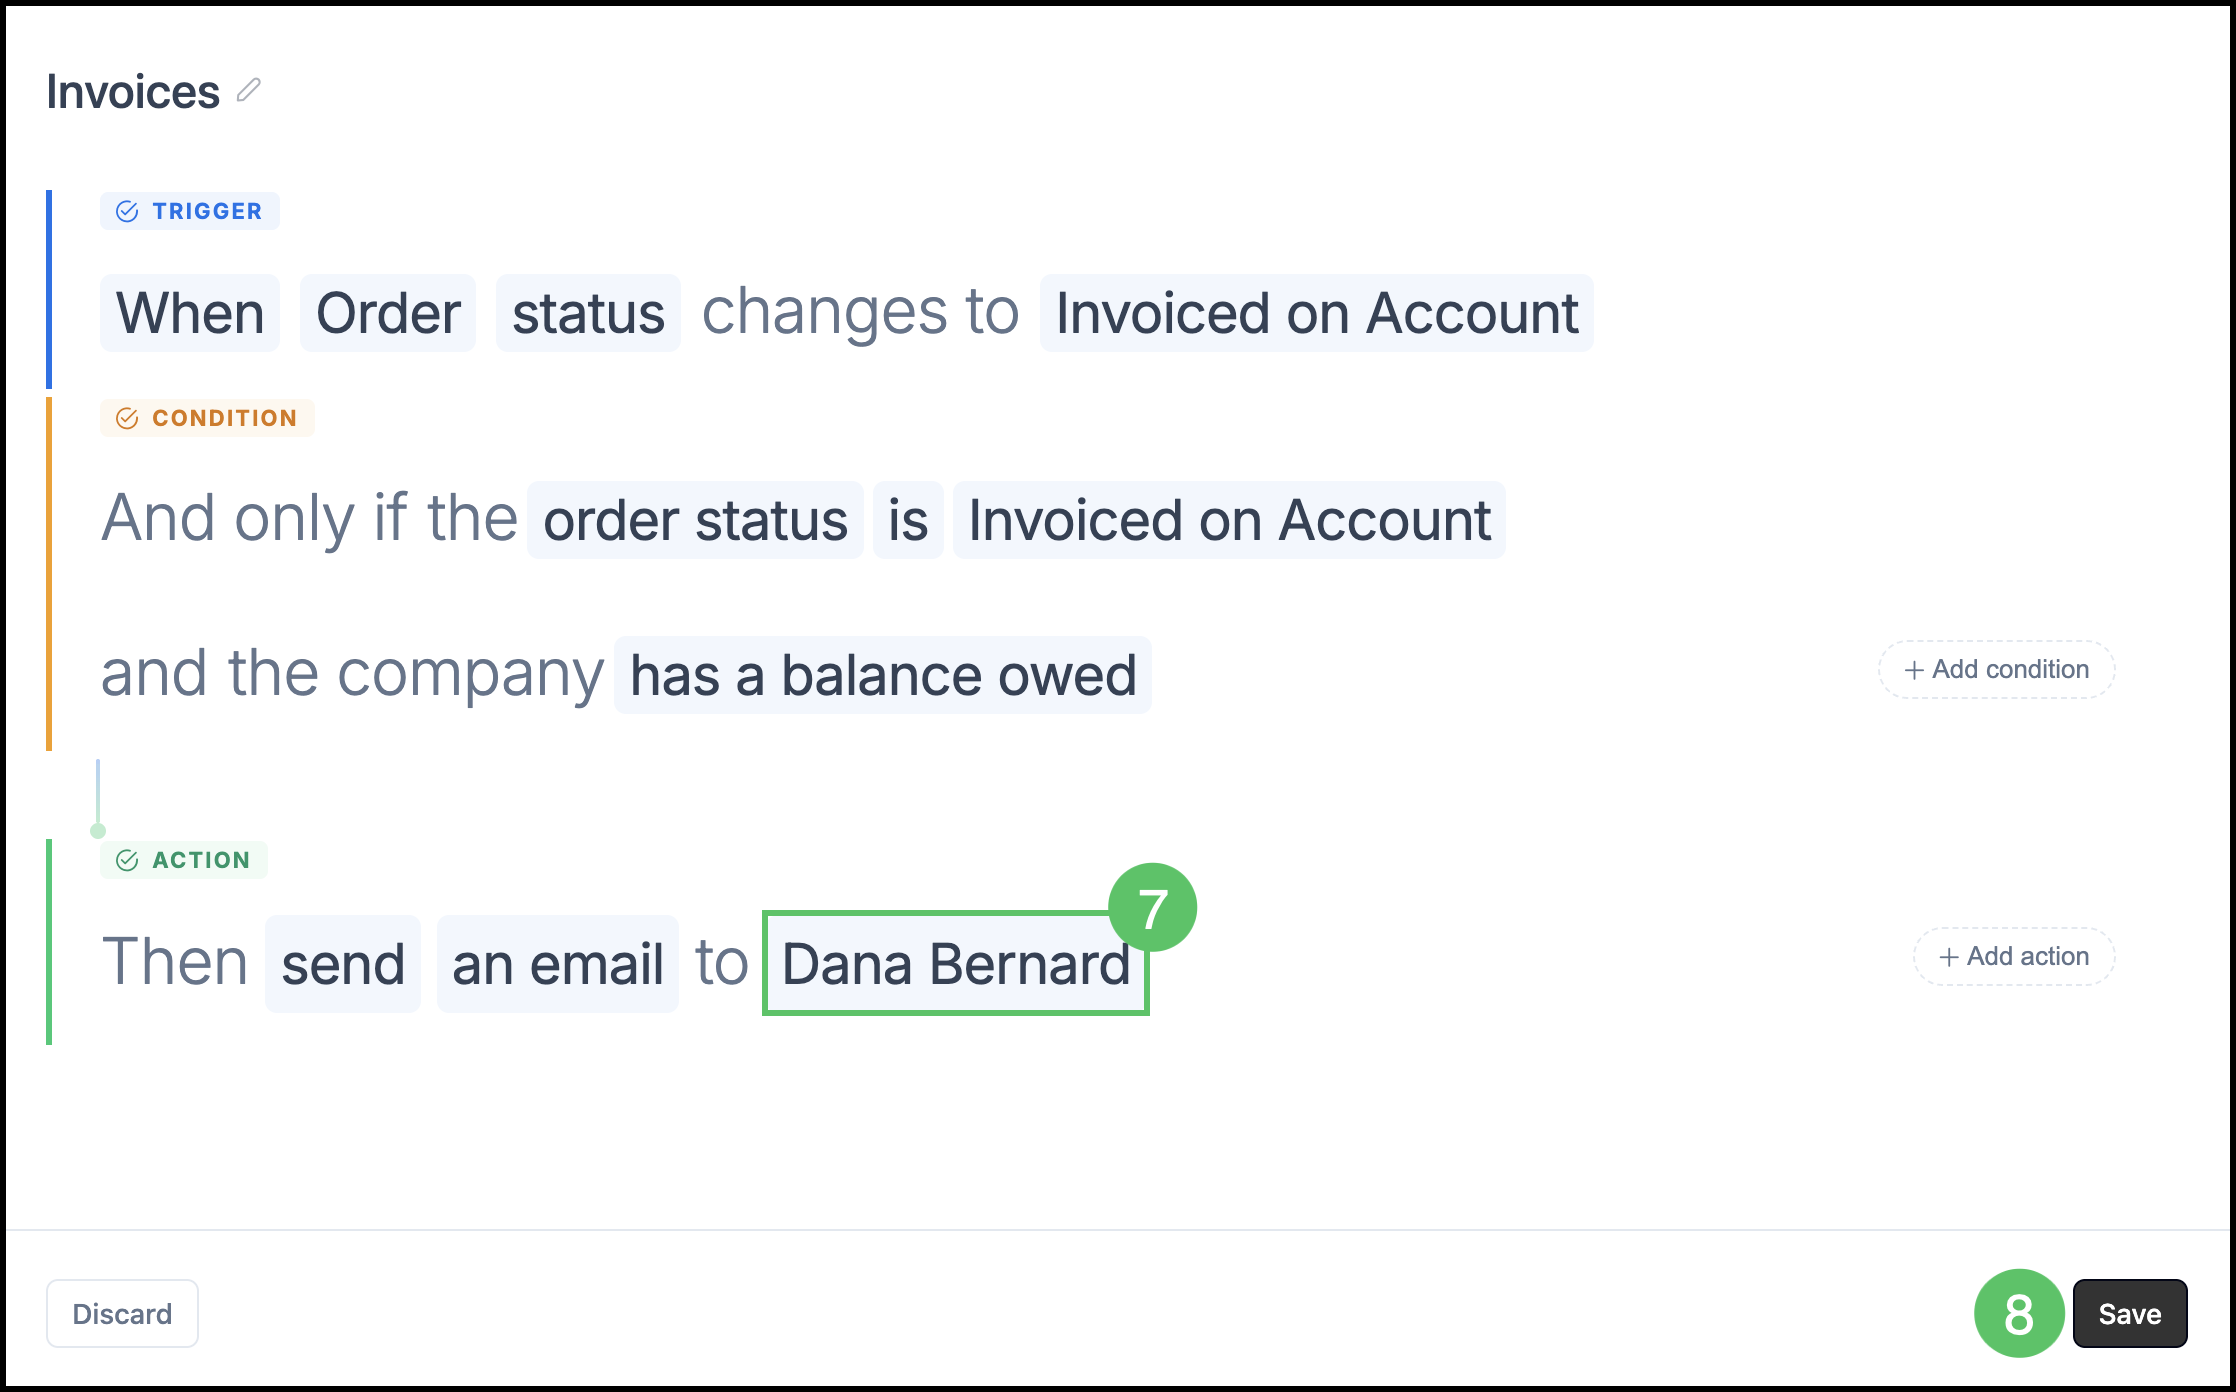
7. Select the recipient.
8. Click Save.
Example: Proof Approved
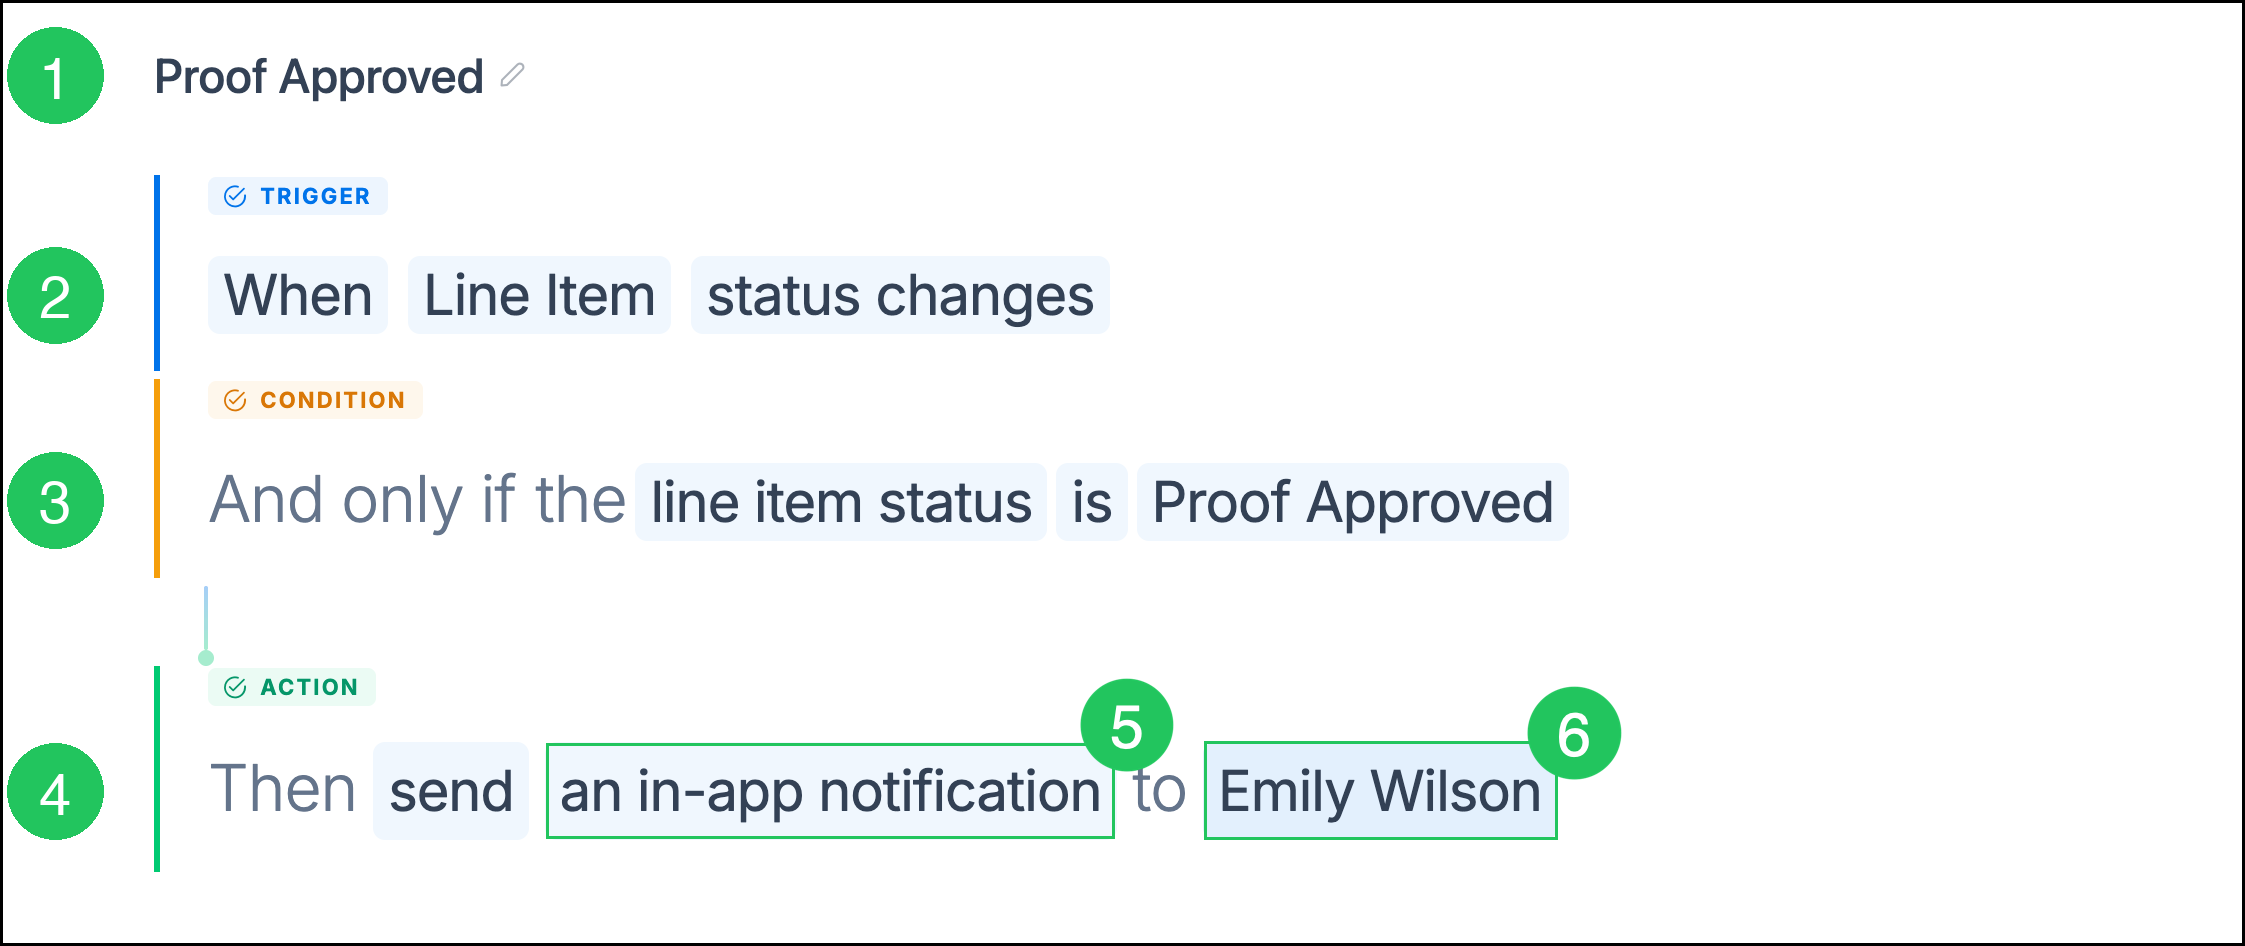
Use this Automation to notify your design team when a Line Item status changes to Proof Approved.
After you select Create from scratch:
1. Enter a name, such as Proof Approved.
2. Set the Trigger to When line item status changes.
3. Add a condition so the Automation runs only if the line item status is Proof Approved.
4. Set the Action to send an in-app notification.
5. Click an in-app notification.
Note: See example below.
6. Select the recipient (People or Roles).
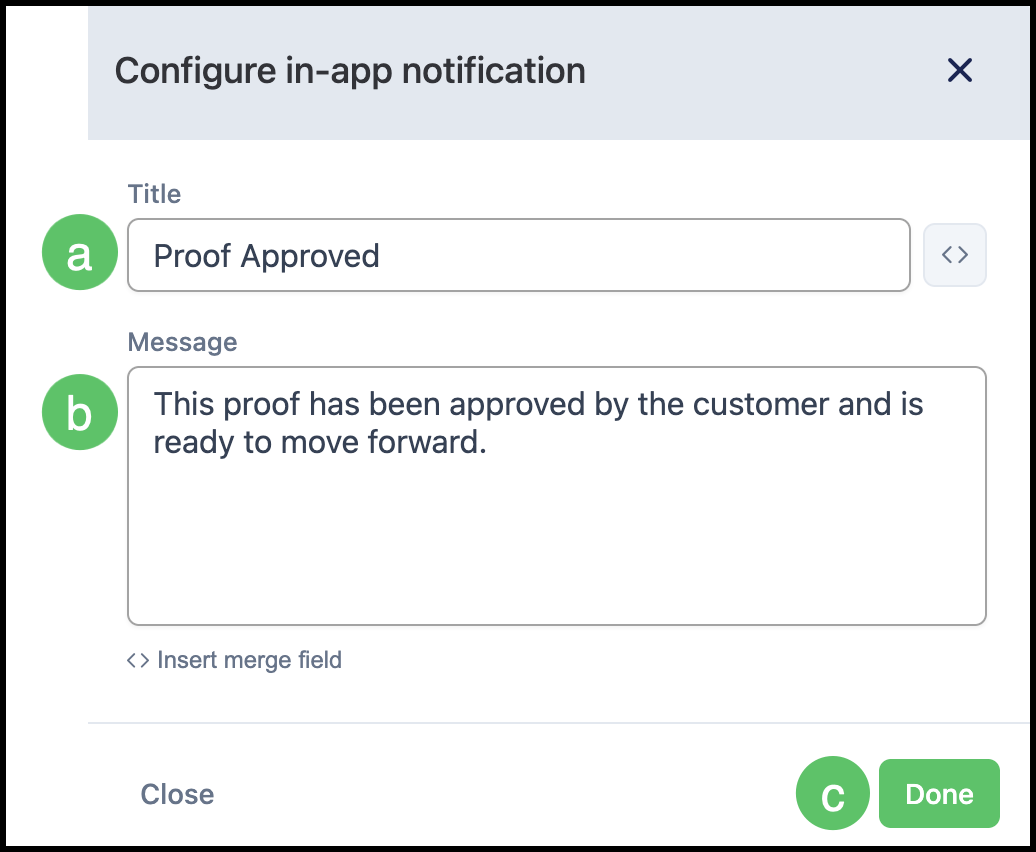
Example:
a. Title - Specifies the title displayed at the top of the notification.
b. Message - Specifies the message displayed in the notification.
c. Done - Saves the notification configuration and closes the dialog.
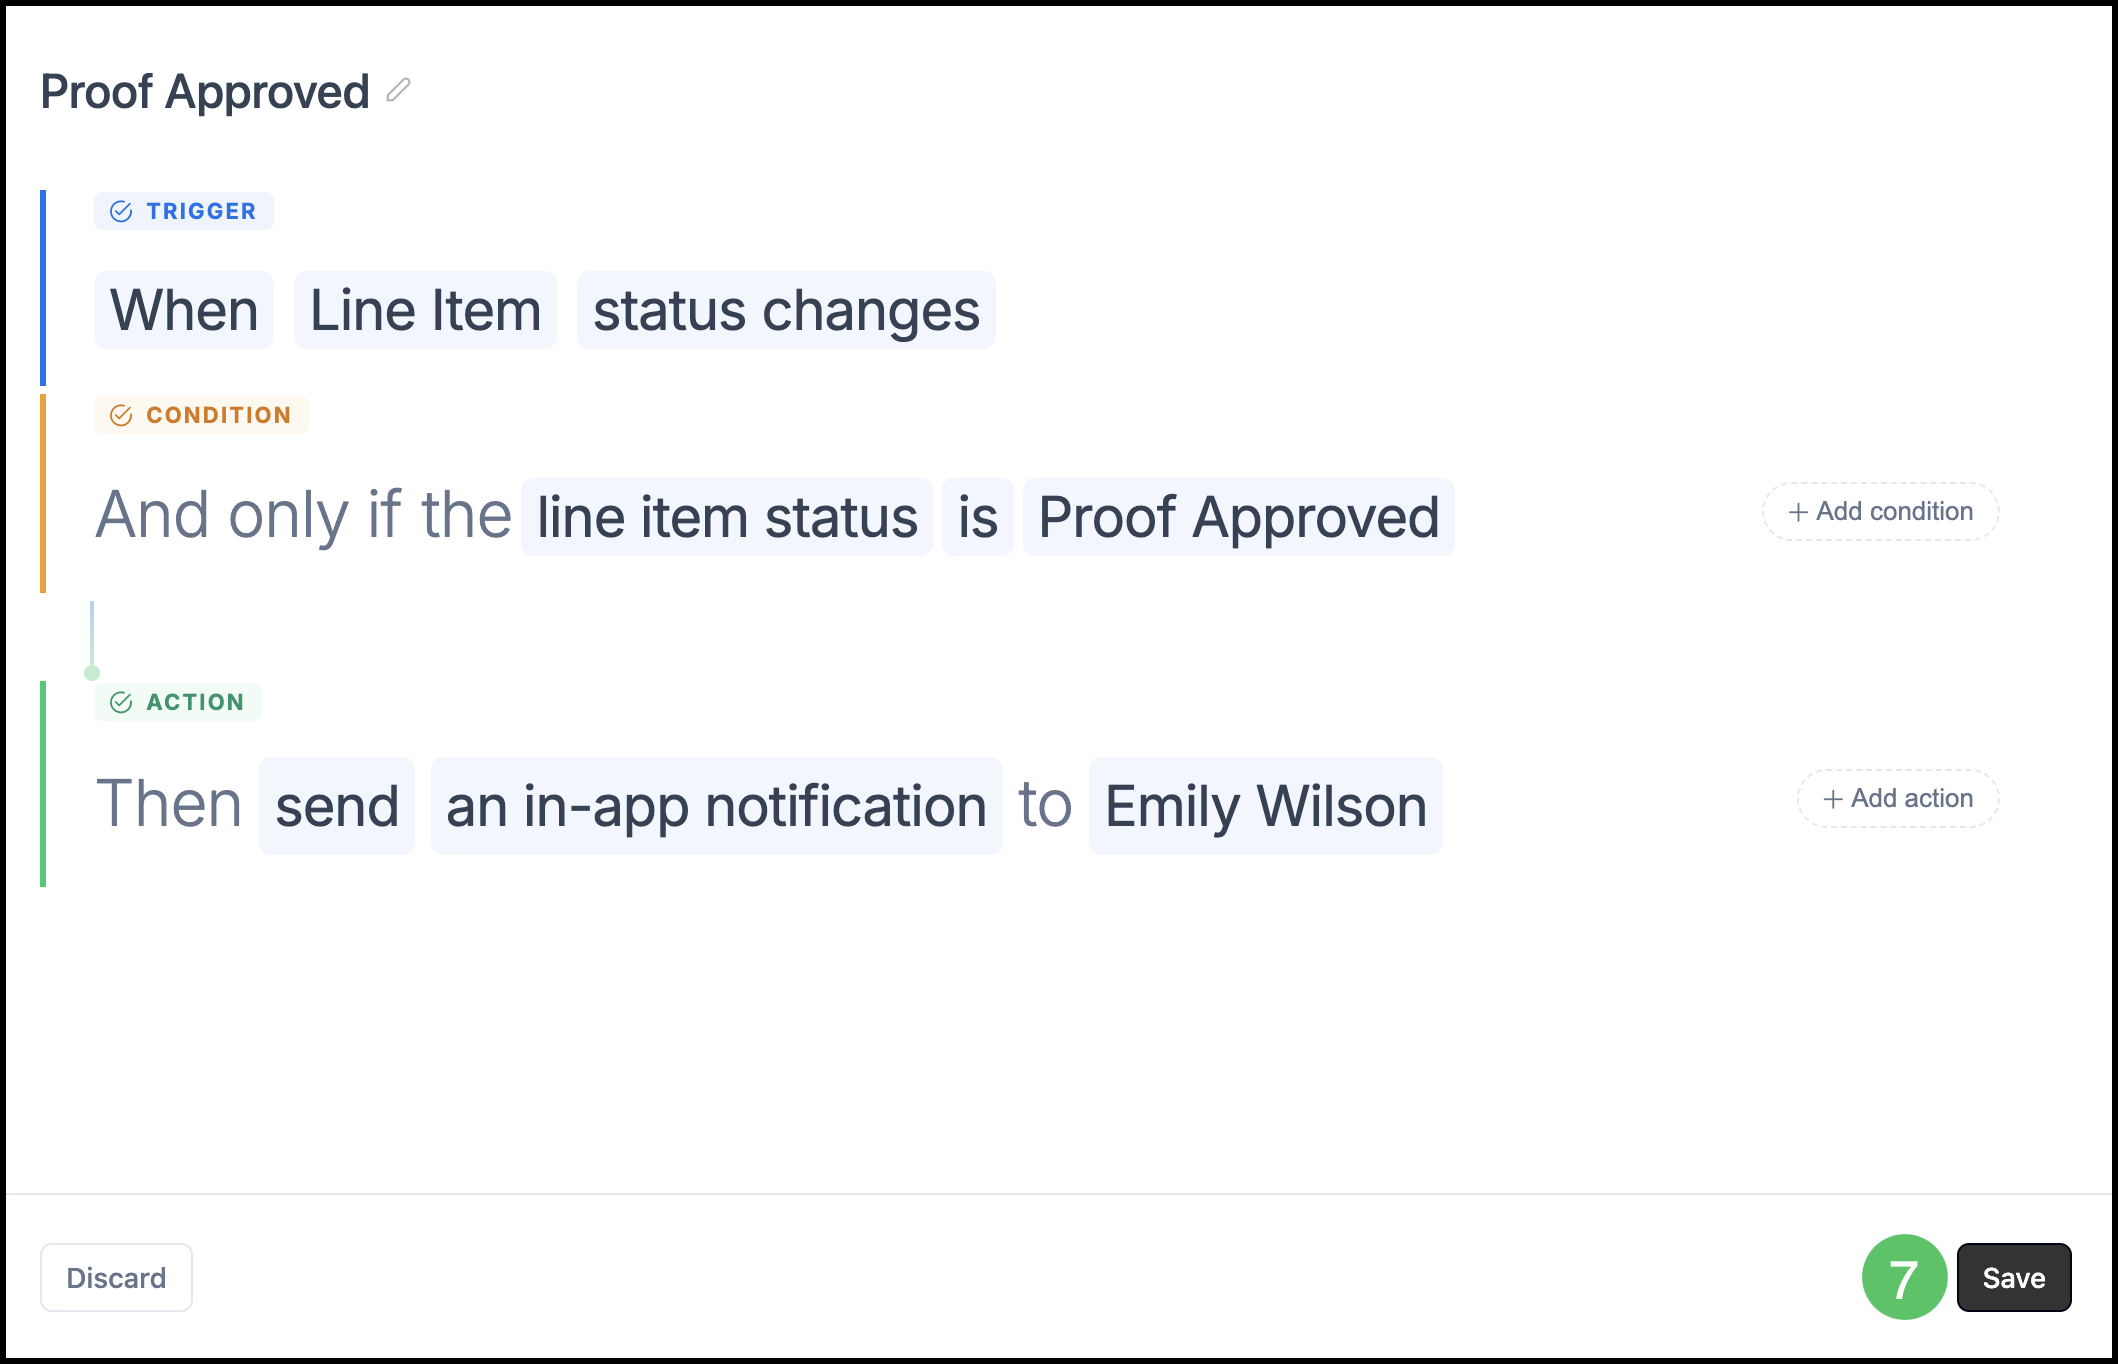
7. Click Save.
Example: New Order Created
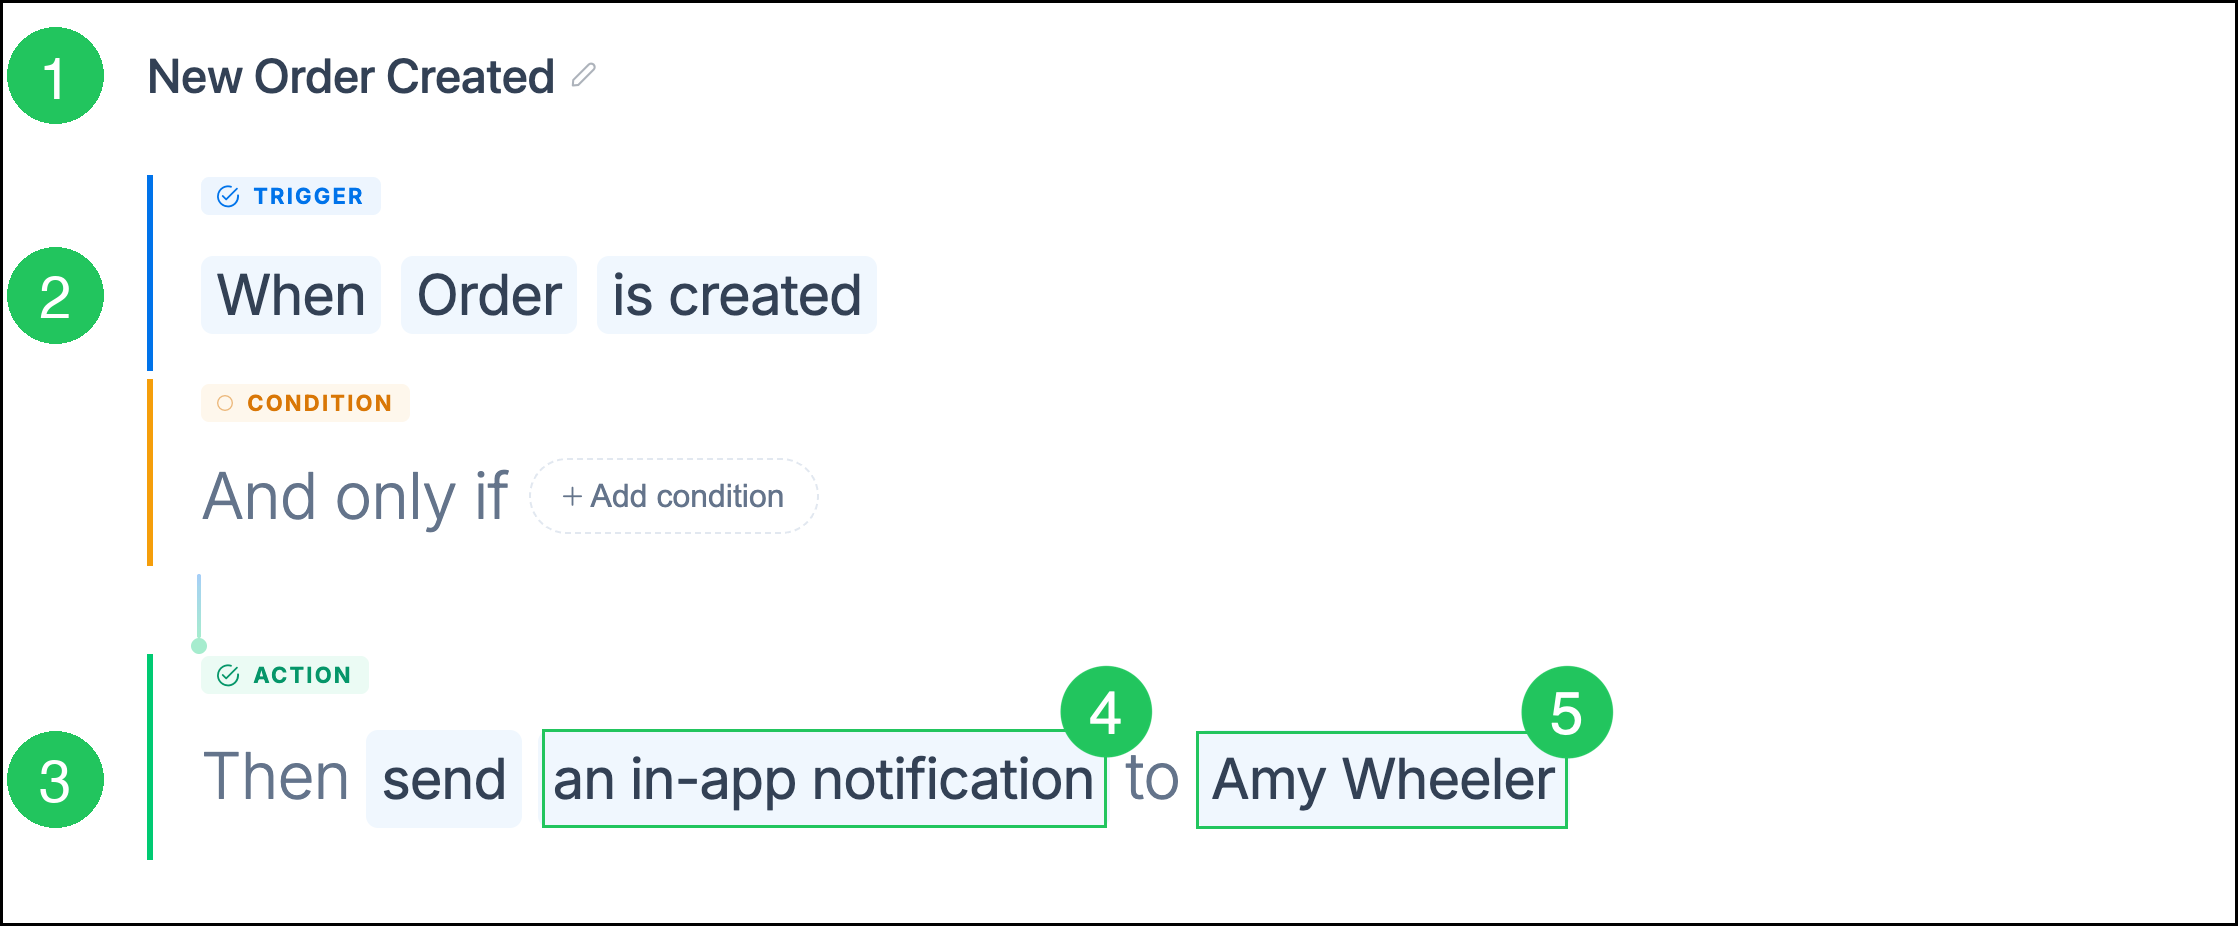
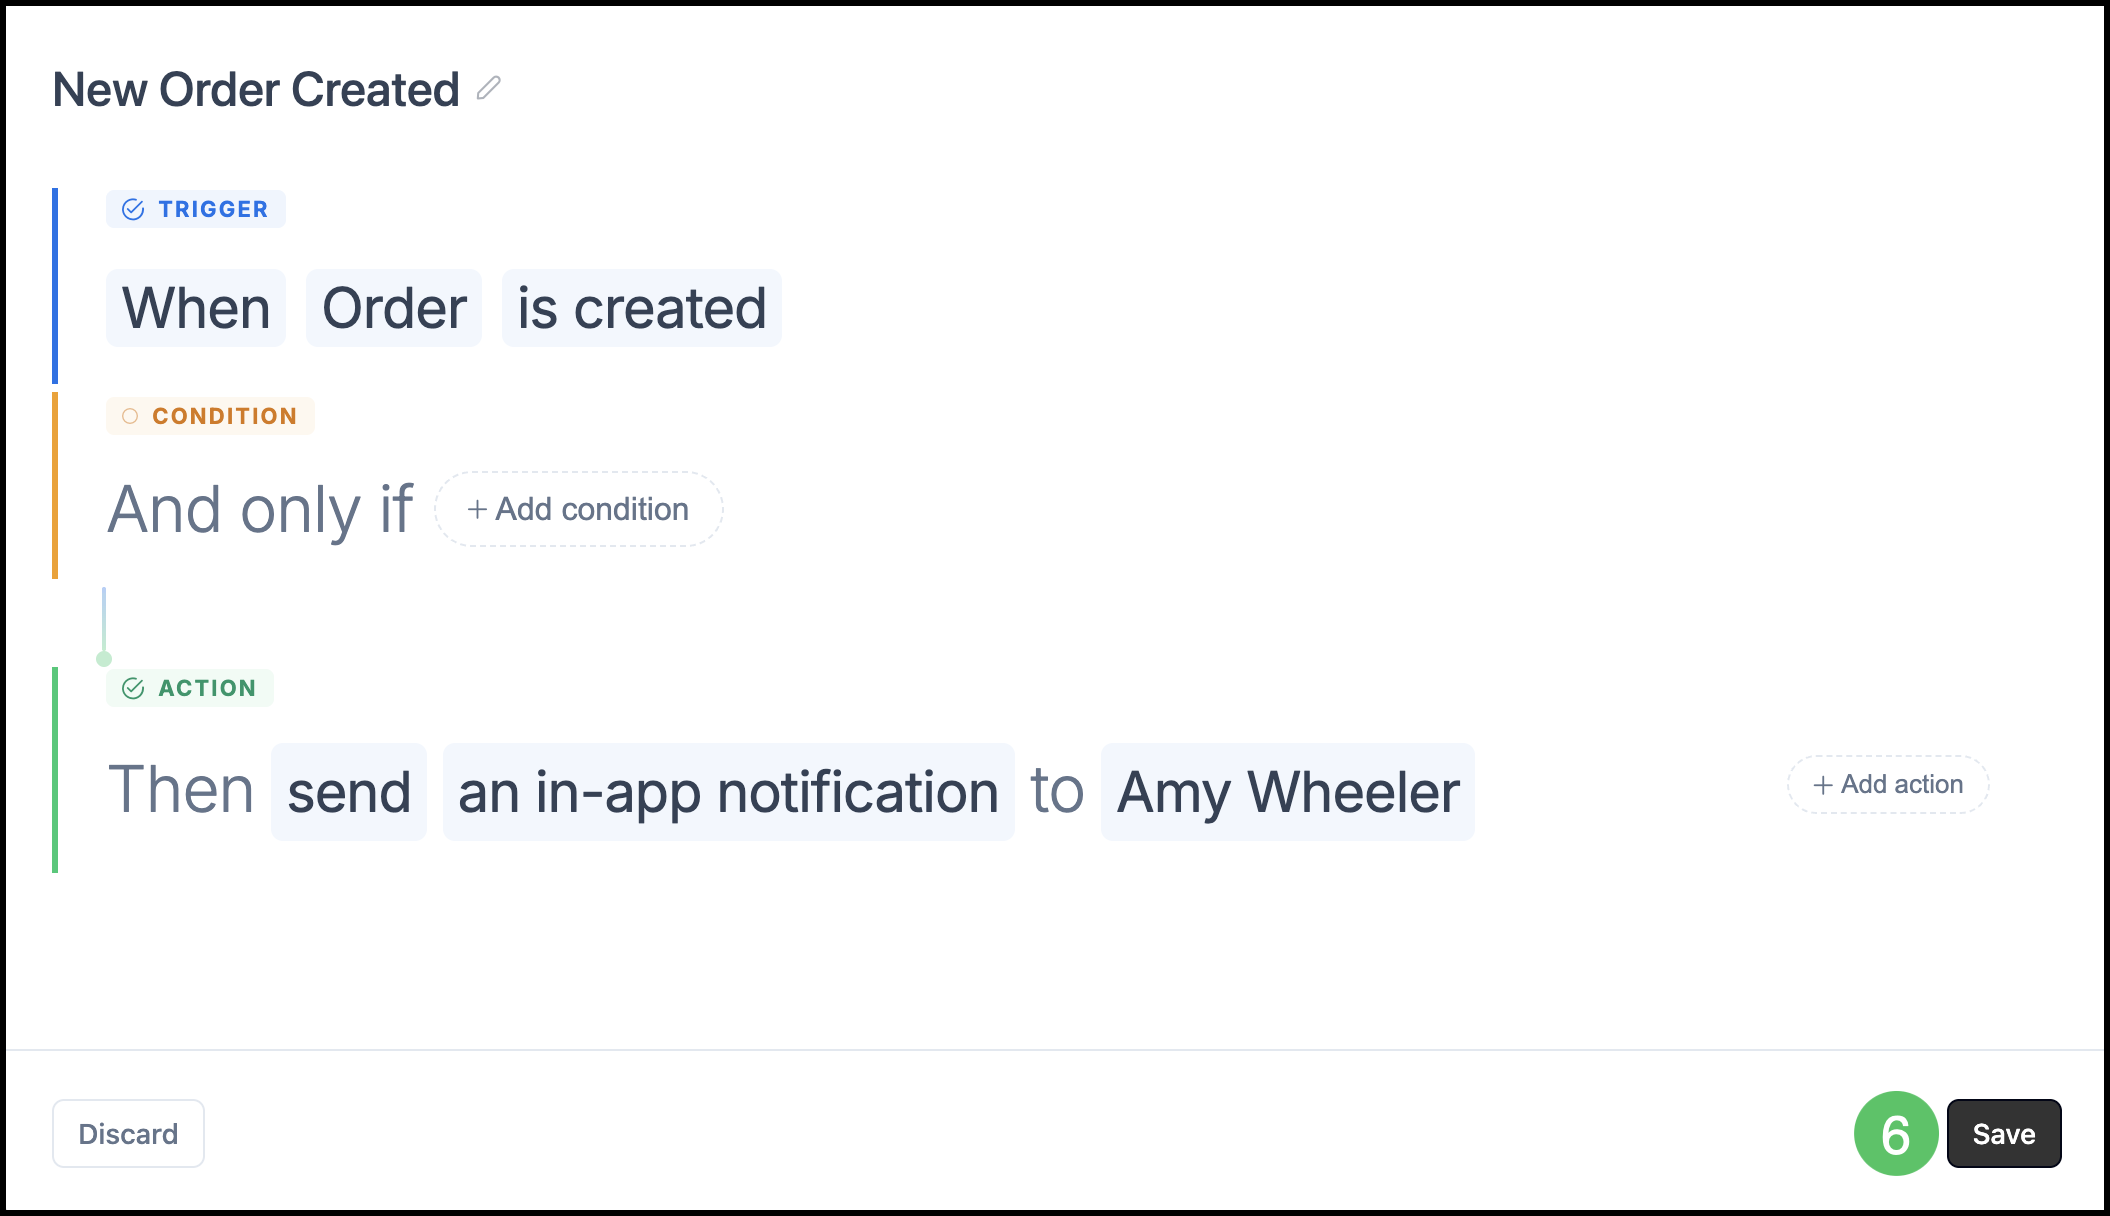
Use this simple Automation to alert a manager whenever a new Order is created. No condition is required.
After you select Create from scratch:
1. Enter a name, such as New Order Created.
2. Set the Trigger to When order is created.
3. Set the Action to send an in-app notification.
4. Click an in-app notification.
Note: See example below.
5. Select the recipient (People or Roles).
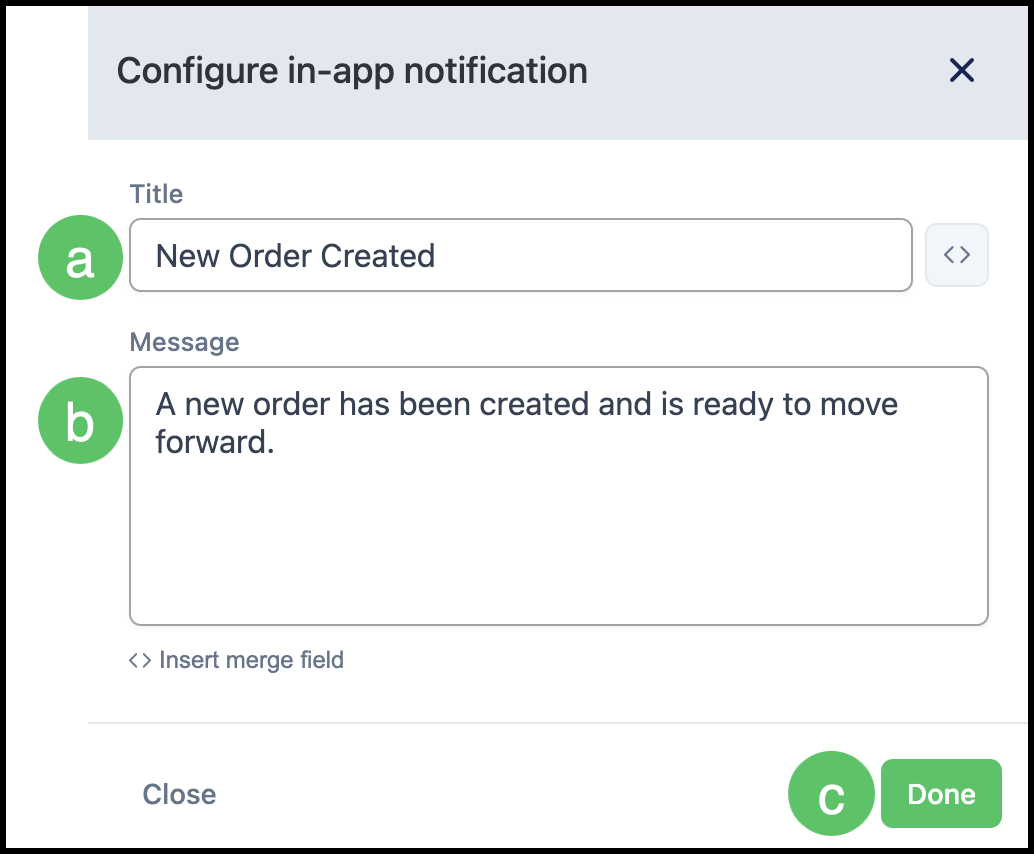
Example:
a. Title - Specifies the title displayed at the top of the notification.
b. Message - Specifies the message displayed in the notification.
c. Done - Saves the notification configuration and closes the dialog.
6. Click Save.
Frequently Asked Questions
1. What is the difference between a Trigger and a Condition?
Answer: The Trigger starts the Automation. Conditions are optional filters that must also be true before the Action runs.
2. Can one Automation send both an email and an in-app Notification?
Answer: Yes. Click Add action to include more than one Action on the same Automation.
3. Do I have to use a template?
Answer: No. Templates are optional. Select Create from scratch when you want full control over the Trigger, conditions, and Action.
4. Where do in-app Notifications appear?
Answer: Notifications appear in the header Notifications window and on the Messages & Notifications screen. For more information, see Messages and Notifications.
Related Articles
Automations Overview
Creating and Managing Notifications
Messages and Notifications
Adding Email From Addresses
Employee Roles and Permissions in Settings