
The Opportunities Pipeline gives you a visual way to track potential sales from first contact through close. Opportunities appear as cards on a board. Each column is a Stage in your sales process. You can customize Stages, route an Opportunity to another pipeline, review Deal Health, chat about the deal, schedule events, and link Estimates and Orders. This article covers the pipeline list, the board, Stages, adding Opportunities, Opportunity details, and moving cards.
Table of Contents
- Opportunities Pipeline Overview
- Pipeline Board
- Configure Pipeline Stages
- Adding a Stage
- Adding Opportunities
- Editing an Opportunity
- Opportunity Side Panel
- Opportunity Details Page
- Estimates and Orders
- Activity Tab
- Chat
- Moving Opportunities Between Stages
- Frequently Asked Questions
- Related Articles
Opportunities Pipeline Overview
Navigate to CRM / Pipelines.
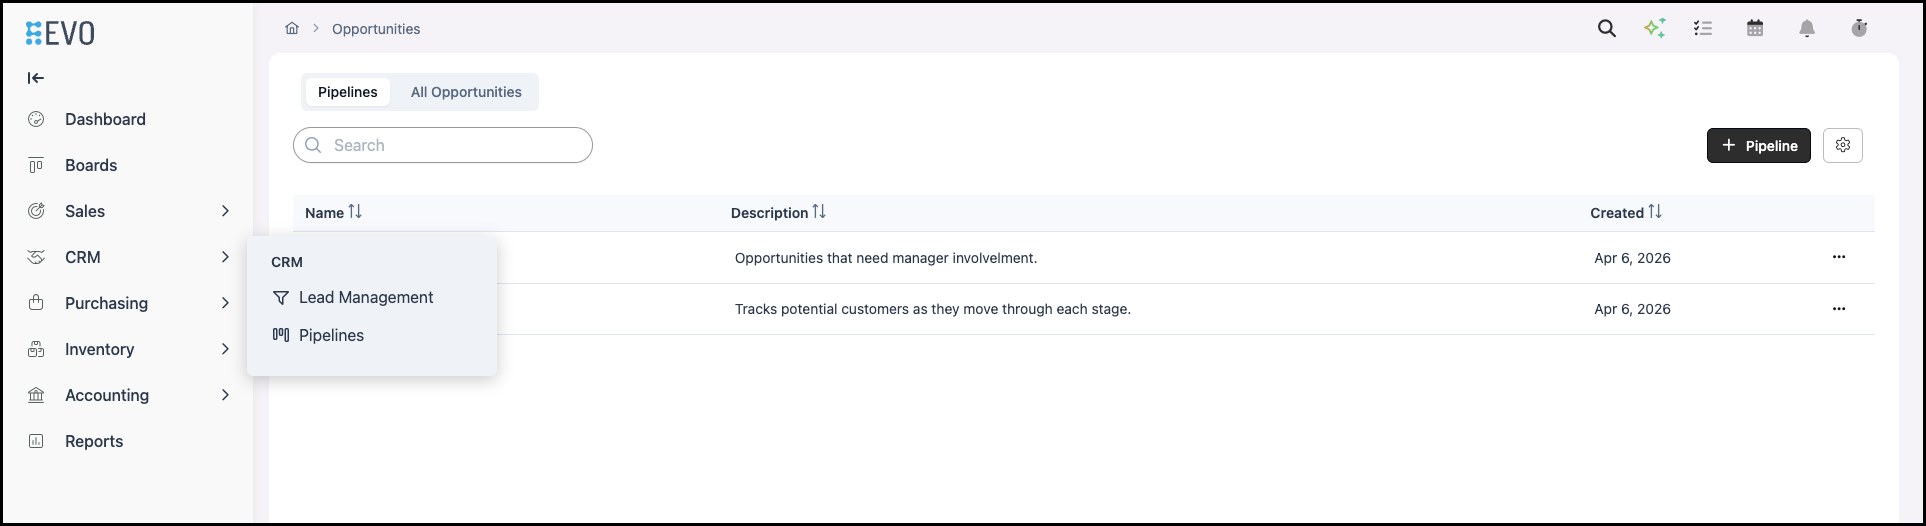
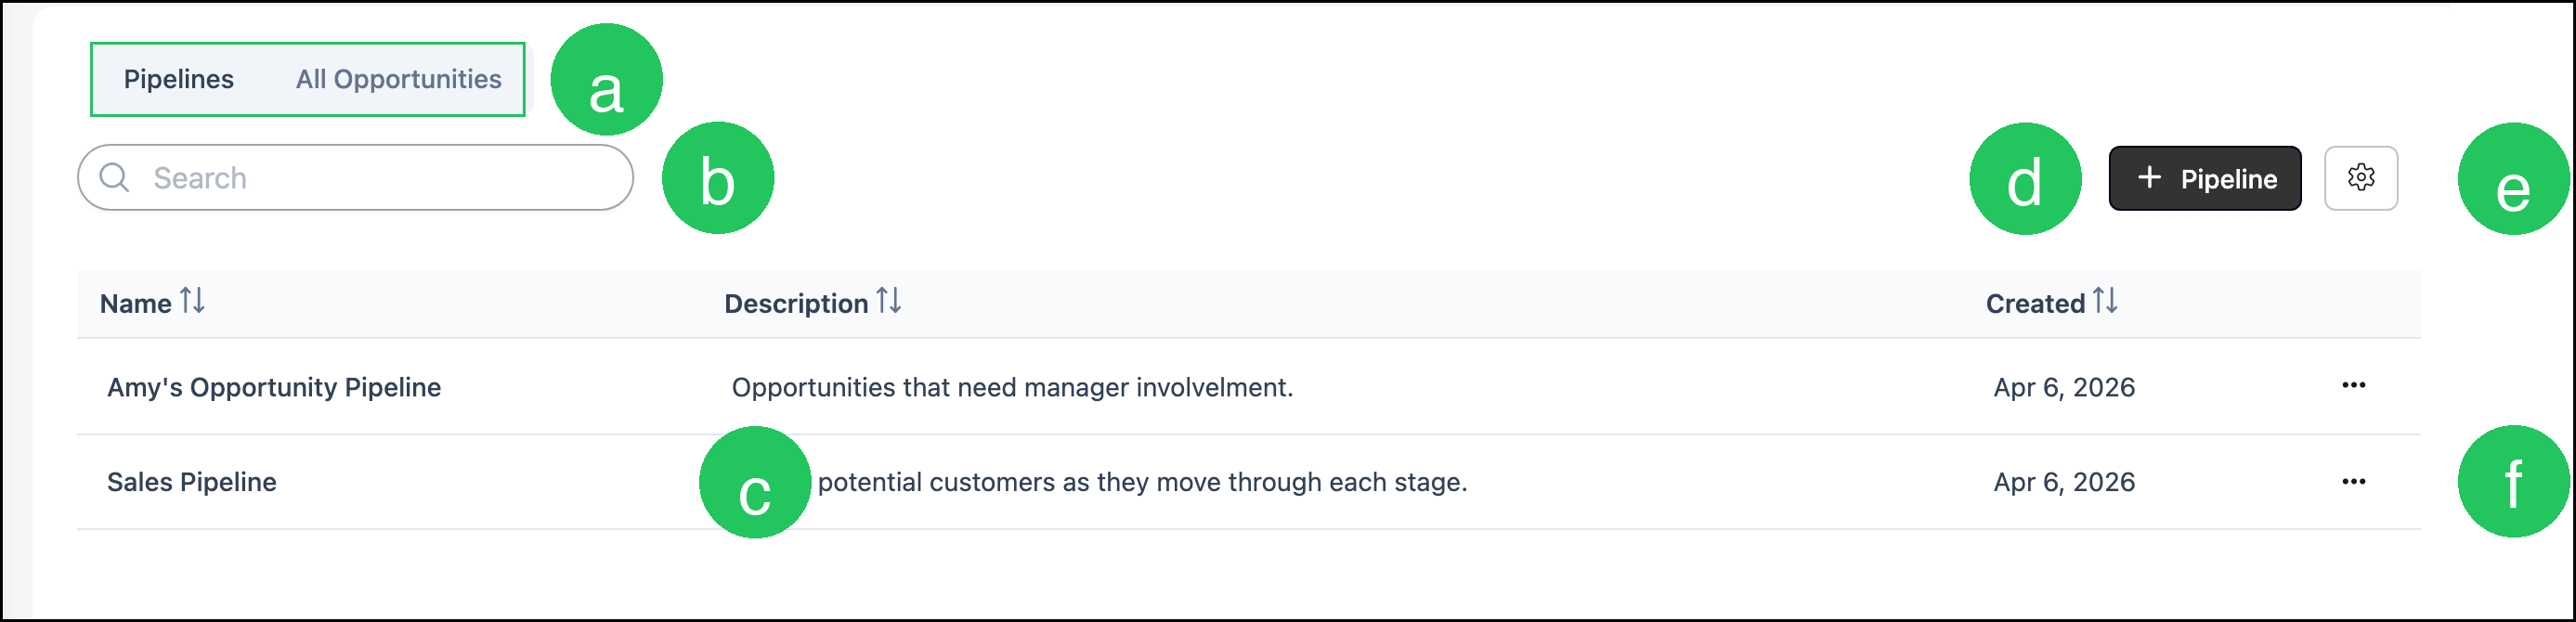
a. Switch between the Pipelines list and All Opportunities.
b. Use Search to find a Pipeline.
c. Each row is a Pipeline. Click a Pipeline name to open its board.
d. Pipeline opens a dialog to create a new Pipeline.
e. Search Settings controls which columns appear and whether inactive Pipelines are included.
f. More Actions on a Pipeline row includes options such as setting the Pipeline inactive.
Pipeline Board
Navigate to CRM / Pipelines.
1. Select a Pipeline.
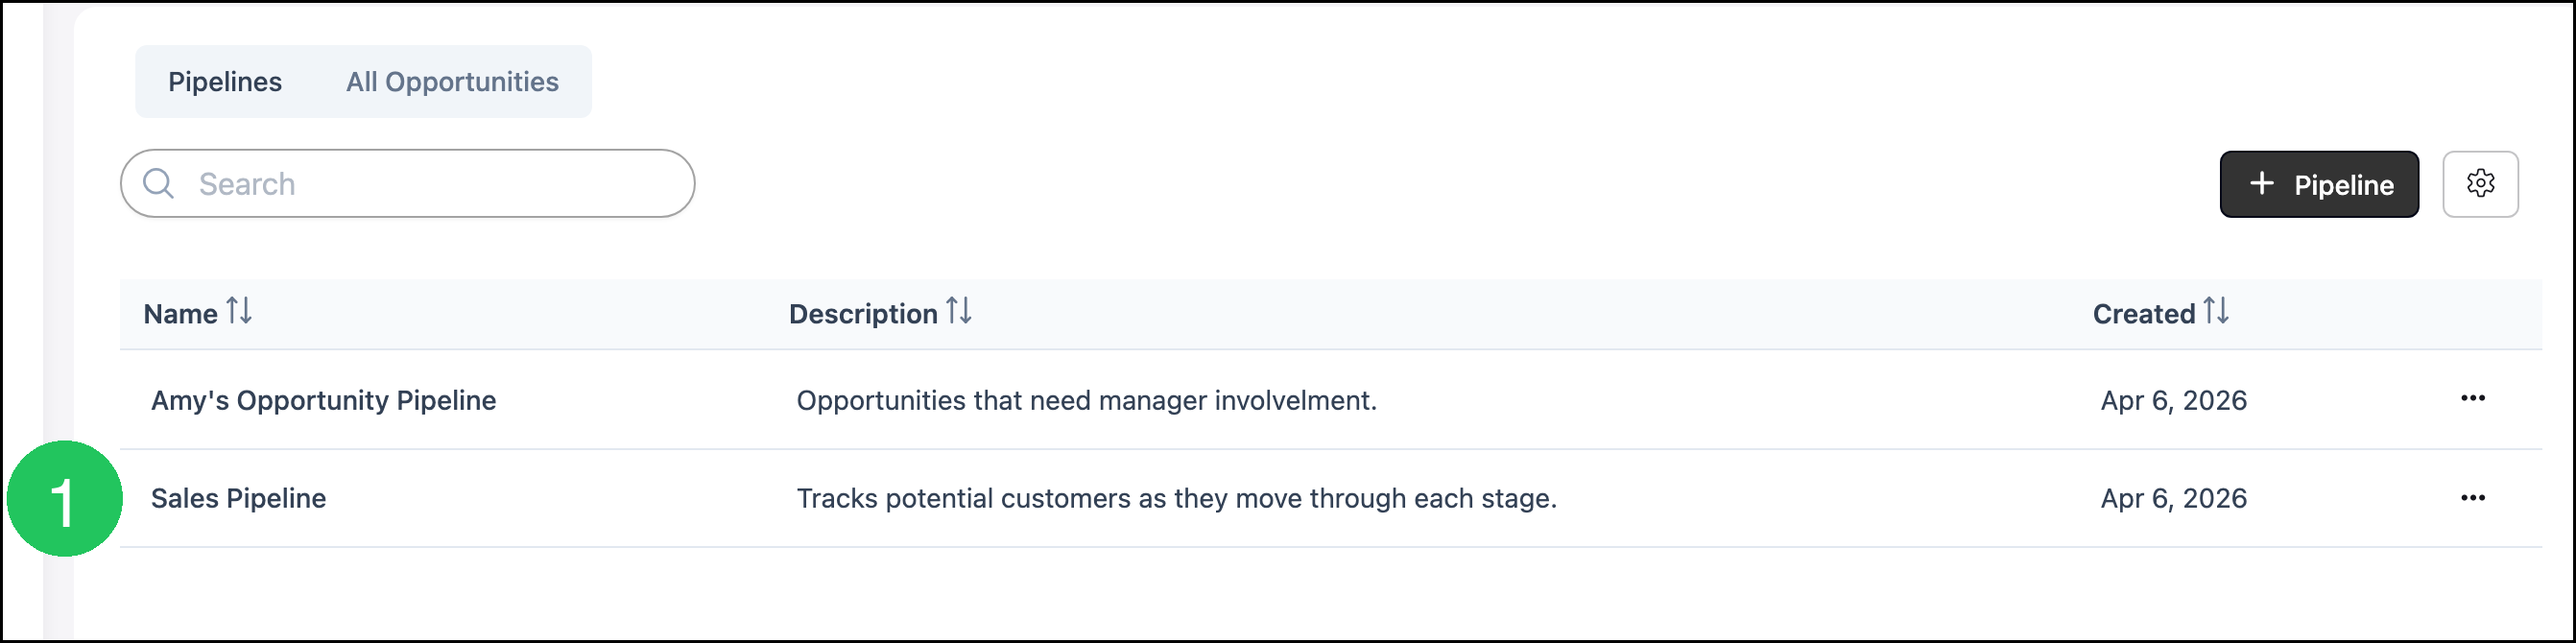
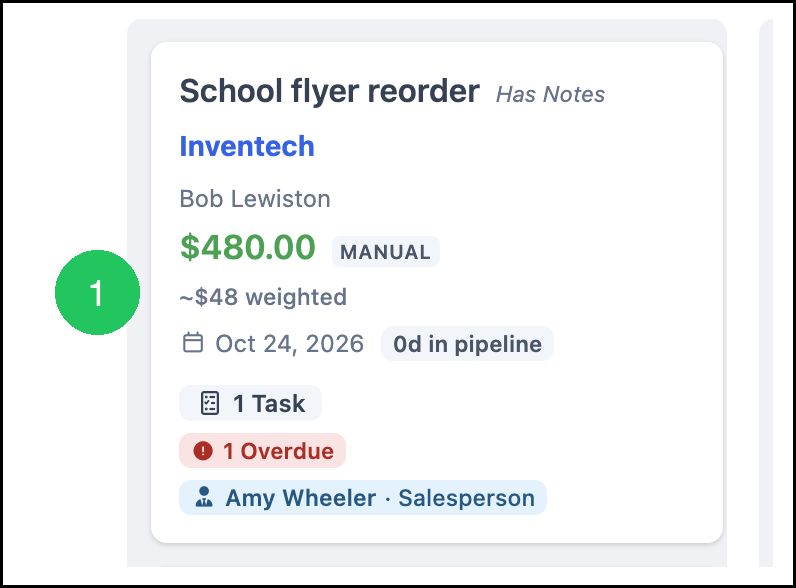
The board displays Opportunities as cards in columns. Each column is a Stage. Stage headers show totals, lead counts, and confidence. Cards show the Opportunity name, Company, contact, amount, a Manual label when the amount was entered by hand, the weighted amount, the expected close date, how long it has been in the pipeline, tasks, and the assignee with a role.
Note: You can also move a card by dragging it to another Stage. A Stage can automatically move the Opportunity to another pipeline when you configure Move to pipeline.
a. Filter controls which Opportunities appear on the board.
b. Sort controls the order of cards in each Stage.
c. Stages opens Configure Pipeline, where you add, edit, reorder, or delete Stages.
d. Search finds Opportunities on this board.
e. More Actions for the Pipeline.
Note: More Actions includes options such as Edit Pipeline, Manage Access, Favorite, and Clone.
f. Card view and list view switch how the board is displayed.
g. Opportunity opens the dialog to add an Opportunity.
h. Each card shows the Opportunity name, Company, contact, amount, the expected close date, how long it has been in the pipeline, tasks, and the assignee with a role.
Configure Pipeline Stages
Use Stages to match the board to your workflow. You can add Stages, edit them, delete them, and reorder them.
1. Click Stages.
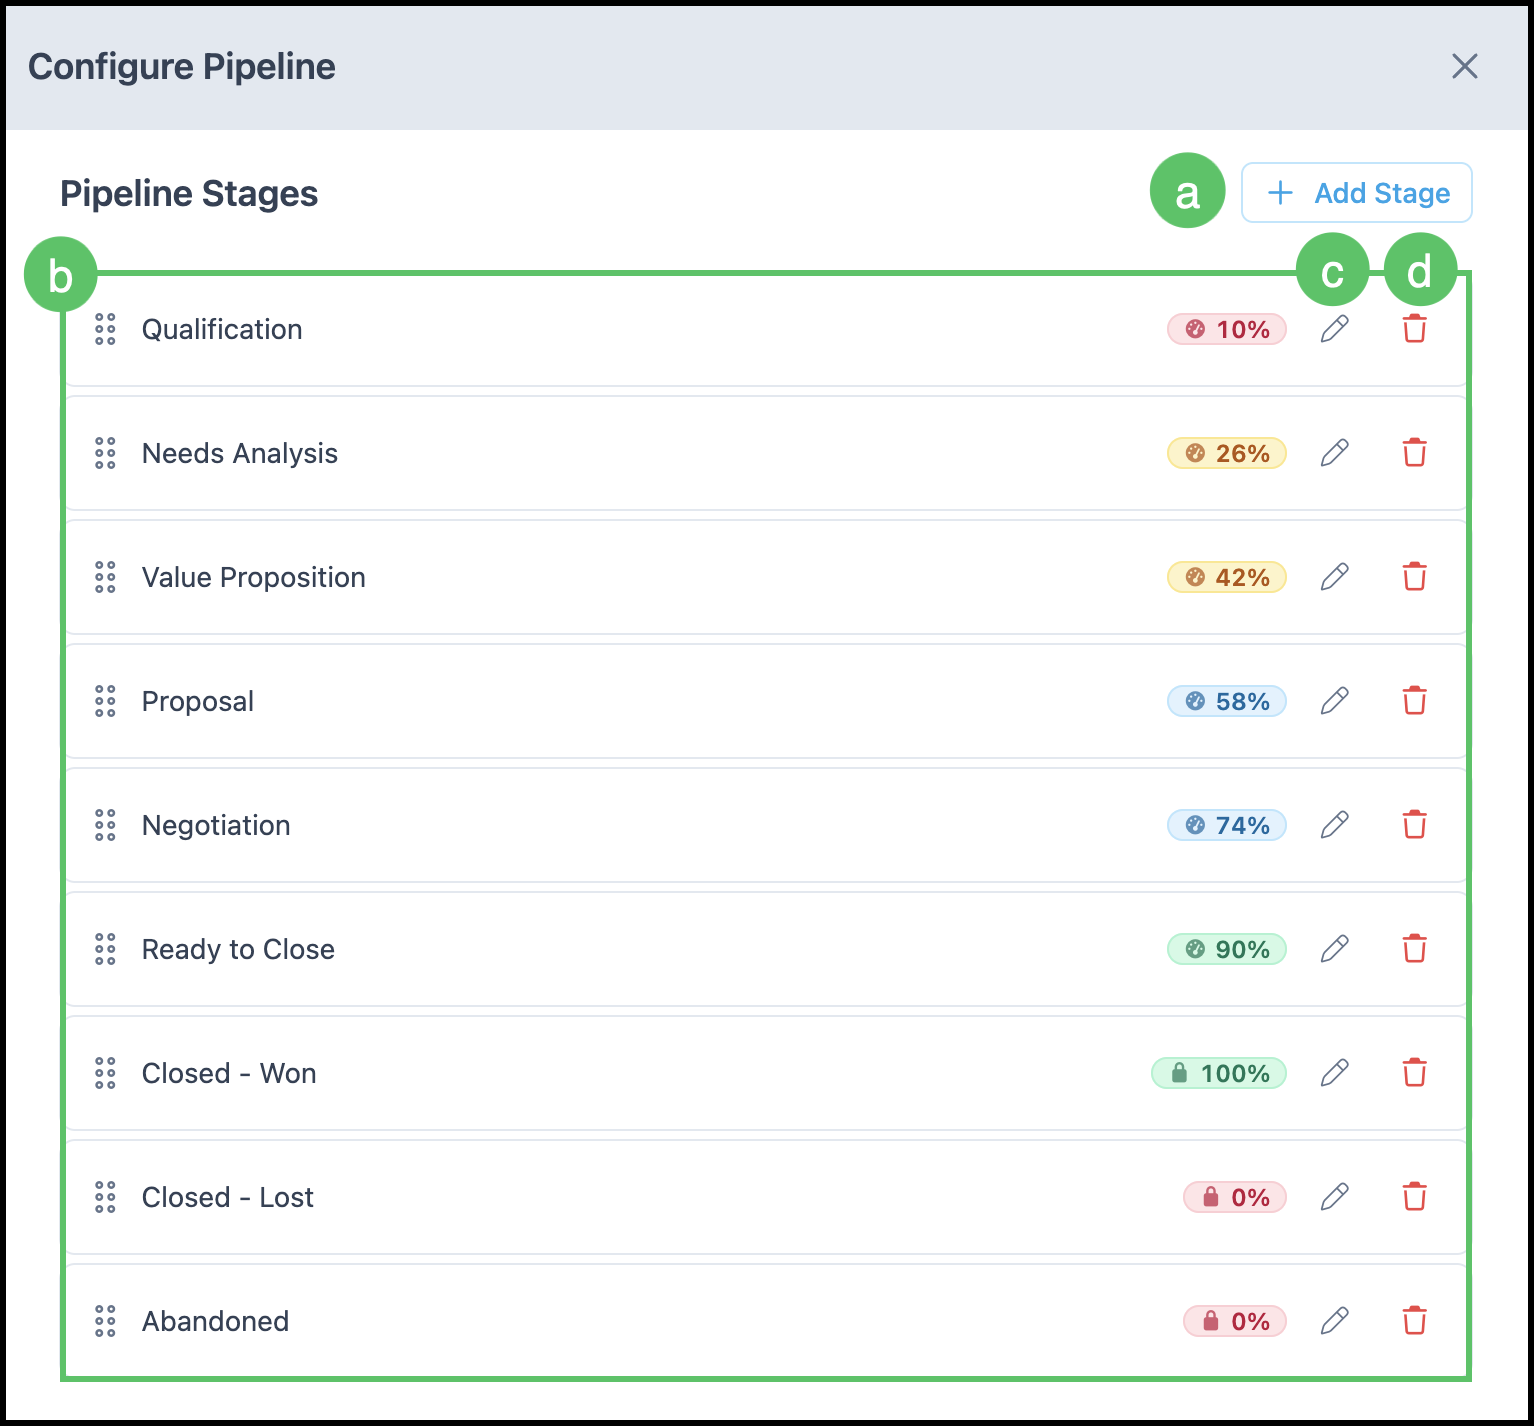
a. Add Stage opens the dialog to create a Stage.
b. The list of Stages. Drag a row to reorder it. Locked Stages show a lock on the confidence value (for example Closed - Won, Closed - Lost, and Abandoned).
c. Edit updates the Stage.
d. Delete removes the Stage.
Adding a Stage
Navigate to CRM / Pipelines and open the Pipeline.
1. Click Stages.
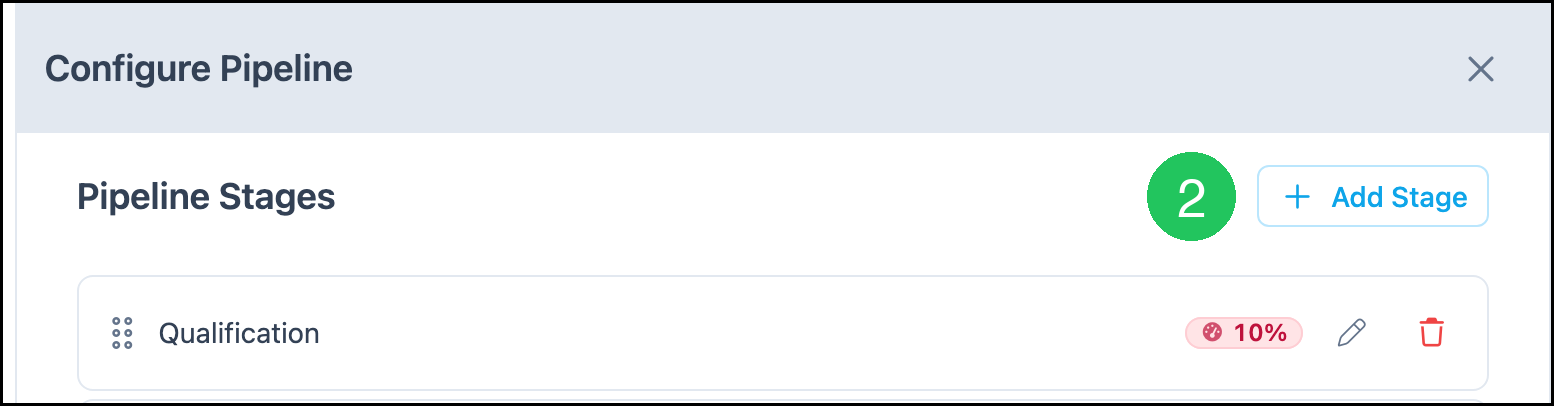
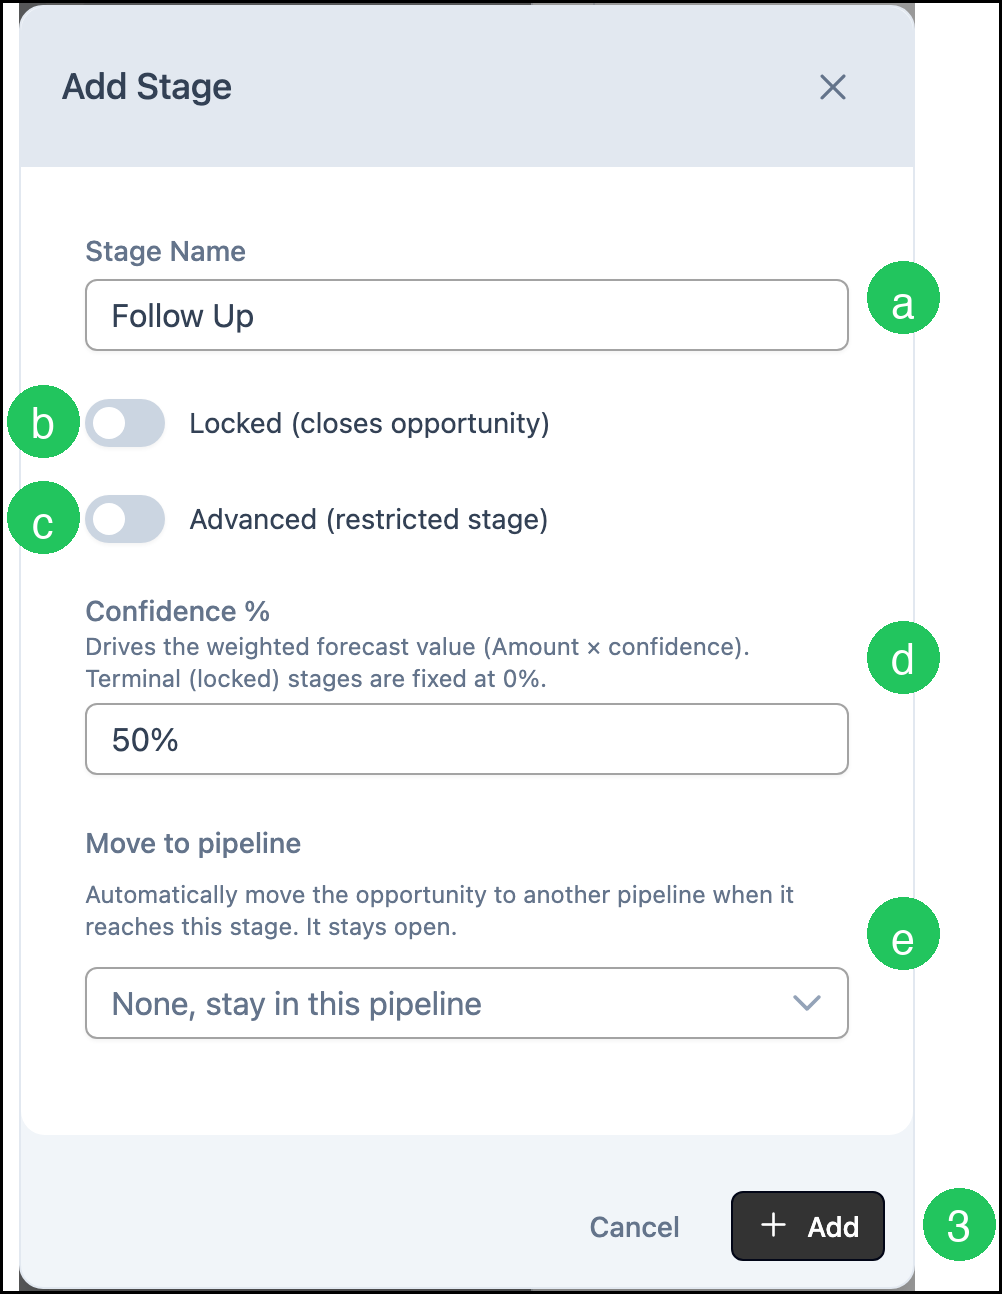
2. Click Add Stage.
a. Stage Name is the label that appears as a column on the board.
b. Locked (closes opportunity) closes the Opportunity when it reaches this Stage. Locked Stages use a fixed confidence of 0% or 100%.
c. Advanced (restricted stage) marks the Stage as restricted.
d. Confidence % drives the weighted forecast value for that Stage.
e. Move to pipeline automatically moves the Opportunity to another pipeline when it reaches this Stage. The Opportunity stays open unless the Stage is also locked. On a locked Stage such as Closed - Won, the Opportunity closes first, then moves.
3. Click Add.
Note: Click Cancel if you are not ready to save the Stage.
Adding Opportunities
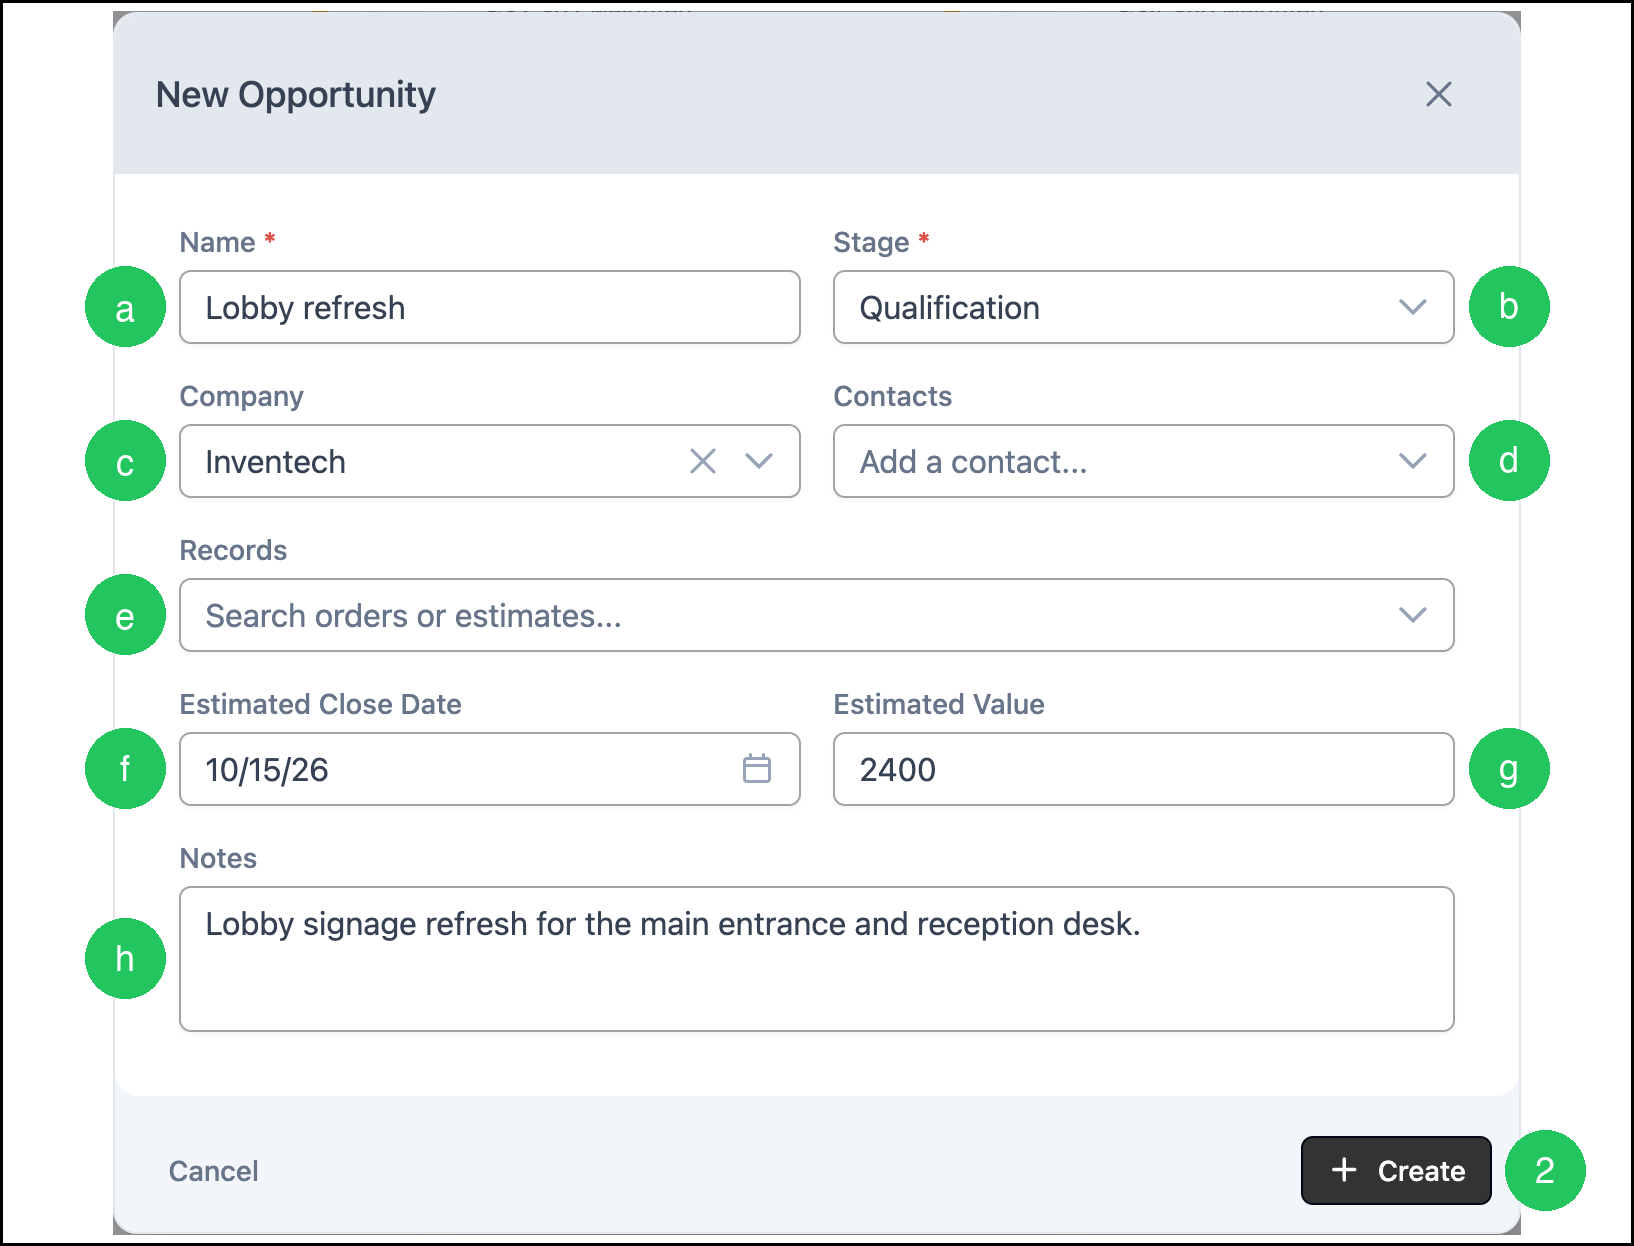
From a Pipeline board, add an Opportunity. Name and Stage are required. Add Company, Contacts, Records, Estimated Close Date, Estimated Value, and Notes as needed.
Navigate to CRM / Pipelines and open the Pipeline.
1. Click Opportunity.

a. Name is required.
b. Stage is required. This is the column the Opportunity starts in.
c. Company links the Opportunity to a Company.
d. Contacts links one or more contacts at that Company.
e. Records links existing Estimates or Orders.
f. Estimated Close Date is the date you expect the deal to close.
g. Estimated Value sets a manual amount. The card shows Manual when this amount is used.
h. Notes stores a summary of the deal.
2. Click Create.
Editing an Opportunity
Navigate to CRM / Pipelines and open the Pipeline.
1. Select the Opportunity card. This opens the side panel.
Opportunity Side Panel
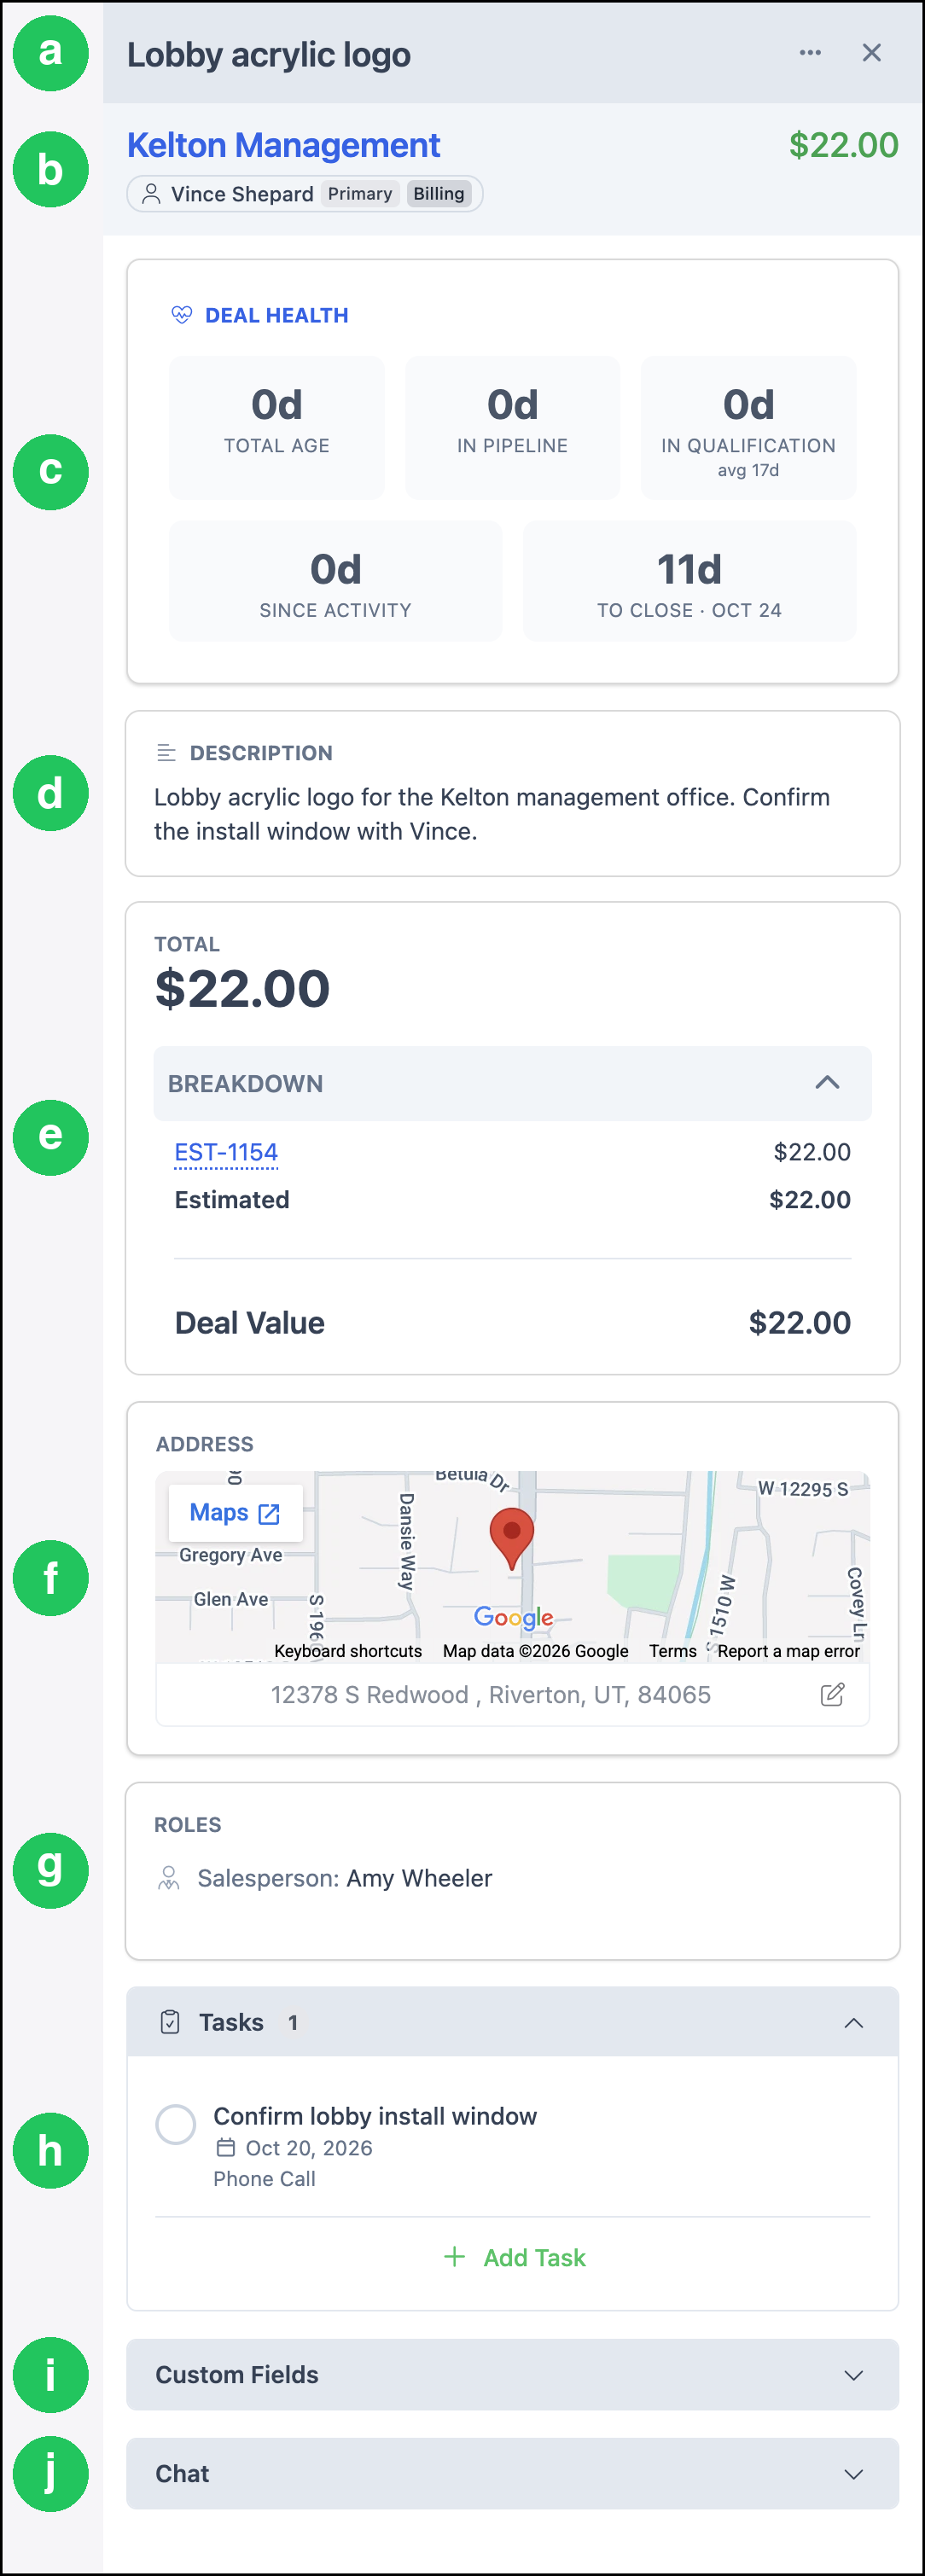
a. The Opportunity name opens the Opportunity Details screen. More Actions includes options such as Clone and Set Inactive.
b. Company and contact names open those records. The deal amount appears beside the Company.
c. Deal Health shows Total Age, In Pipeline, time in the current Stage, days since activity, and To Close or Overdue with the date.
d. Description summarizes the Opportunity. Edit it on the Opportunity Details screen.
e. Total shows the deal amount and the weighted value. Breakdown lists linked Estimates and Orders, the estimated amount, the weighted value, and Deal Value.
f. Address shows the location for the Company, with a map.
g. Roles associated with this Opportunity can be entered here.
h. Tasks lists tasks for this Opportunity. Tasks can also be added here. For more information, see Tasks.
i. Any Custom Fields configured for Opportunities will be displayed here.
j. Chat is an internal conversation regarding this Opportunity. For more information, see Company Notes in Chat.
Opportunity Details Page
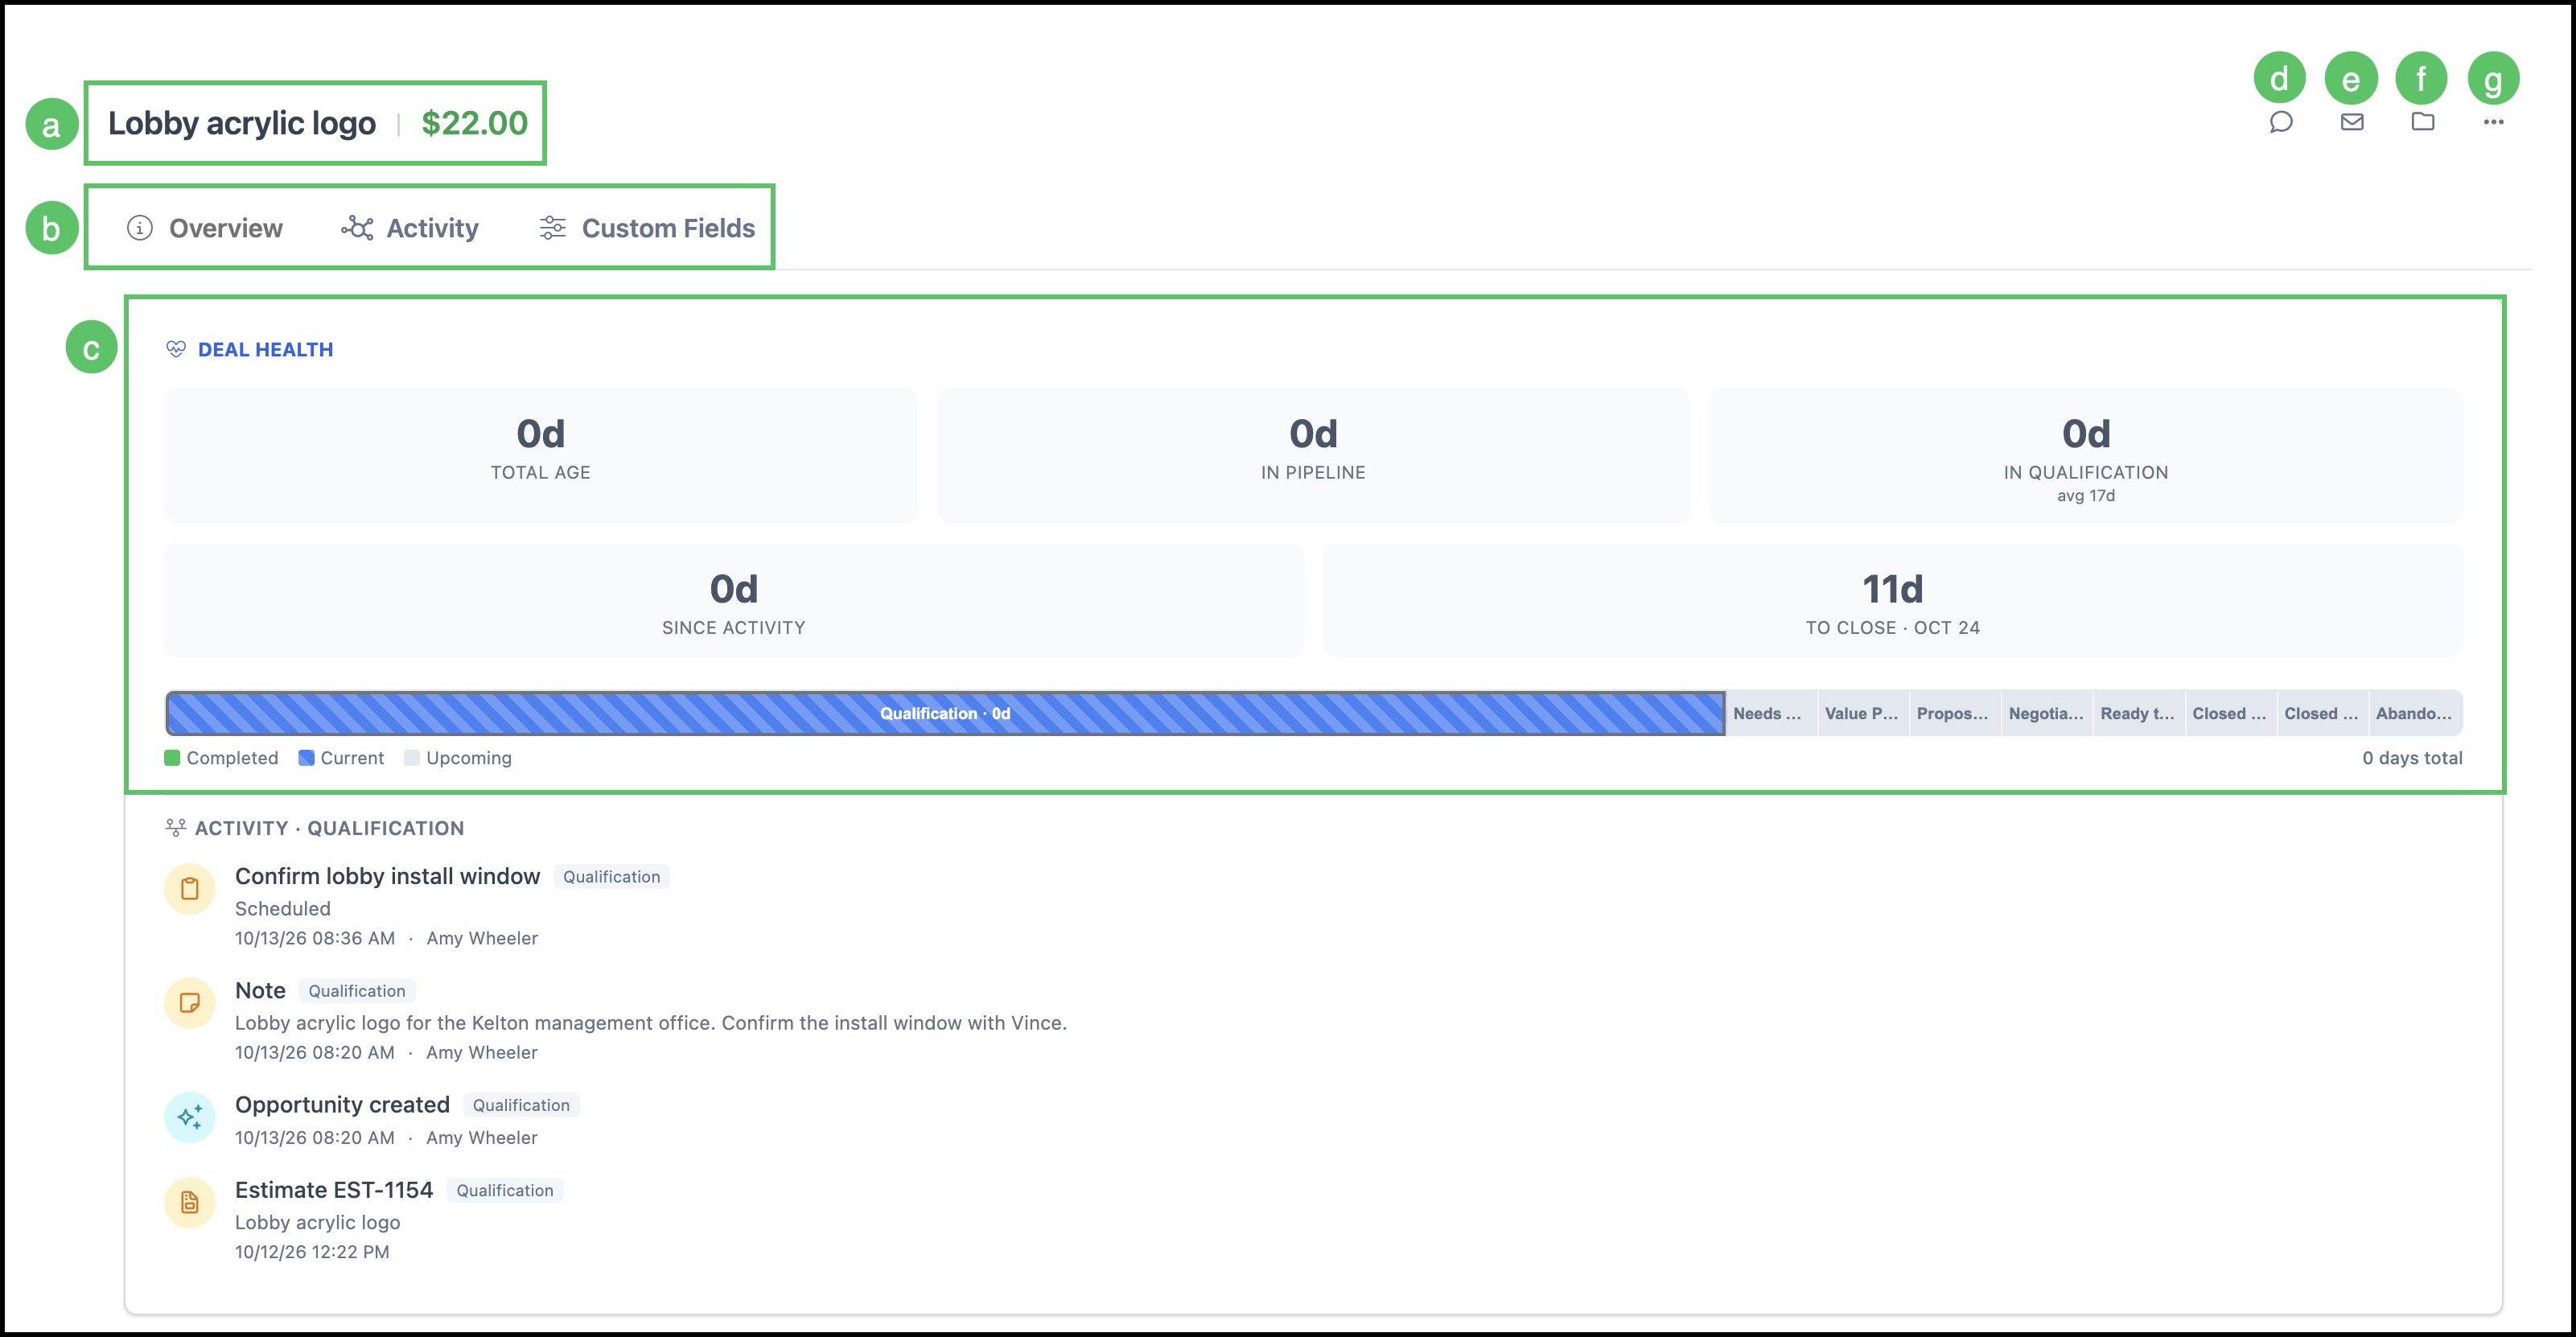
Use the Opportunity Details screen for a full view of the deal, including Deal Health, tasks, events, linked records, activity, custom fields, and chat. Open it from the Opportunity name in the side panel.
a. The Opportunity name and amount. Edit changes the name or amount.
b. Tabs: Overview, Activity, and Custom Fields. Custom Fields follow the Opportunity layout in System Settings / Components / Custom Fields. If no fields are configured, the tab states that.
c. Deal Health shows Total Age, In Pipeline, time in the current Stage, days since activity, and To Close or Overdue with the date. A Stage bar marks completed, current, and upcoming Stages. Activity below the bar is for the current Stage.
d. Chat opens the internal conversation for this Opportunity. For more information, see Company Notes in Chat.
e. Email opens an email dialog.
f. Files is where you upload files for the Opportunity.
g. More Actions for the Opportunity.
Note: More Actions includes Create Opportunity, Create Estimate, Create Order, Clone, History, and Set Inactive.
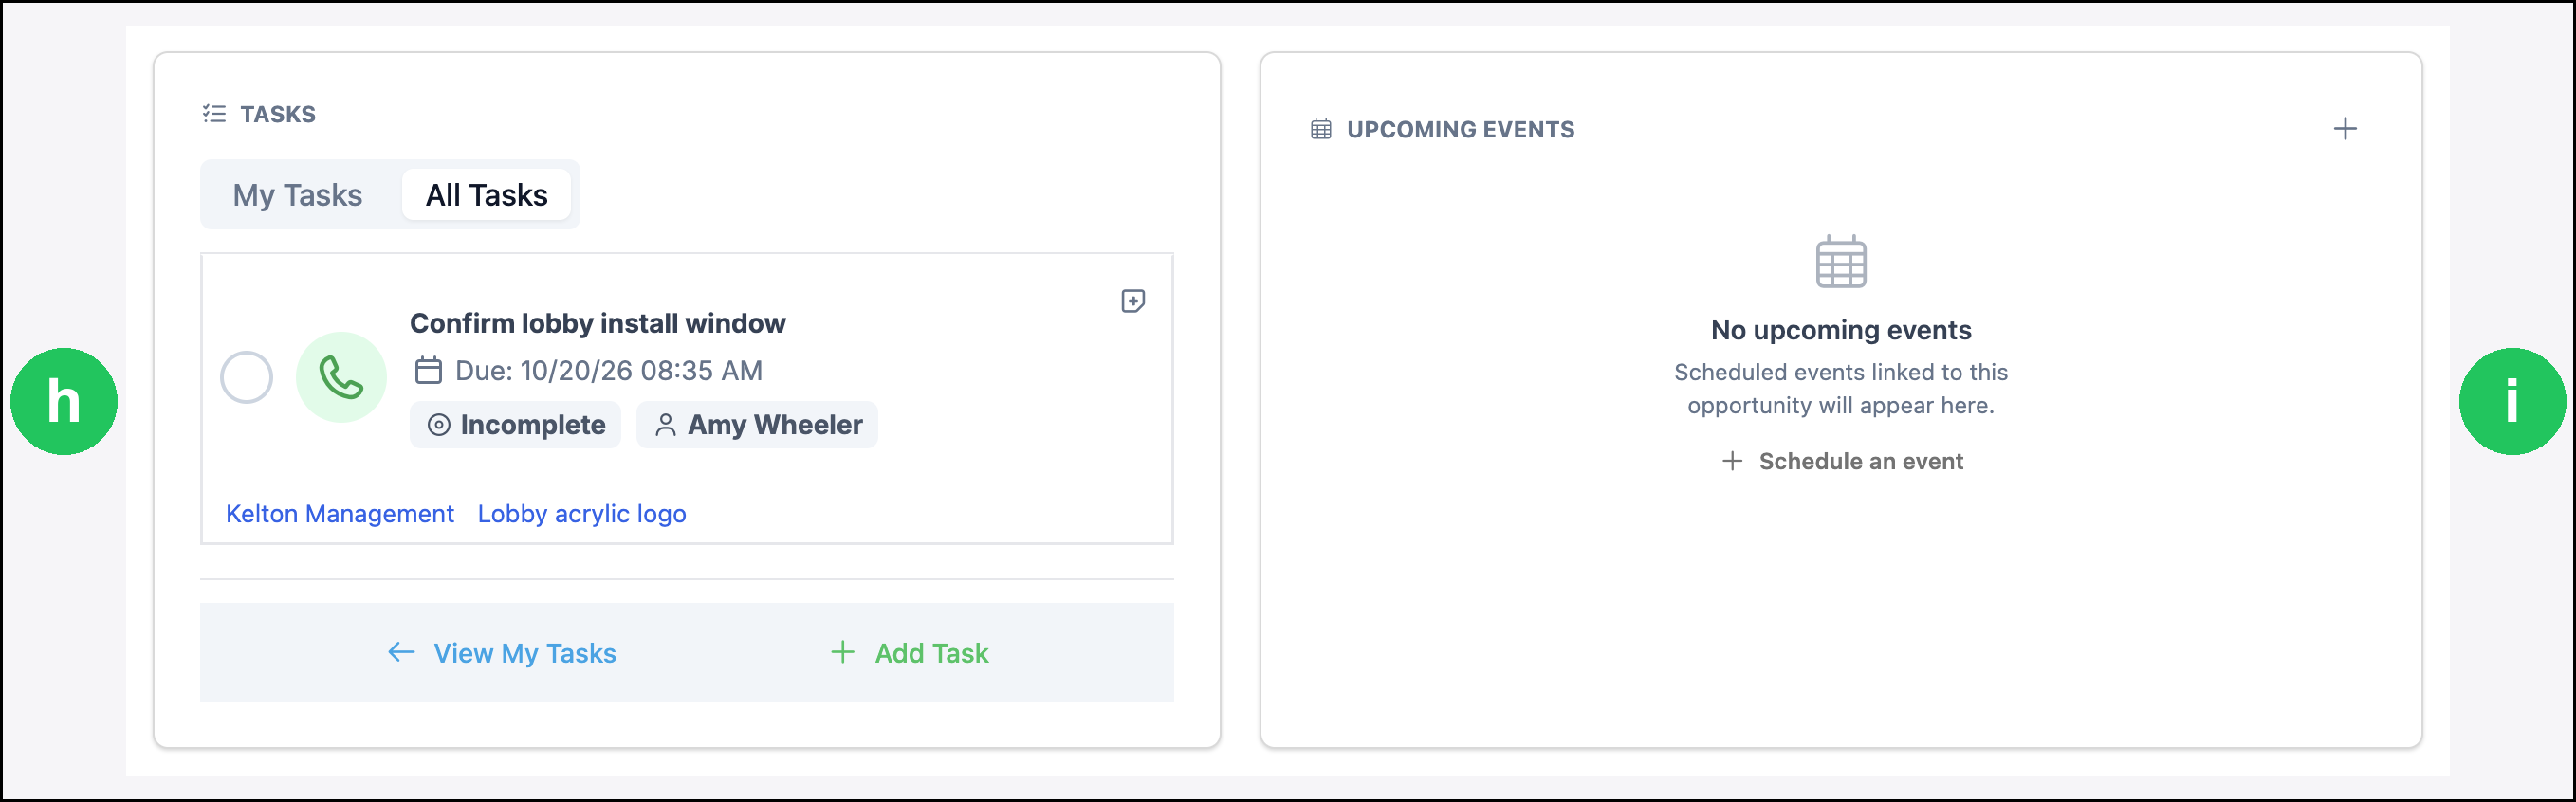
h. Tasks lists tasks for this Opportunity. Tasks can also be added here. For more information, see Tasks.
i. Upcoming Events lists calendar events linked to the Opportunity. Schedule an event creates an event. For more information, see How to Use Calendars.
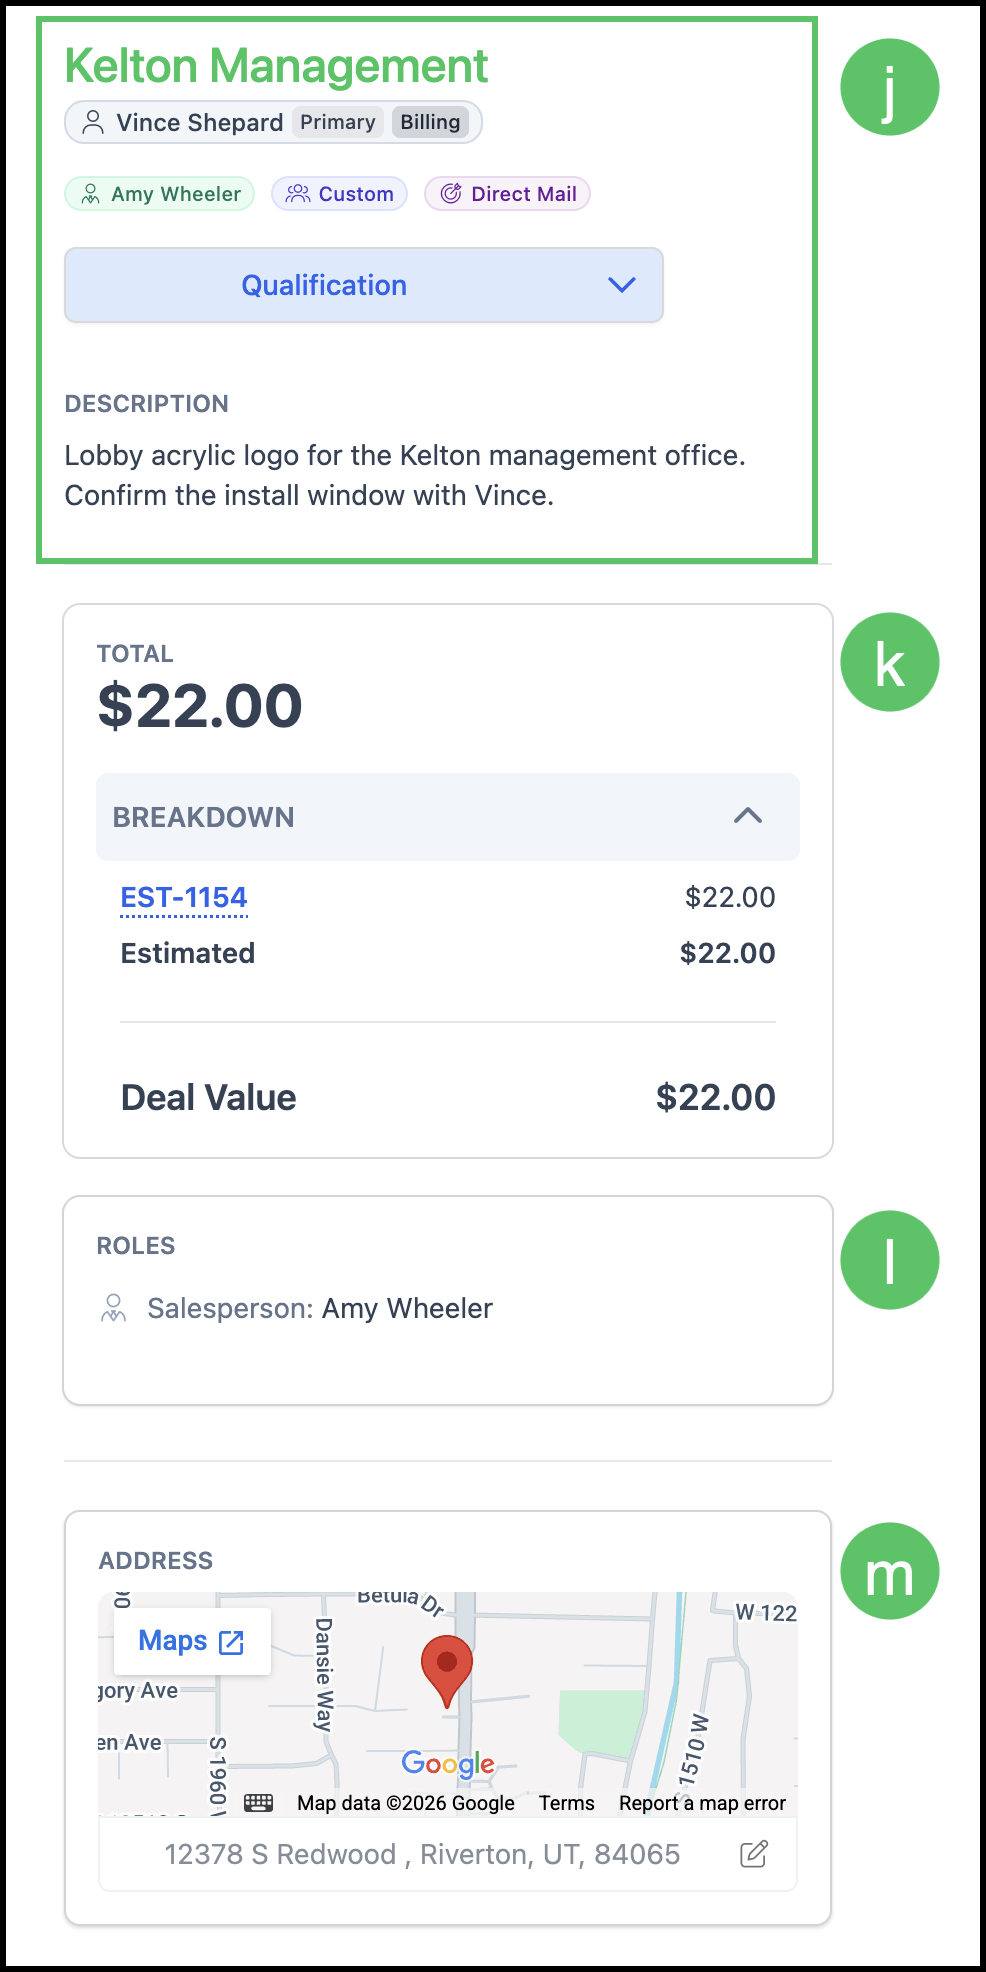
j. Company, contact, origination, weighted amount, and the Stage dropdown. The Stage dropdown moves the Opportunity to another Stage. Description appears here as well.
k. Total shows the deal amount. Breakdown lists linked records, the estimated amount, the weighted value, and Deal Value. Roles appear in this same column.
Note: Company, contact, Stage, description, total, roles, and address stay visible when you change tabs.
l. Roles associated with this Opportunity can be entered here. For more information about Roles, please see Employee Roles and Permissions in Settings.
m. Address shows the location for the Company, with a map.
Note: Linked Estimates and Orders are covered in Estimates and Orders below. Click a number to open the record.
Estimates and Orders
a. Create Estimate starts a new Estimate for this Opportunity.
b. Create Order starts a new Order for this Opportunity.
c. Link records attaches an existing Estimate or Order.
d. Linked Estimates and Orders appear in the list. Click a number to open the record.

Activity Tab
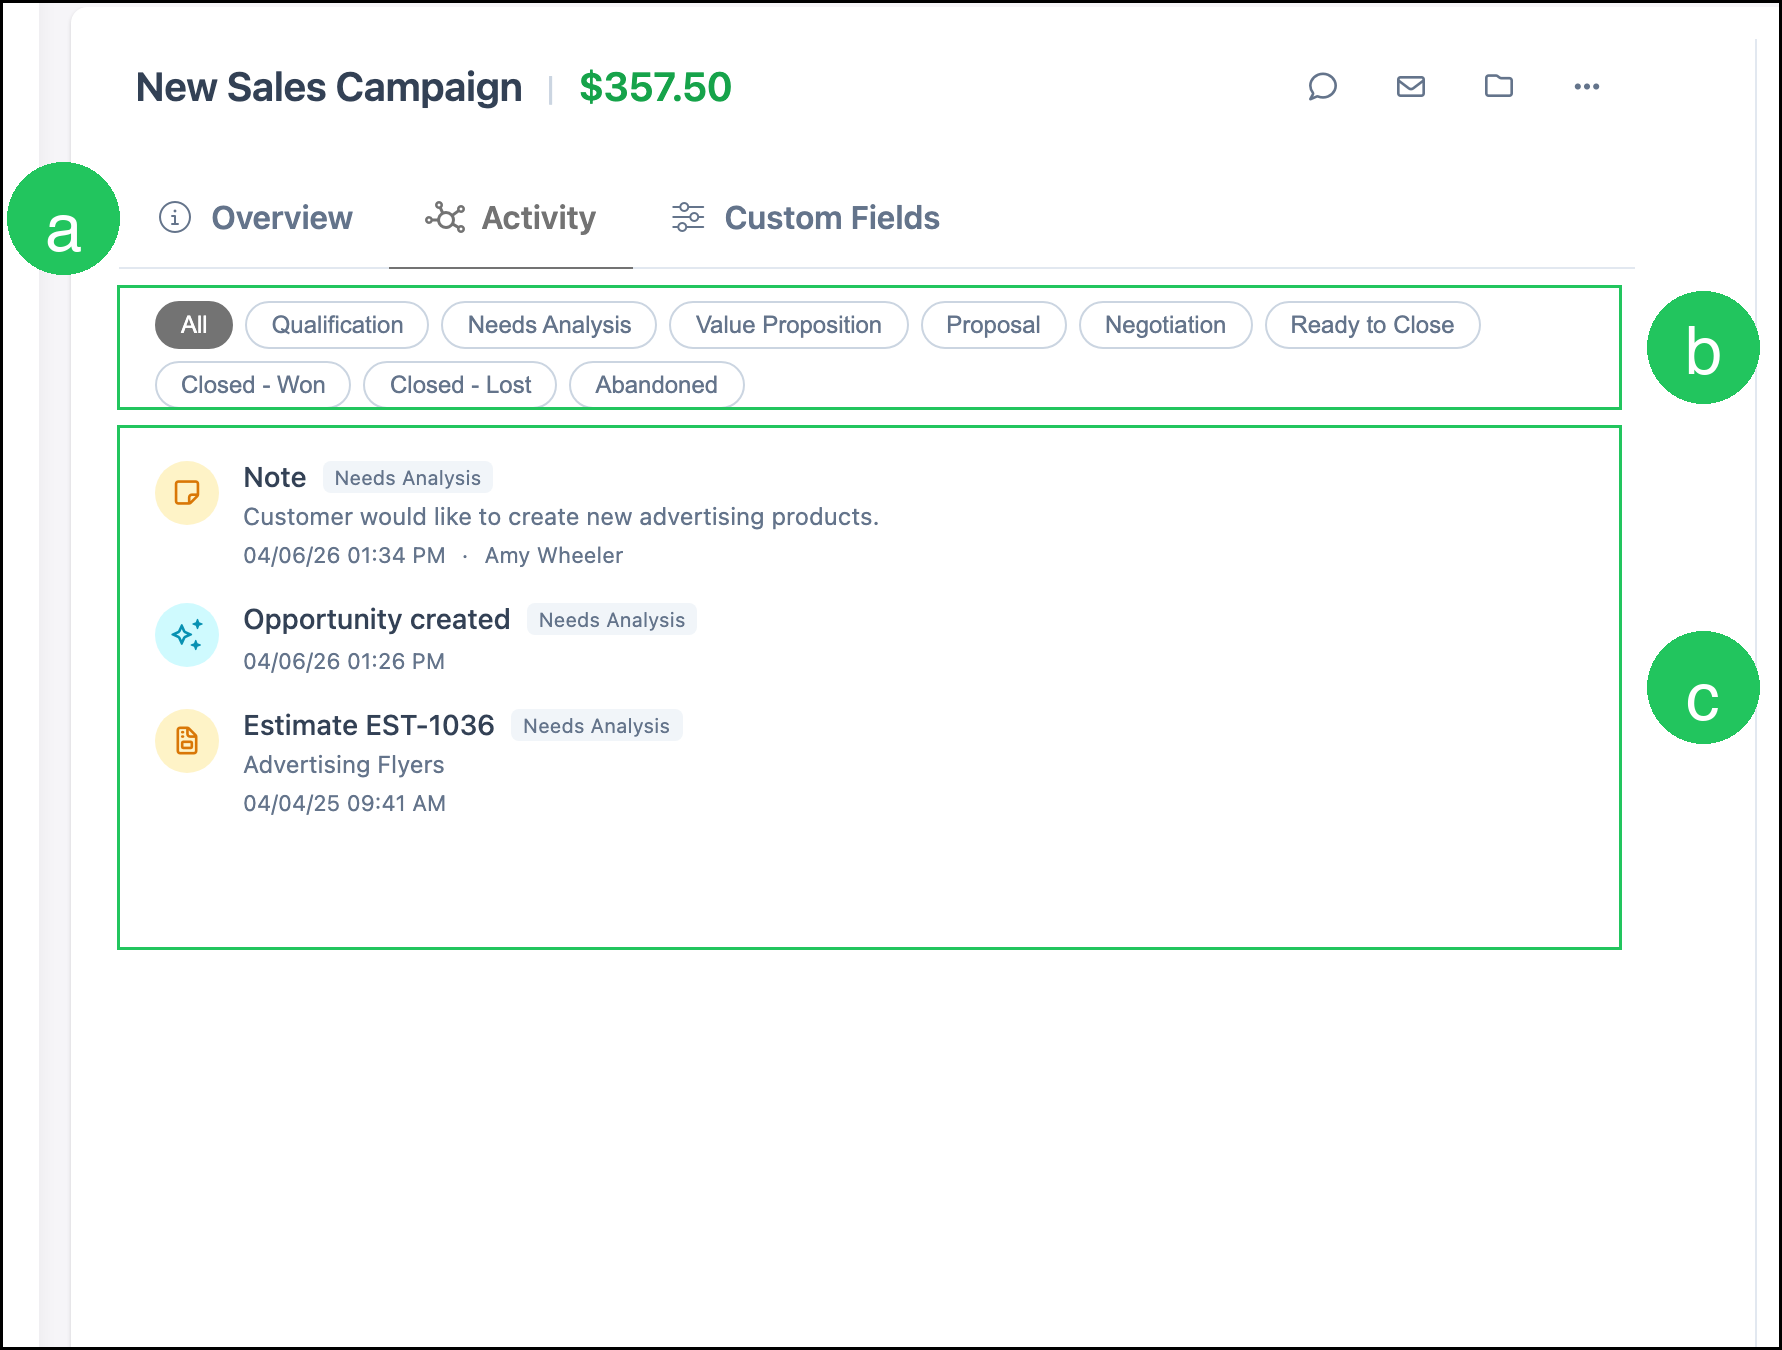
a. The Activity tab shows a timeline for the Opportunity.
b. Stage filters limit the timeline to one Stage or to all Stages.
c. Each entry shows the activity type, Stage, and when it happened.
Chat
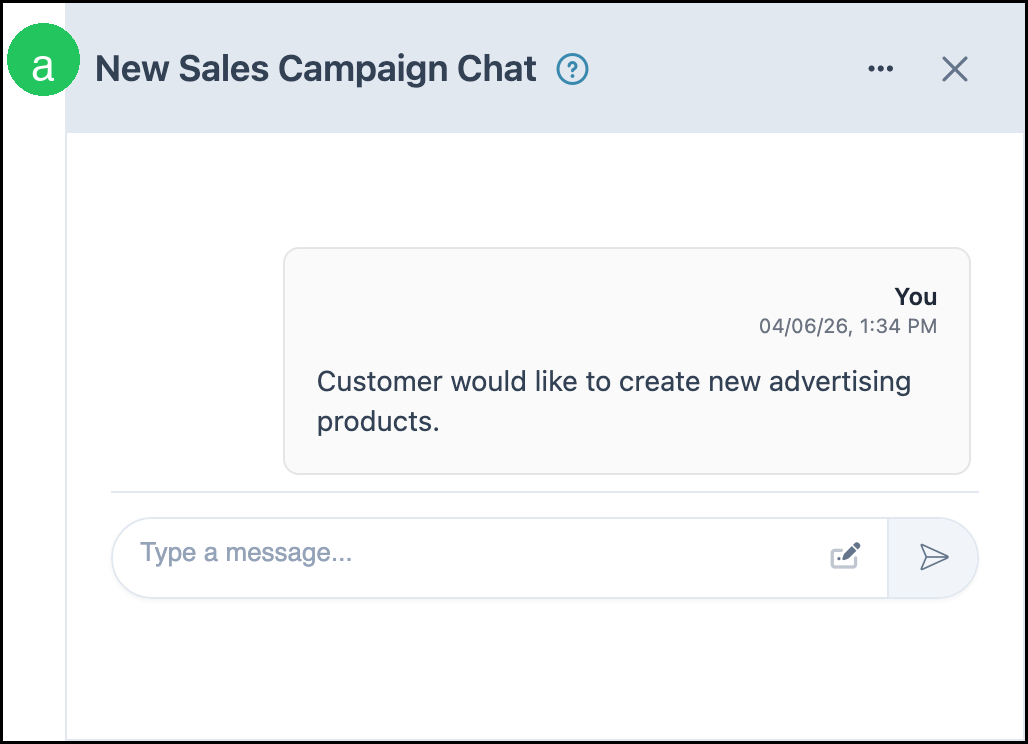
a. Chat is an internal, timestamped conversation about this Opportunity. Type a message and send it to keep notes with the deal.
Moving Opportunities Between Stages
You can move an Opportunity on the board or from Opportunity Details.
On the board, drag the Opportunity card into the Stage column you want.
On Opportunity Details, select the Stage from the Stage dropdown.
Frequently Asked Questions
1. What happens when a Stage is locked?
Answer: Locked (closes opportunity) closes the Opportunity when it reaches that Stage. Closed - Won, Closed - Lost, and Abandoned are examples of locked Stages. Confidence is fixed on locked Stages.
2. Can a Stage move an Opportunity to another pipeline?
Answer: Yes. On the Stage, set Move to pipeline to another pipeline. You can do this on any Stage, not only a locked Stage. If the Stage is not locked, the Opportunity stays open after it moves. If the Stage is locked, the Opportunity closes first, then moves.
3. Where did Notes go?
Answer: Internal notes for an Opportunity are in Chat on the Opportunity Details screen. Activity still lists those notes on the timeline.
4. How is the Opportunity amount calculated?
Answer: The Total is the deal amount. Estimated Value sets a manual amount, and the card shows Manual. Breakdown lists linked Estimates and Orders on their own. Weighted value uses the Stage confidence.
Related Articles
Company Notes in Chat
Creating an Estimate
Creating Companies
Creating Contacts
Custom Fields
Employee Roles and Permissions in Settings.
How to Use Calendars
Tasks