
Press Prints - Offset is a product for pricing offset press printing. It is stored in Products & Modifiers, in the Press Prints category. Print Type on the Sales Form takes flat sheets or a booklet. The Pricing card sets the method Calculate uses. The same Sales Form is used when Press Prints - Offset is added on an Estimate or Order.
Table of Contents
- Where to Find Press Prints - Offset
- What Press Prints - Offset Includes
- Product Settings
- Linked Components
- Enter a Flat Sheet
- Enter a Booklet
- Standard Options
- Review the Price
- Add Press Prints - Offset to an Estimate
- Frequently Asked Questions
- Related Articles
Where to Find Press Prints - Offset
Navigate to System Settings / Components / Products & Modifiers.
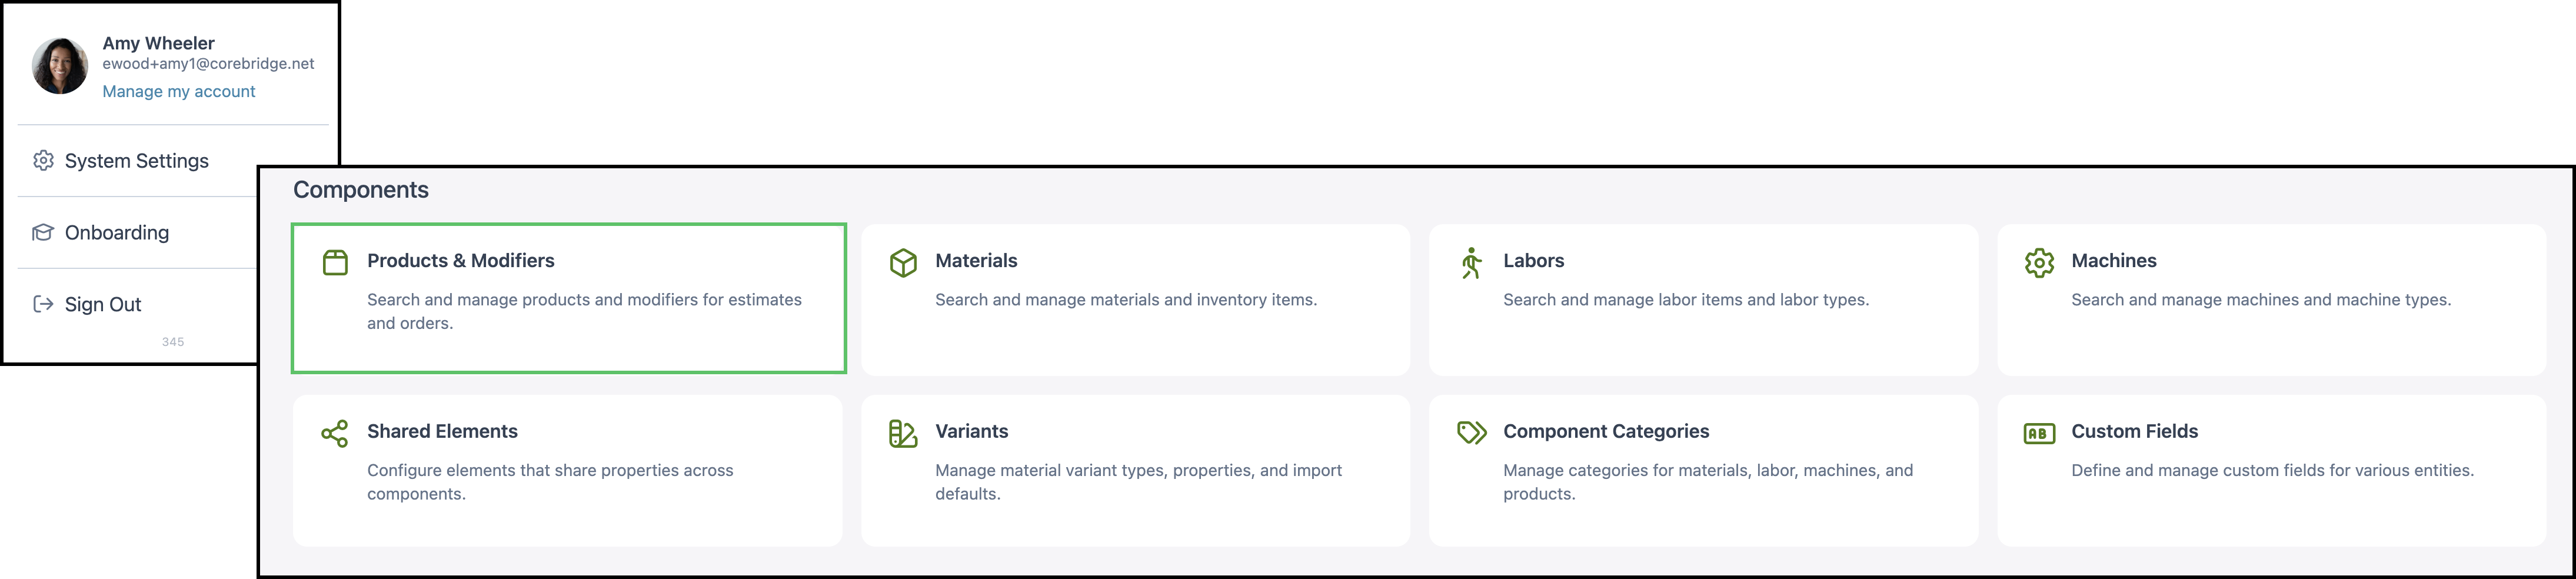
1. Open Press Prints - Offset.
Note: Search lists this row by the word Offset. Open the row whose name is Press Prints - Offset and whose Type is Product.

What Press Prints - Offset Includes
a. The name is Press Prints - Offset. The category is Press Prints. The name on customer documents is Digital Prints. The description is Printer Copier Machine used to create Business Cards, Flyers, Brochures, Mailings.

b. Pricing is the method Calculate uses.
- For the fields on this card, see Product Details.
- For how each method calculates, see Understanding Market-Based vs. Cost-Plus Pricing, Cost Based Pricing, and Market Based Pricing.
- For tables, minimums, and fees, see Markup and Margin Pricing Tables and Product Minimums and Fees.
c. Product Settings holds lead time, order-entry visibility, and machine options. The card shows 17 settings.
d. Linked Components are the materials, labor, machines, and modifiers this product can use. This product shows 11 linked and 1 unlinked.
e. Accounting & Tax assigns income, expense, and tax. This product shows Configured.
- For the fields on this card, see Product Details.
- Taxability Codes are managed at System Settings / Accounting / Taxability Codes. See Taxability Codes.

Product Settings
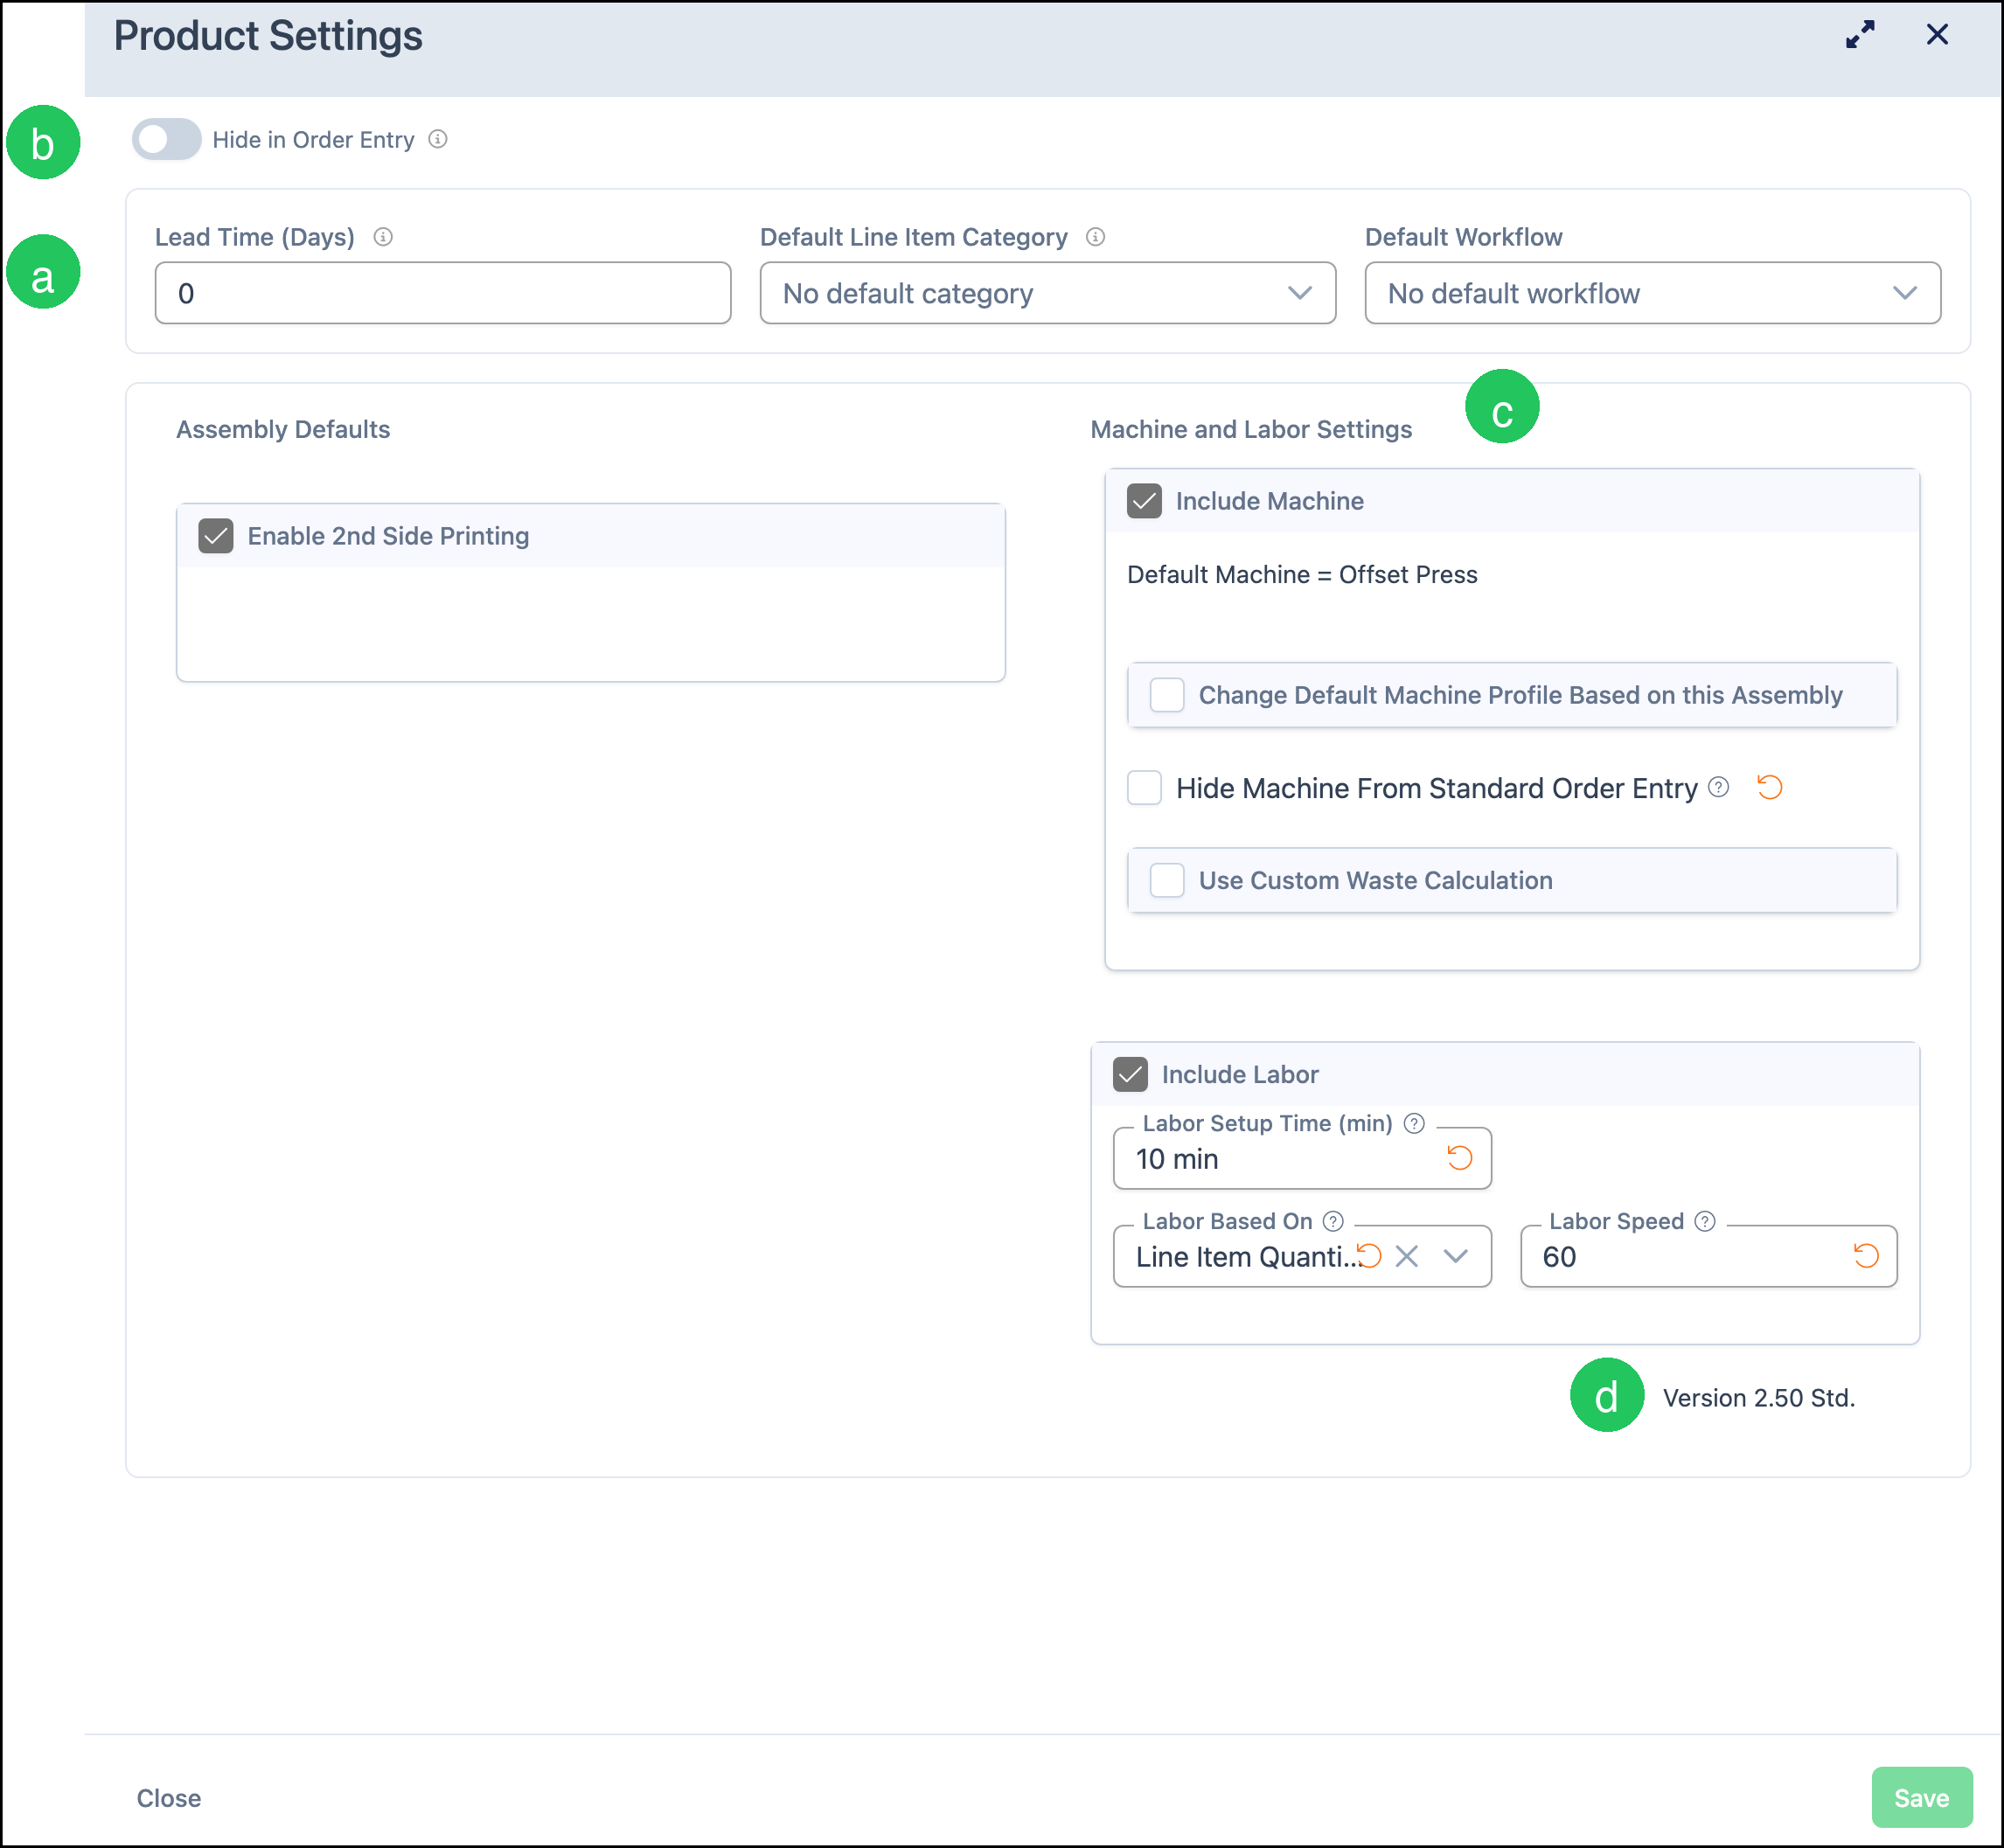
Product Settings holds the defaults that follow the product onto an Estimate or Order. The card shows how many settings are saved.
a. Lead Time (Days) is the number of days orders use when calculating a production due date. On this product it is 0.
b. Hide in Order Entry, when on, keeps the product out of the Estimate and Order list without deleting it. On this product it is off, so Press Prints - Offset can be added to a line.
c. Include Machine is on. Default Machine is Offset Press. Hide Machine From Standard Order Entry is off, so Offset Press 2.11 appears on the Sales Form.
d. Version 2.50 Std. is shown on the card.
Note: Enable 2nd Side Printing is on. Use Custom Waste Calculation is off. Default Line Item Category and Default Workflow have no default.
- For every setting on the card, see Product Details.
Linked Components
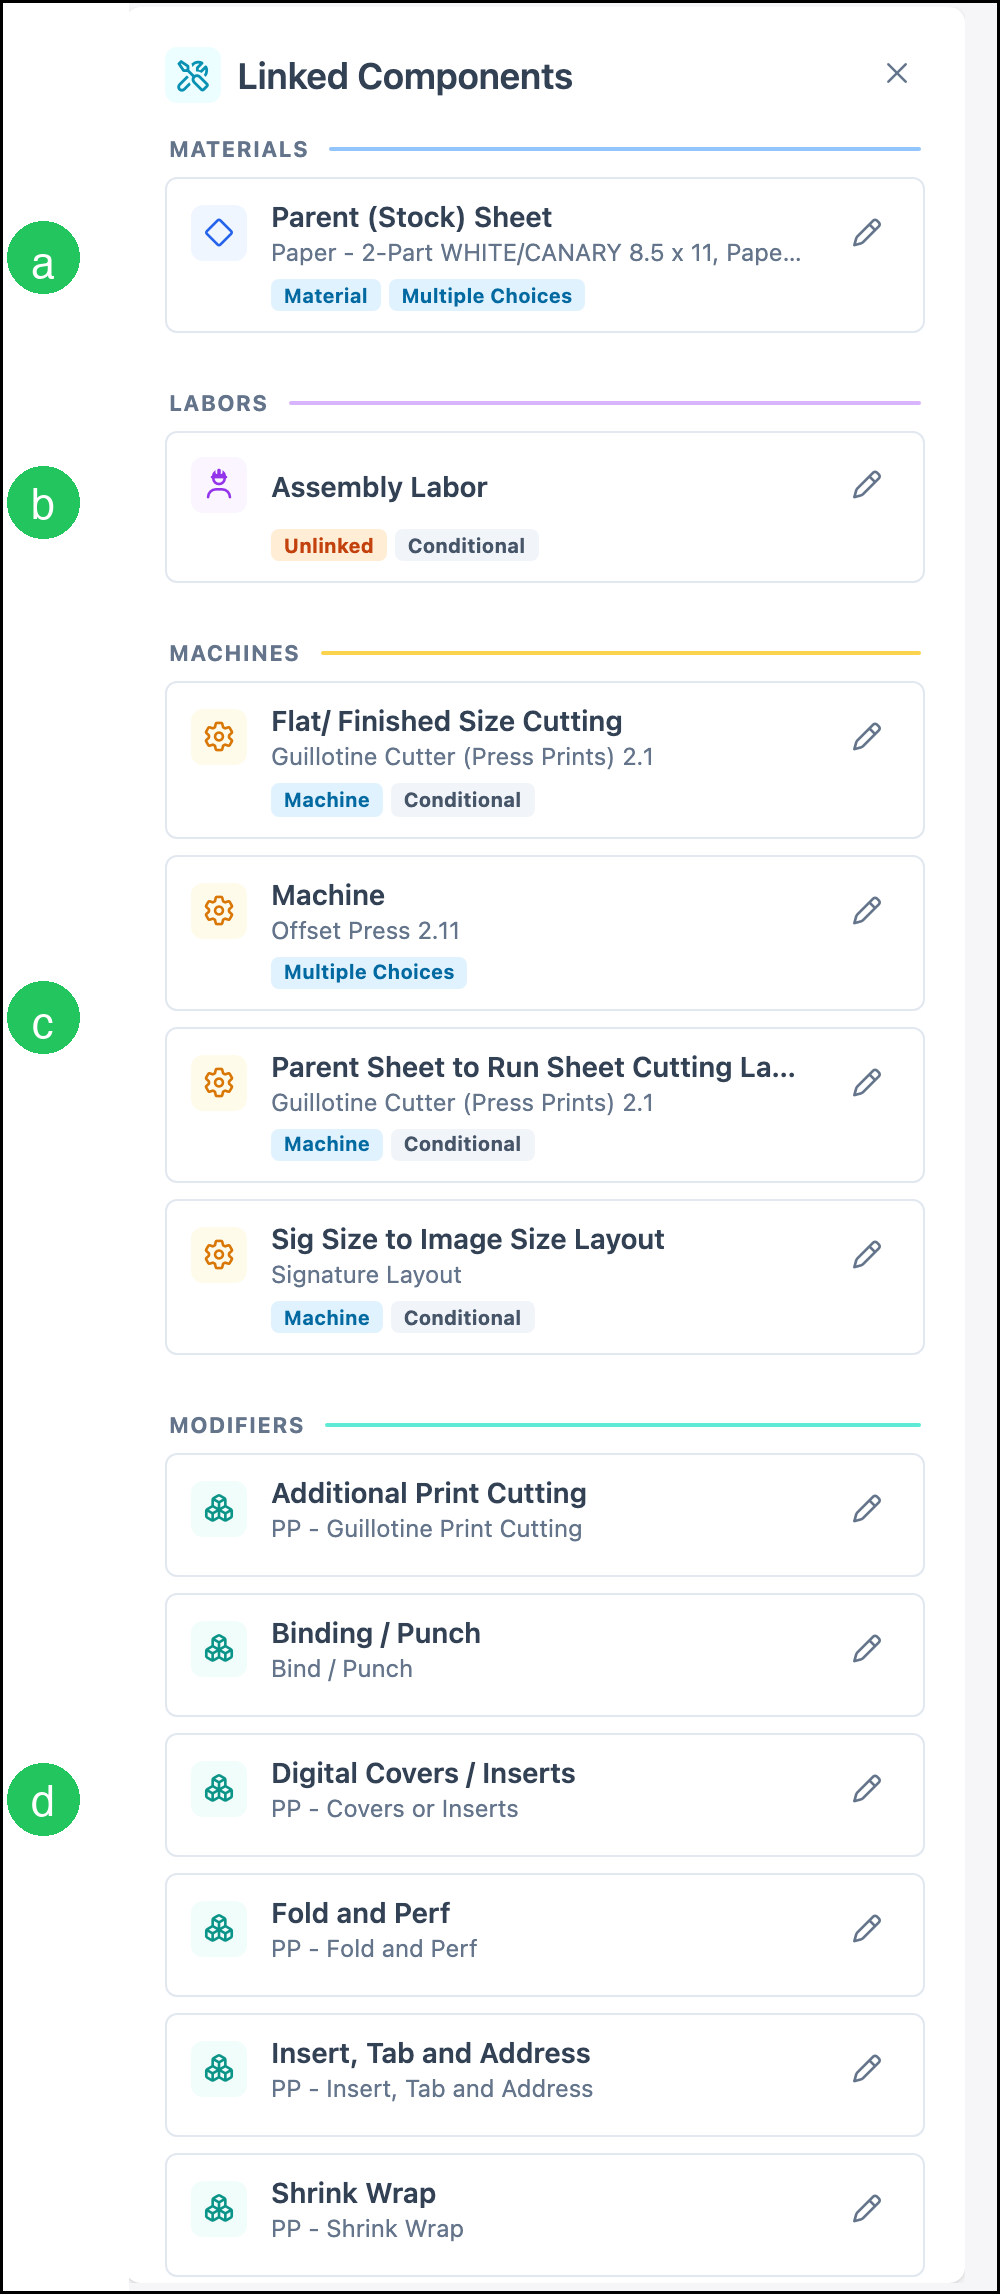
Linked Components are the materials, labor, machines, and modifiers the product is allowed to use. The card counts linked rows and unlinked rows. A shop links its own catalog.
a. Parent (Stock) Sheet is a material with Multiple Choices. The choices on this product include Paper - 2-Part WHITE/CANARY 8.5 x 11, Paper - White 11x17, Paper - White 12 x 18, Paper - White 13 x 19, Paper - White 19 x 13, Paper - White 25 x 38, and Paper - White 8.5 x 11.
b. Assembly Labor is the unlinked row. It is marked Conditional. Link a labor there when the product should include assembly time.
c. Machine is Offset Press 2.11, with Multiple Choices. Sig Size to Image Size Layout uses Signature Layout, and it is conditional. Flat/ Finished Size Cutting and Parent Sheet to Run Sheet Cutting Layout use Guillotine Cutter (Press Prints) 2.1, and both are conditional.
d. The modifiers are Additional Print Cutting (PP - Guillotine Print Cutting), Binding / Punch (Bind / Punch), Digital Covers / Inserts (PP - Covers or Inserts), Fold and Perf (PP - Fold and Perf), Insert, Tab and Address (PP - Insert, Tab and Address), and Shrink Wrap (PP - Shrink Wrap). Those options appear on the Sales Form.
- For how to link or unlink a component, see Linked Components.
- For how a modifier differs from a product, see Products vs. Modifiers.
Enter a Flat Sheet
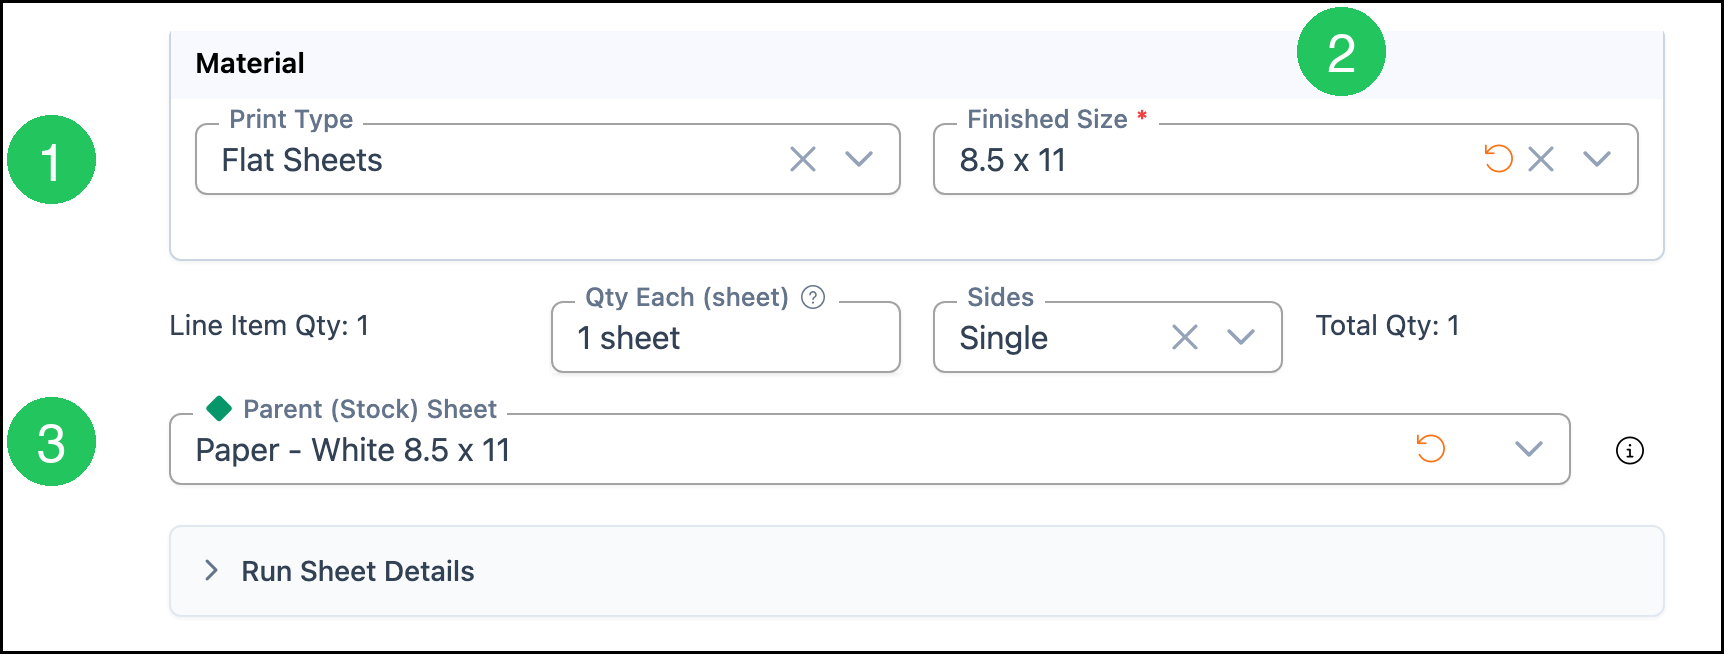
1. Set Print Type to Flat Sheets.
2. Select Finished Size. This example uses 8.5 x 11.
3. Select Parent (Stock) Sheet. This example uses Paper - White 8.5 x 11.
Note: Quantity in this example is 1. Qty Each (sheet) is 1 sheet. Sides is Single. Sides can be Single or Double. Total Qty is 1. Run Sheet Details stays closed in this example.
Enter a Booklet
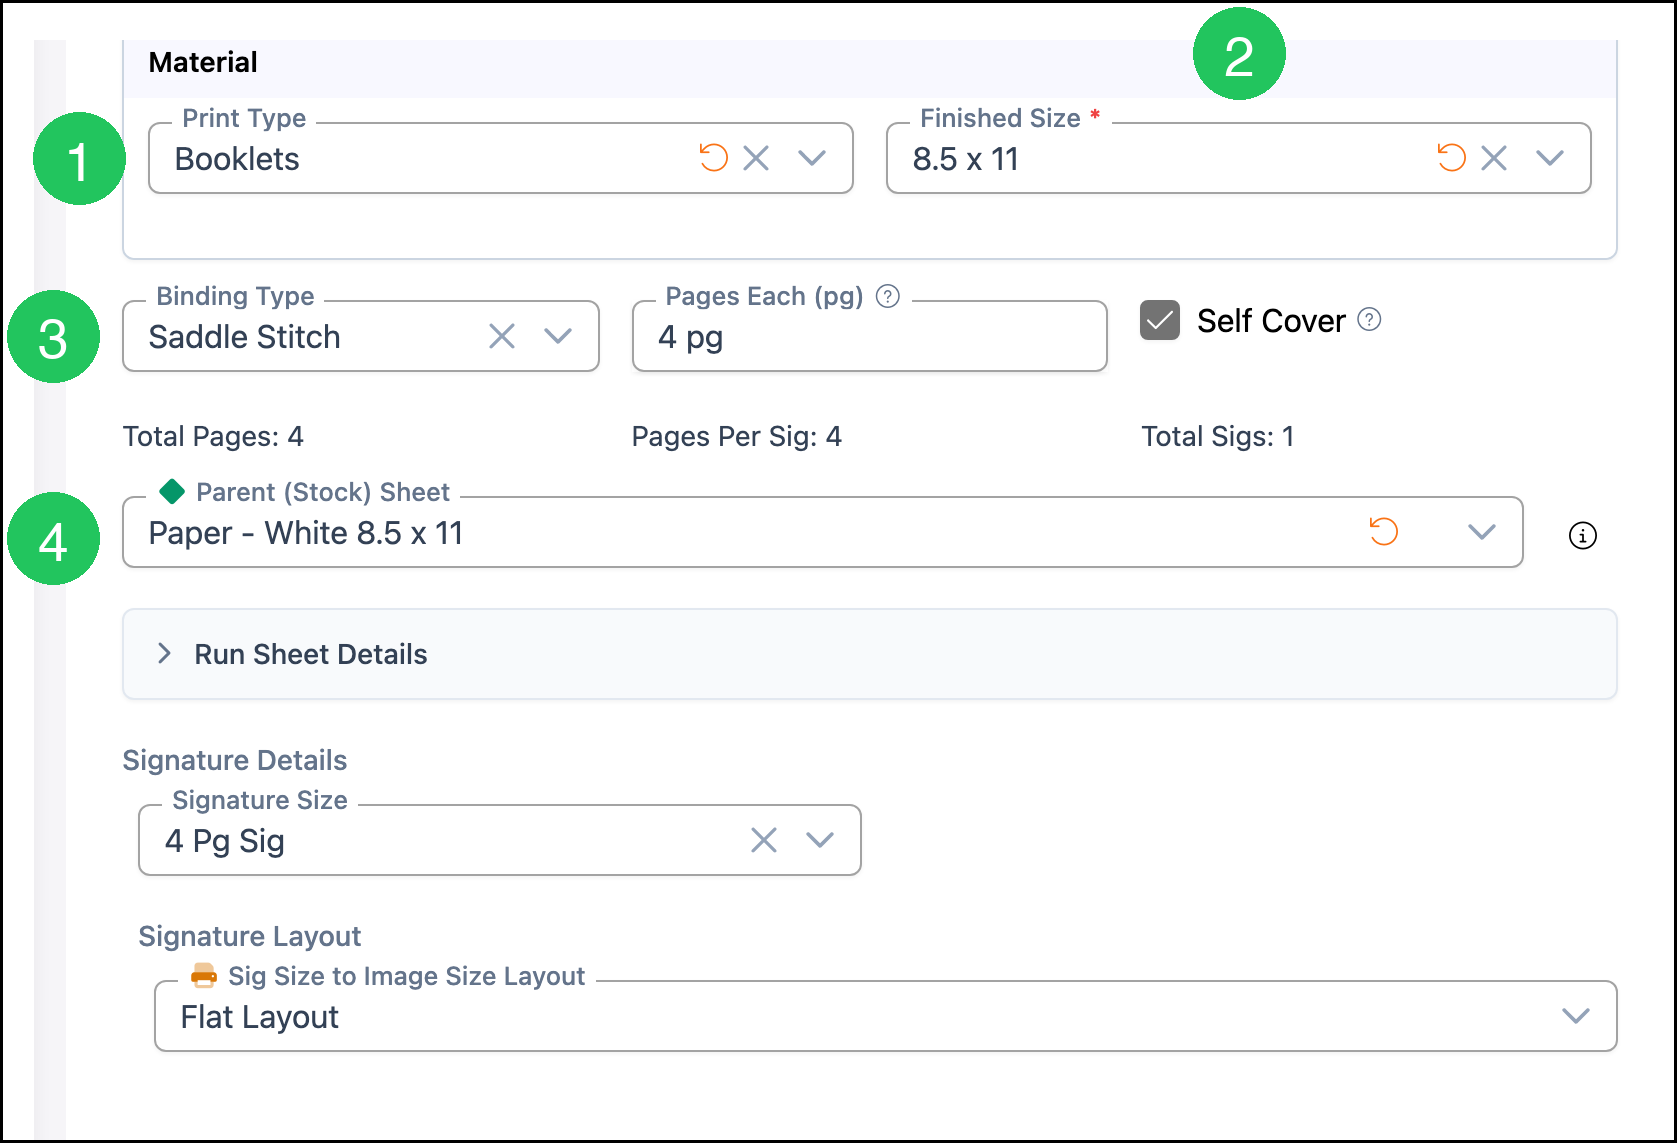
1. Set Print Type to Booklets.
2. Select Finished Size. This example uses 8.5 x 11.
3. Select Binding Type. This example uses Saddle Stitch. The other choice is Perfect Bound.
4. Select Parent (Stock) Sheet. This example uses Paper - White 8.5 x 11.
Note: Pages Each is 4 pg, and Self Cover is checked. Total Pages is 4, Pages Per Sig is 4, and Total Sigs is 1. Signature Size is 4 Pg Sig. Sig Size to Image Size Layout is Flat Layout.
Standard Options
Standard Options are the modifiers that can be added on the Sales Form. Click a button to add that option.
a. Additional Print Cutting
b. Digital Covers / Inserts
c. Binding / Punch
Note: The other buttons on this form are Fold and Perf, Insert, Tab and Address, and Shrink Wrap.

Review the Price
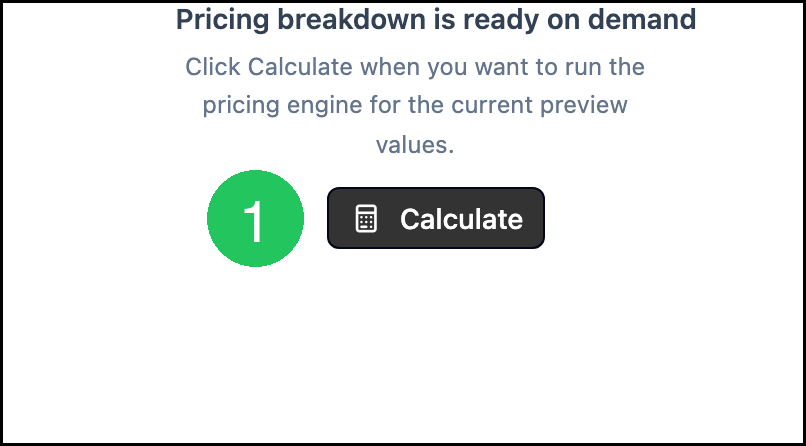
1. Click Calculate.
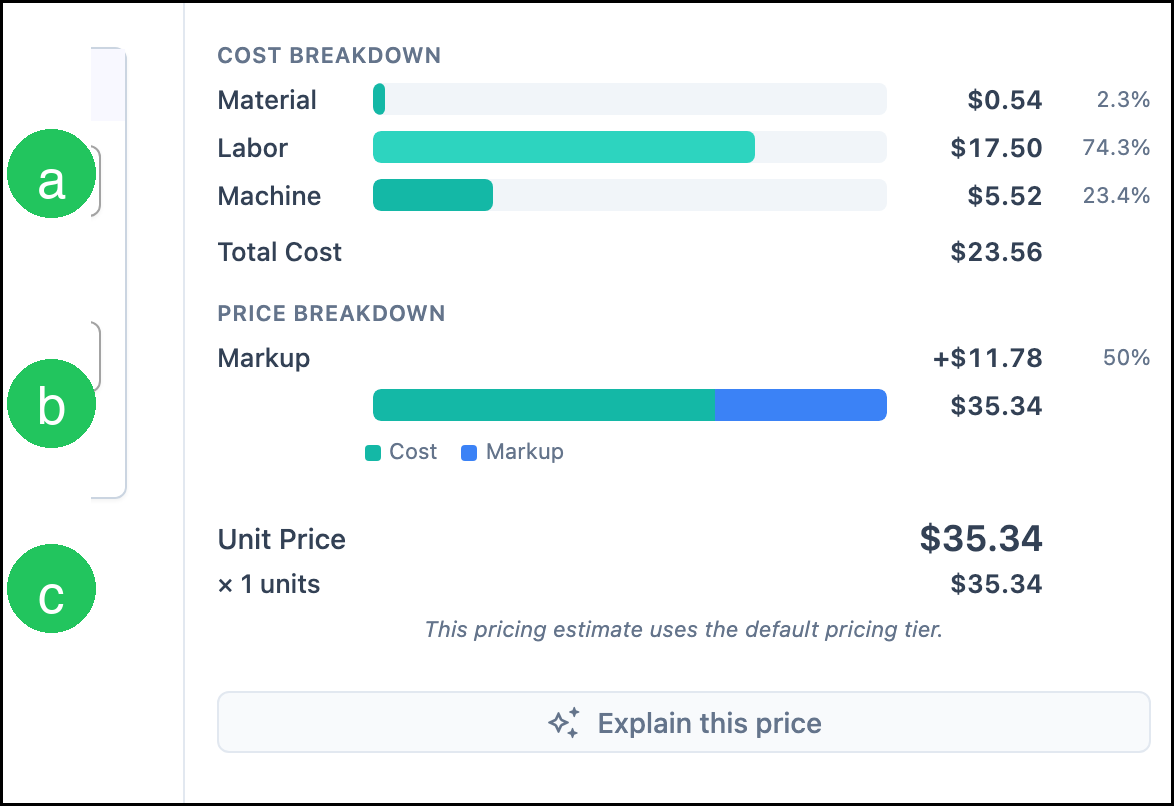
a. Cost Breakdown lists Material, Labor, Machine, and Total Cost.
b. Markup is the amount added by the saved Cost Plus - Markup method. In this example it is 50%. The bar shows Cost and Markup.
c. Unit Price is the price for one. The line total is Unit Price times Quantity.
Note: Calculate prices the current Sales Form with the method on the Pricing card. The amounts below are one example: Flat Sheets, Finished Size 8.5 x 11, quantity 1, Qty Each (sheet) 1, Sides Single, Parent (Stock) Sheet Paper - White 8.5 x 11, and Machine Offset Press 2.11, with Cost Plus - Markup. Material is $0.54, Labor is $17.50, Machine is $5.52, and Total Cost is $23.56. The markup is $11.78, and Unit Price is $35.34. A different method, percentage, or form value produces a different price. Click Calculate again after the form changes. The button label then reads Recalculate. The note under the price says the estimate uses the default pricing tier.
Add Press Prints - Offset to an Estimate
Navigate to Sales / Estimates.
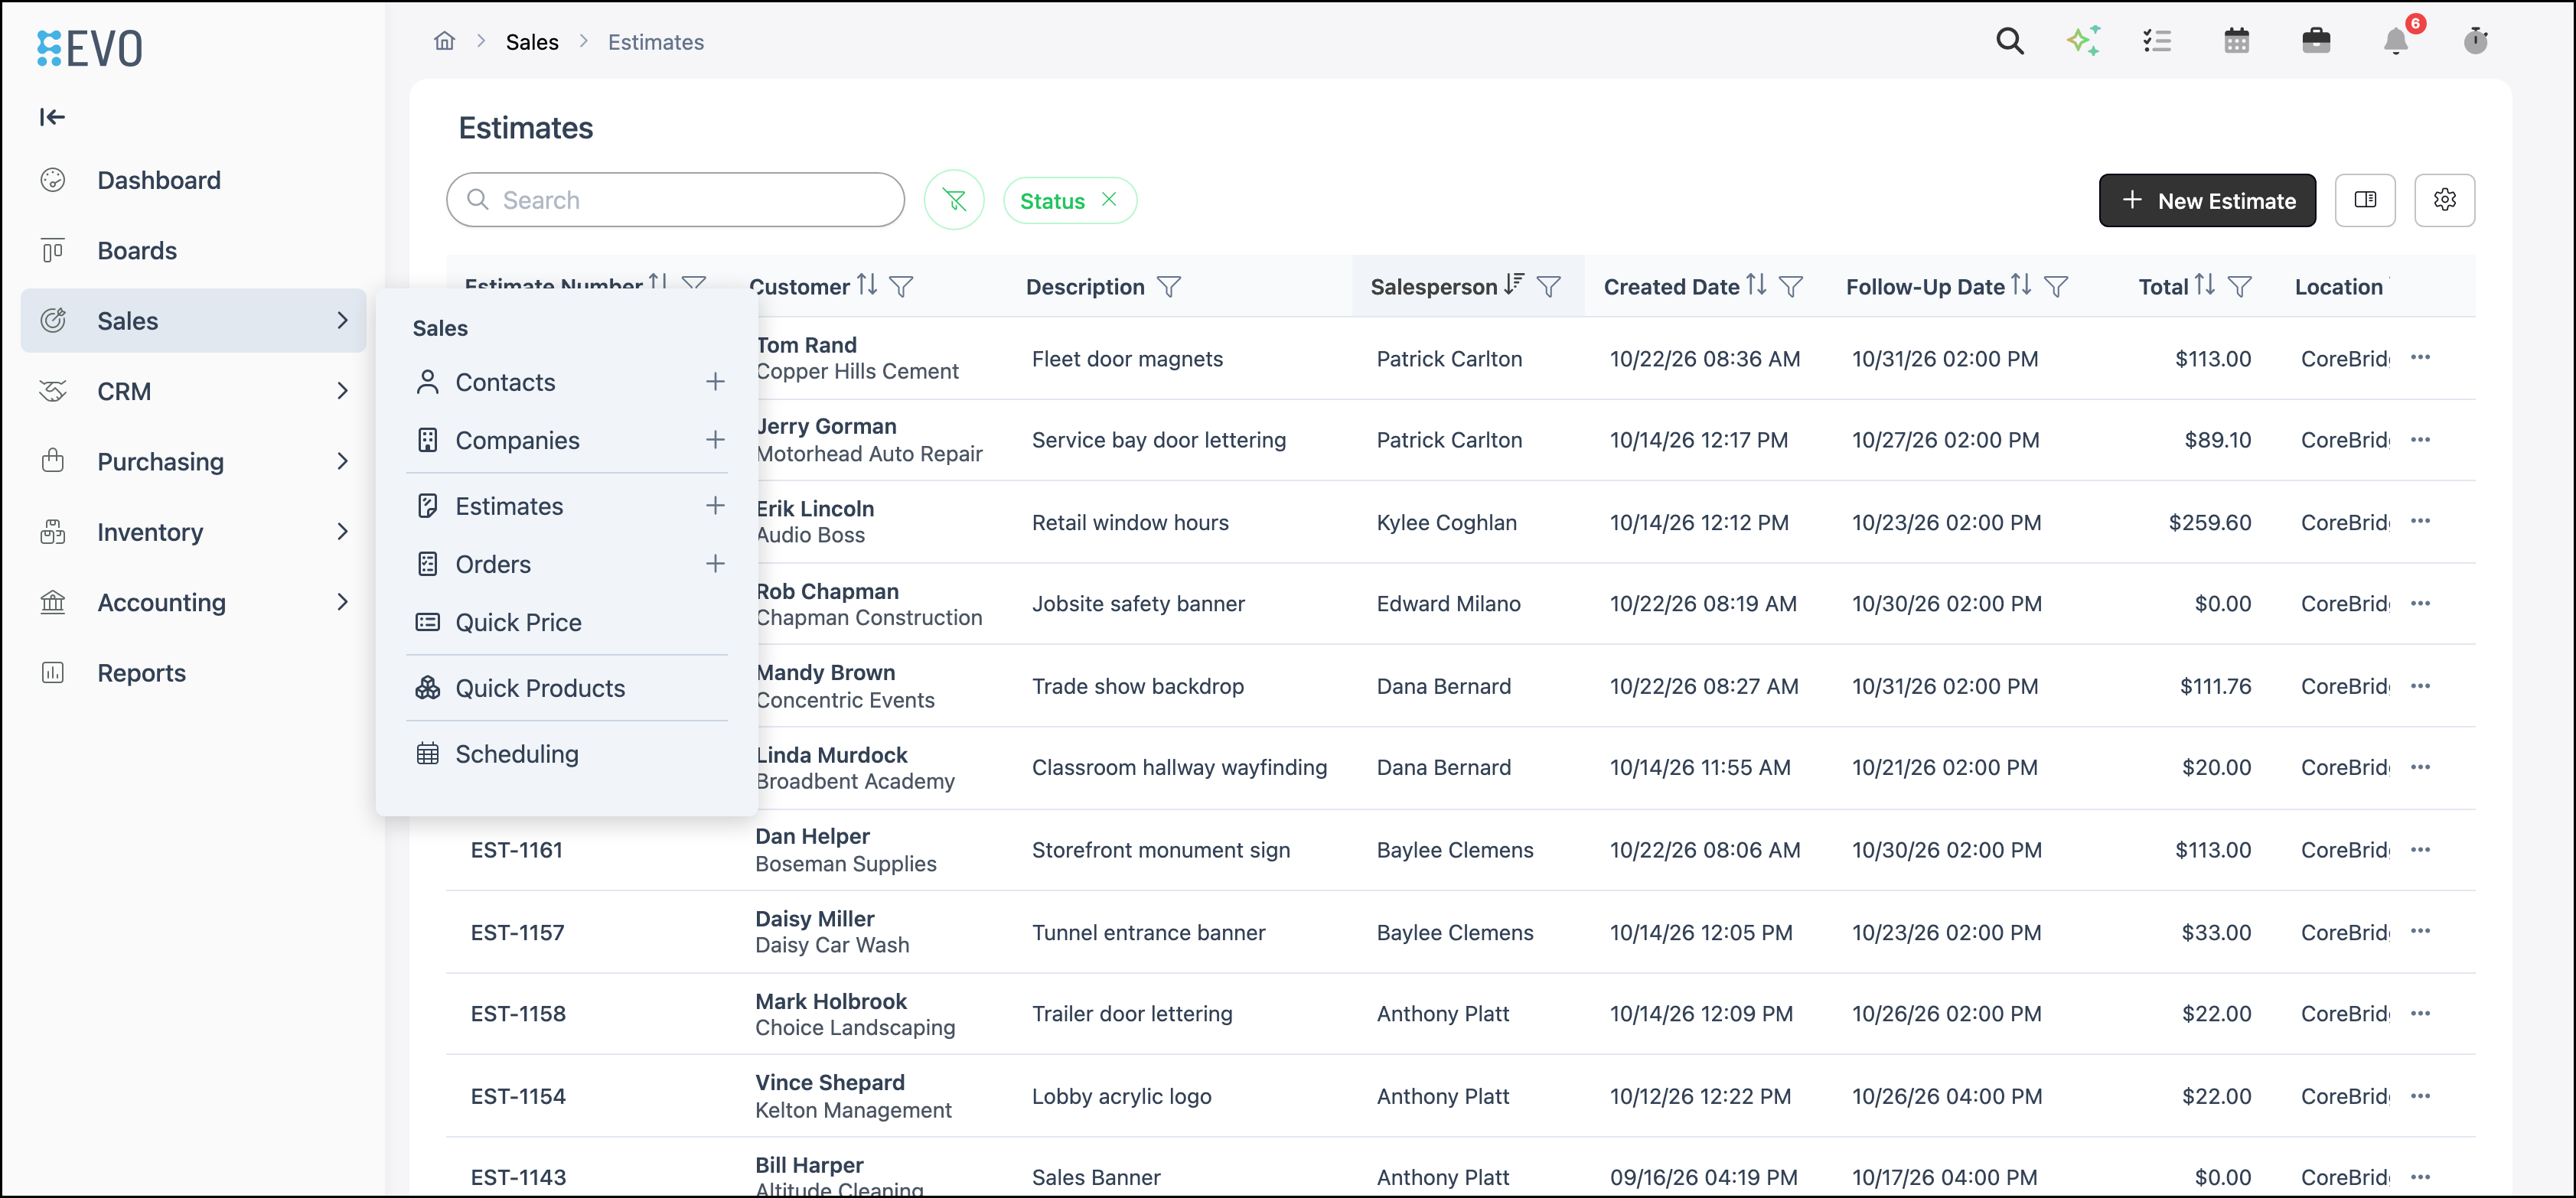
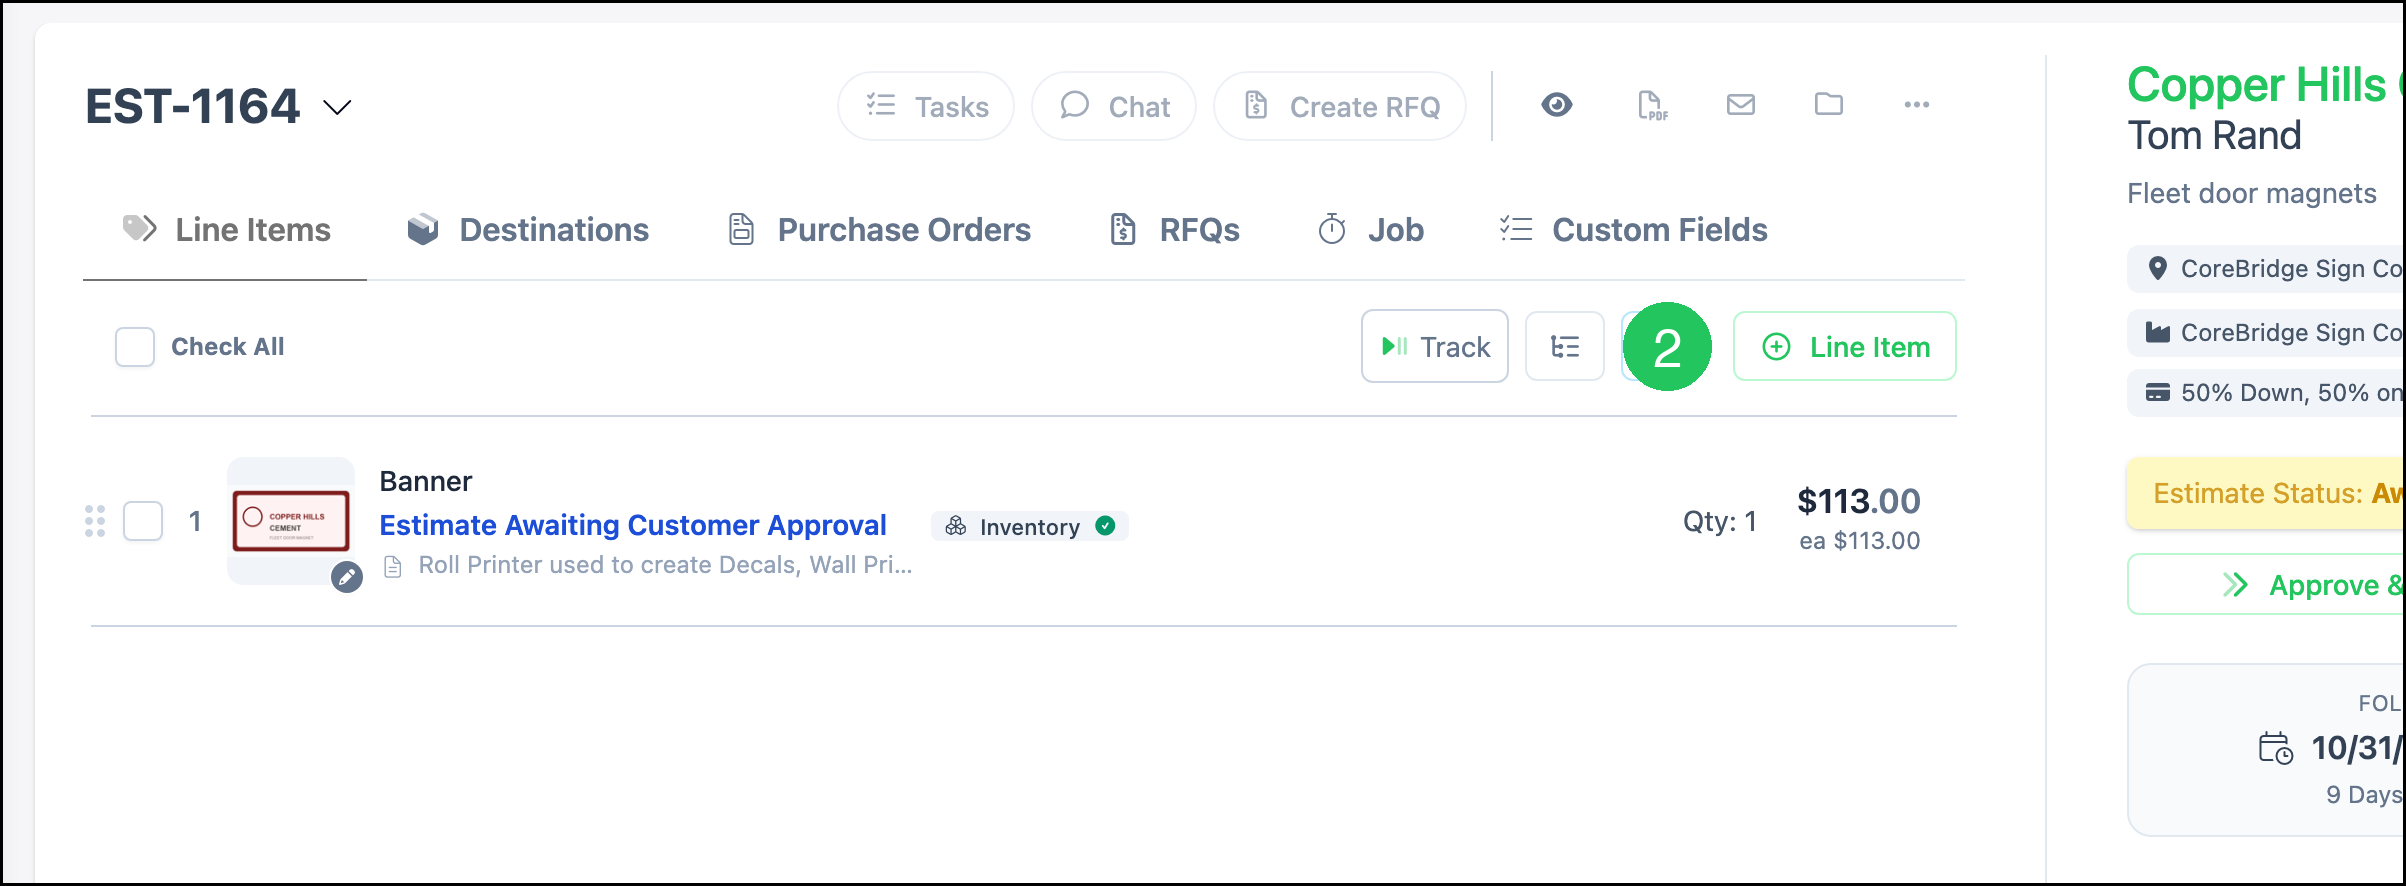
1. Click the Estimate.

2. Click Line Item.
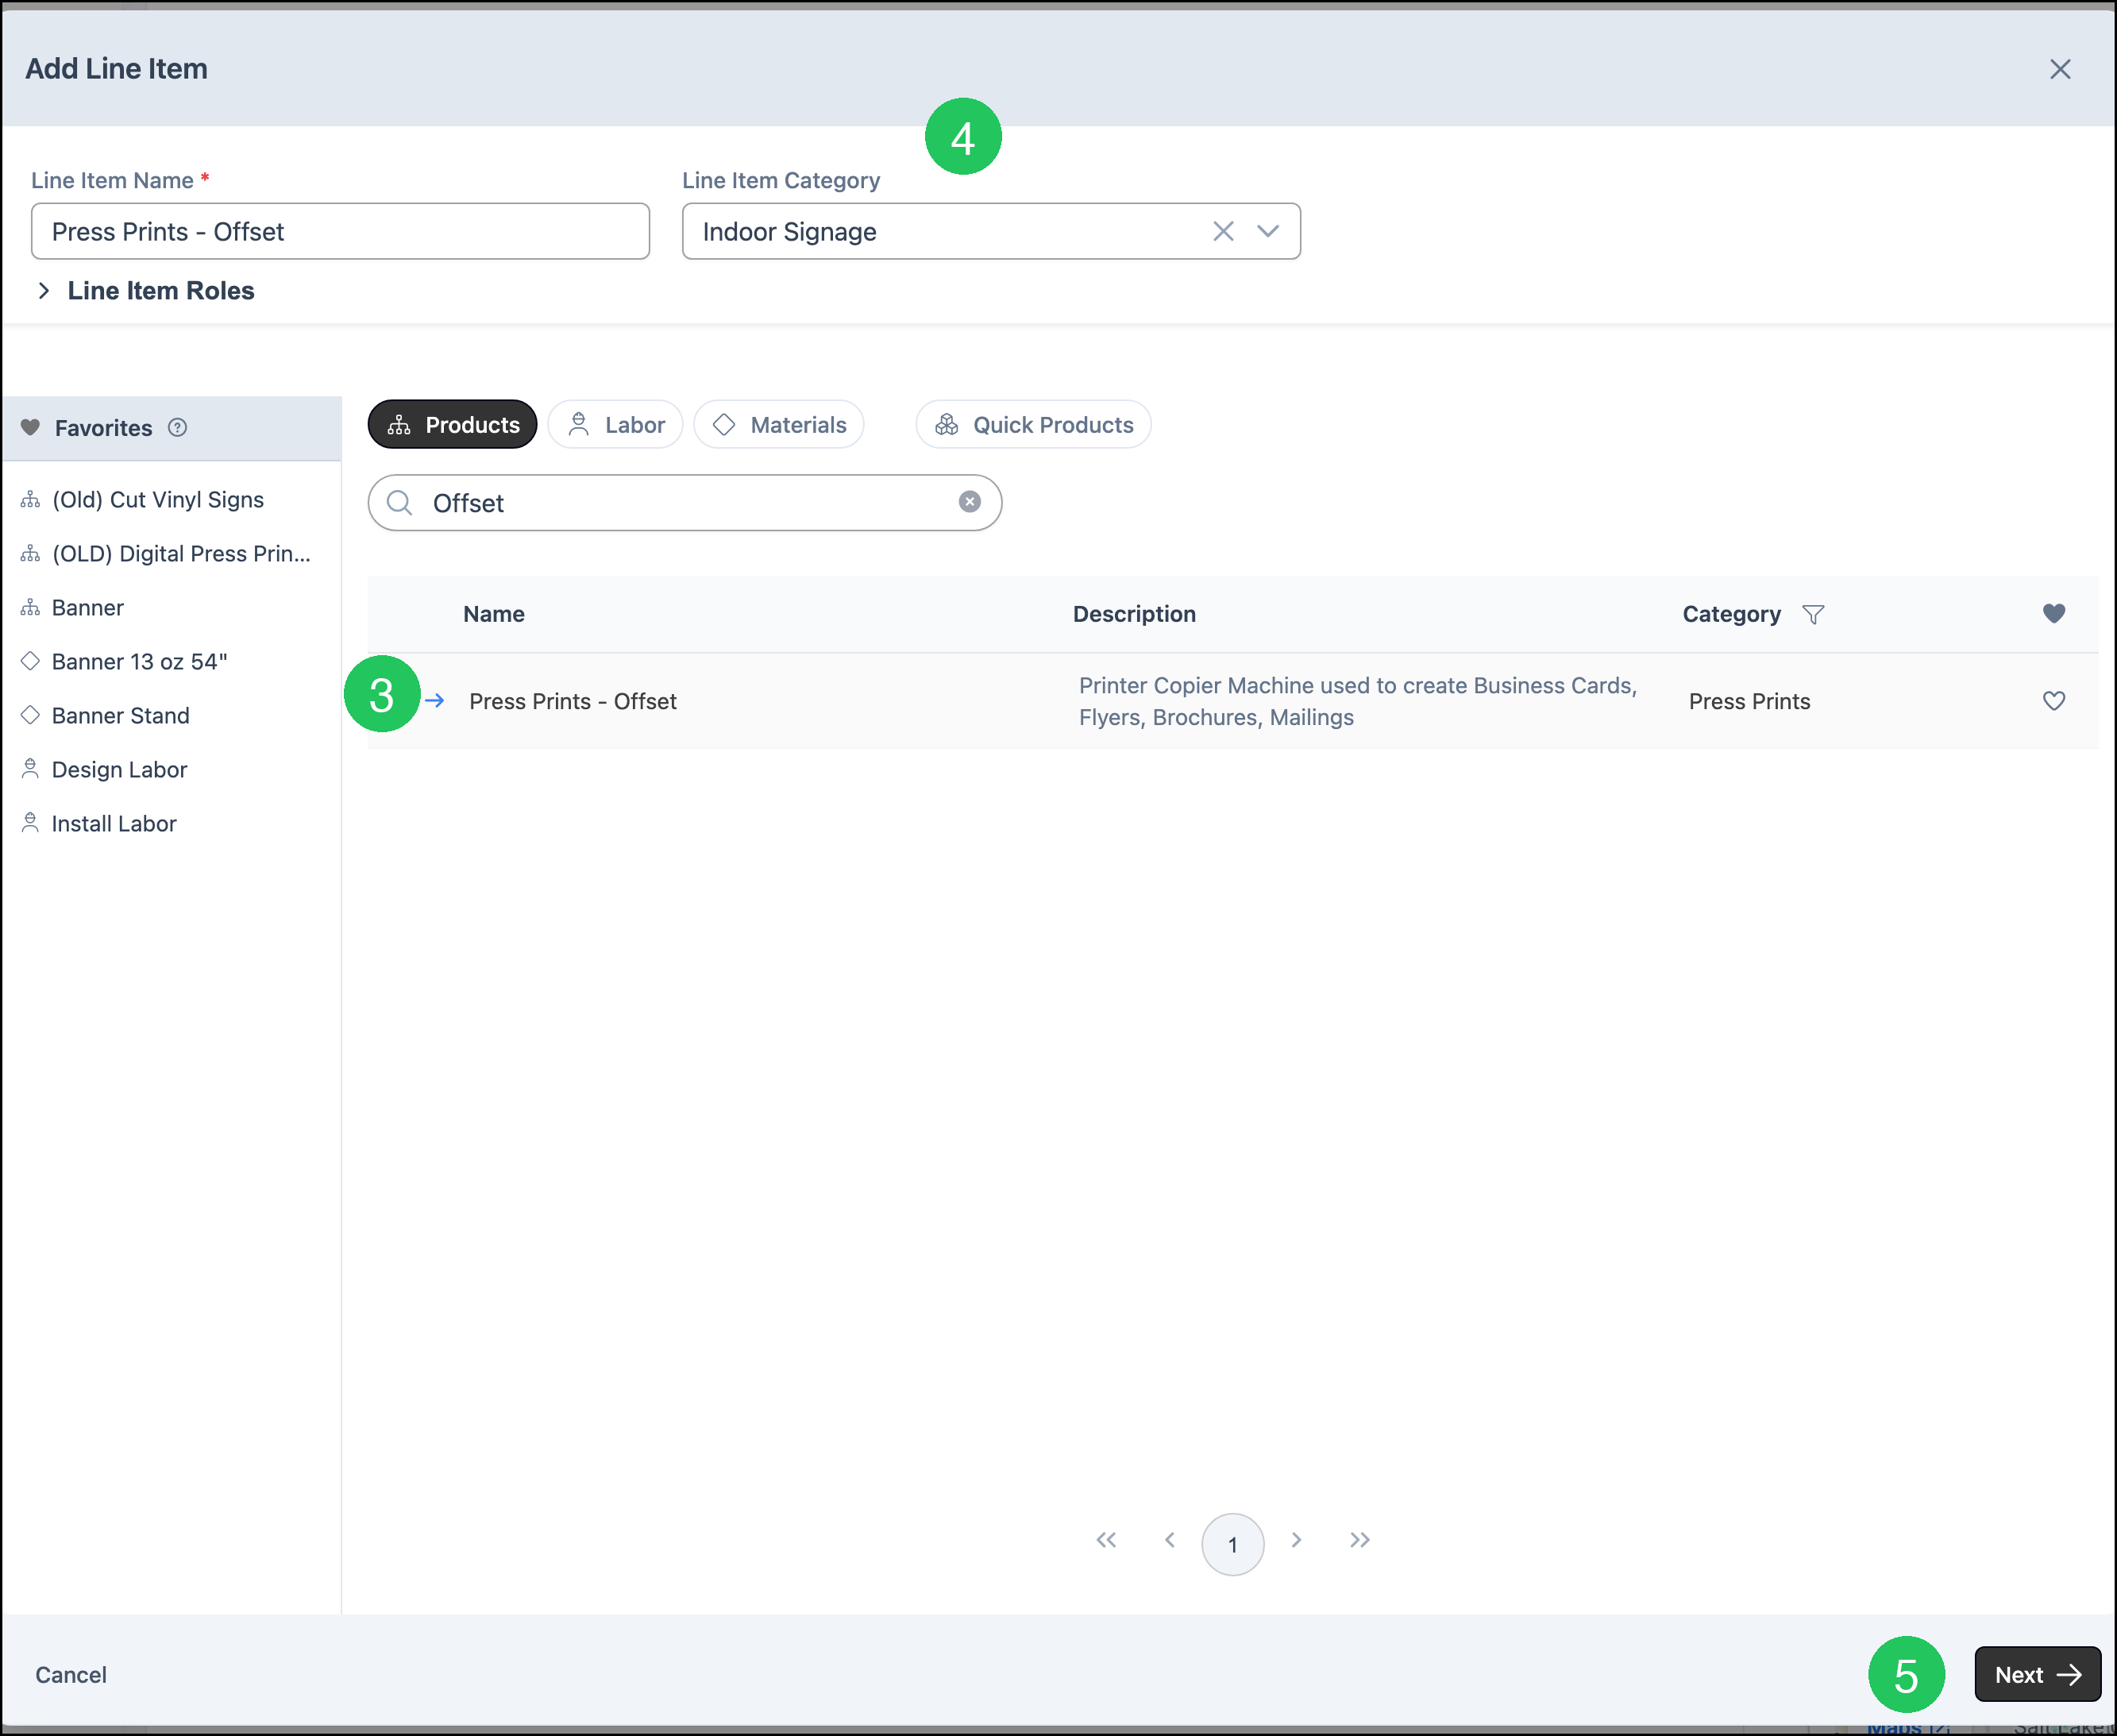
3. On the Products tab, click Press Prints - Offset. Line Item Name fills with Press Prints - Offset.
4. Select a Line Item Category. This example uses Indoor Signage.
5. Click Next.
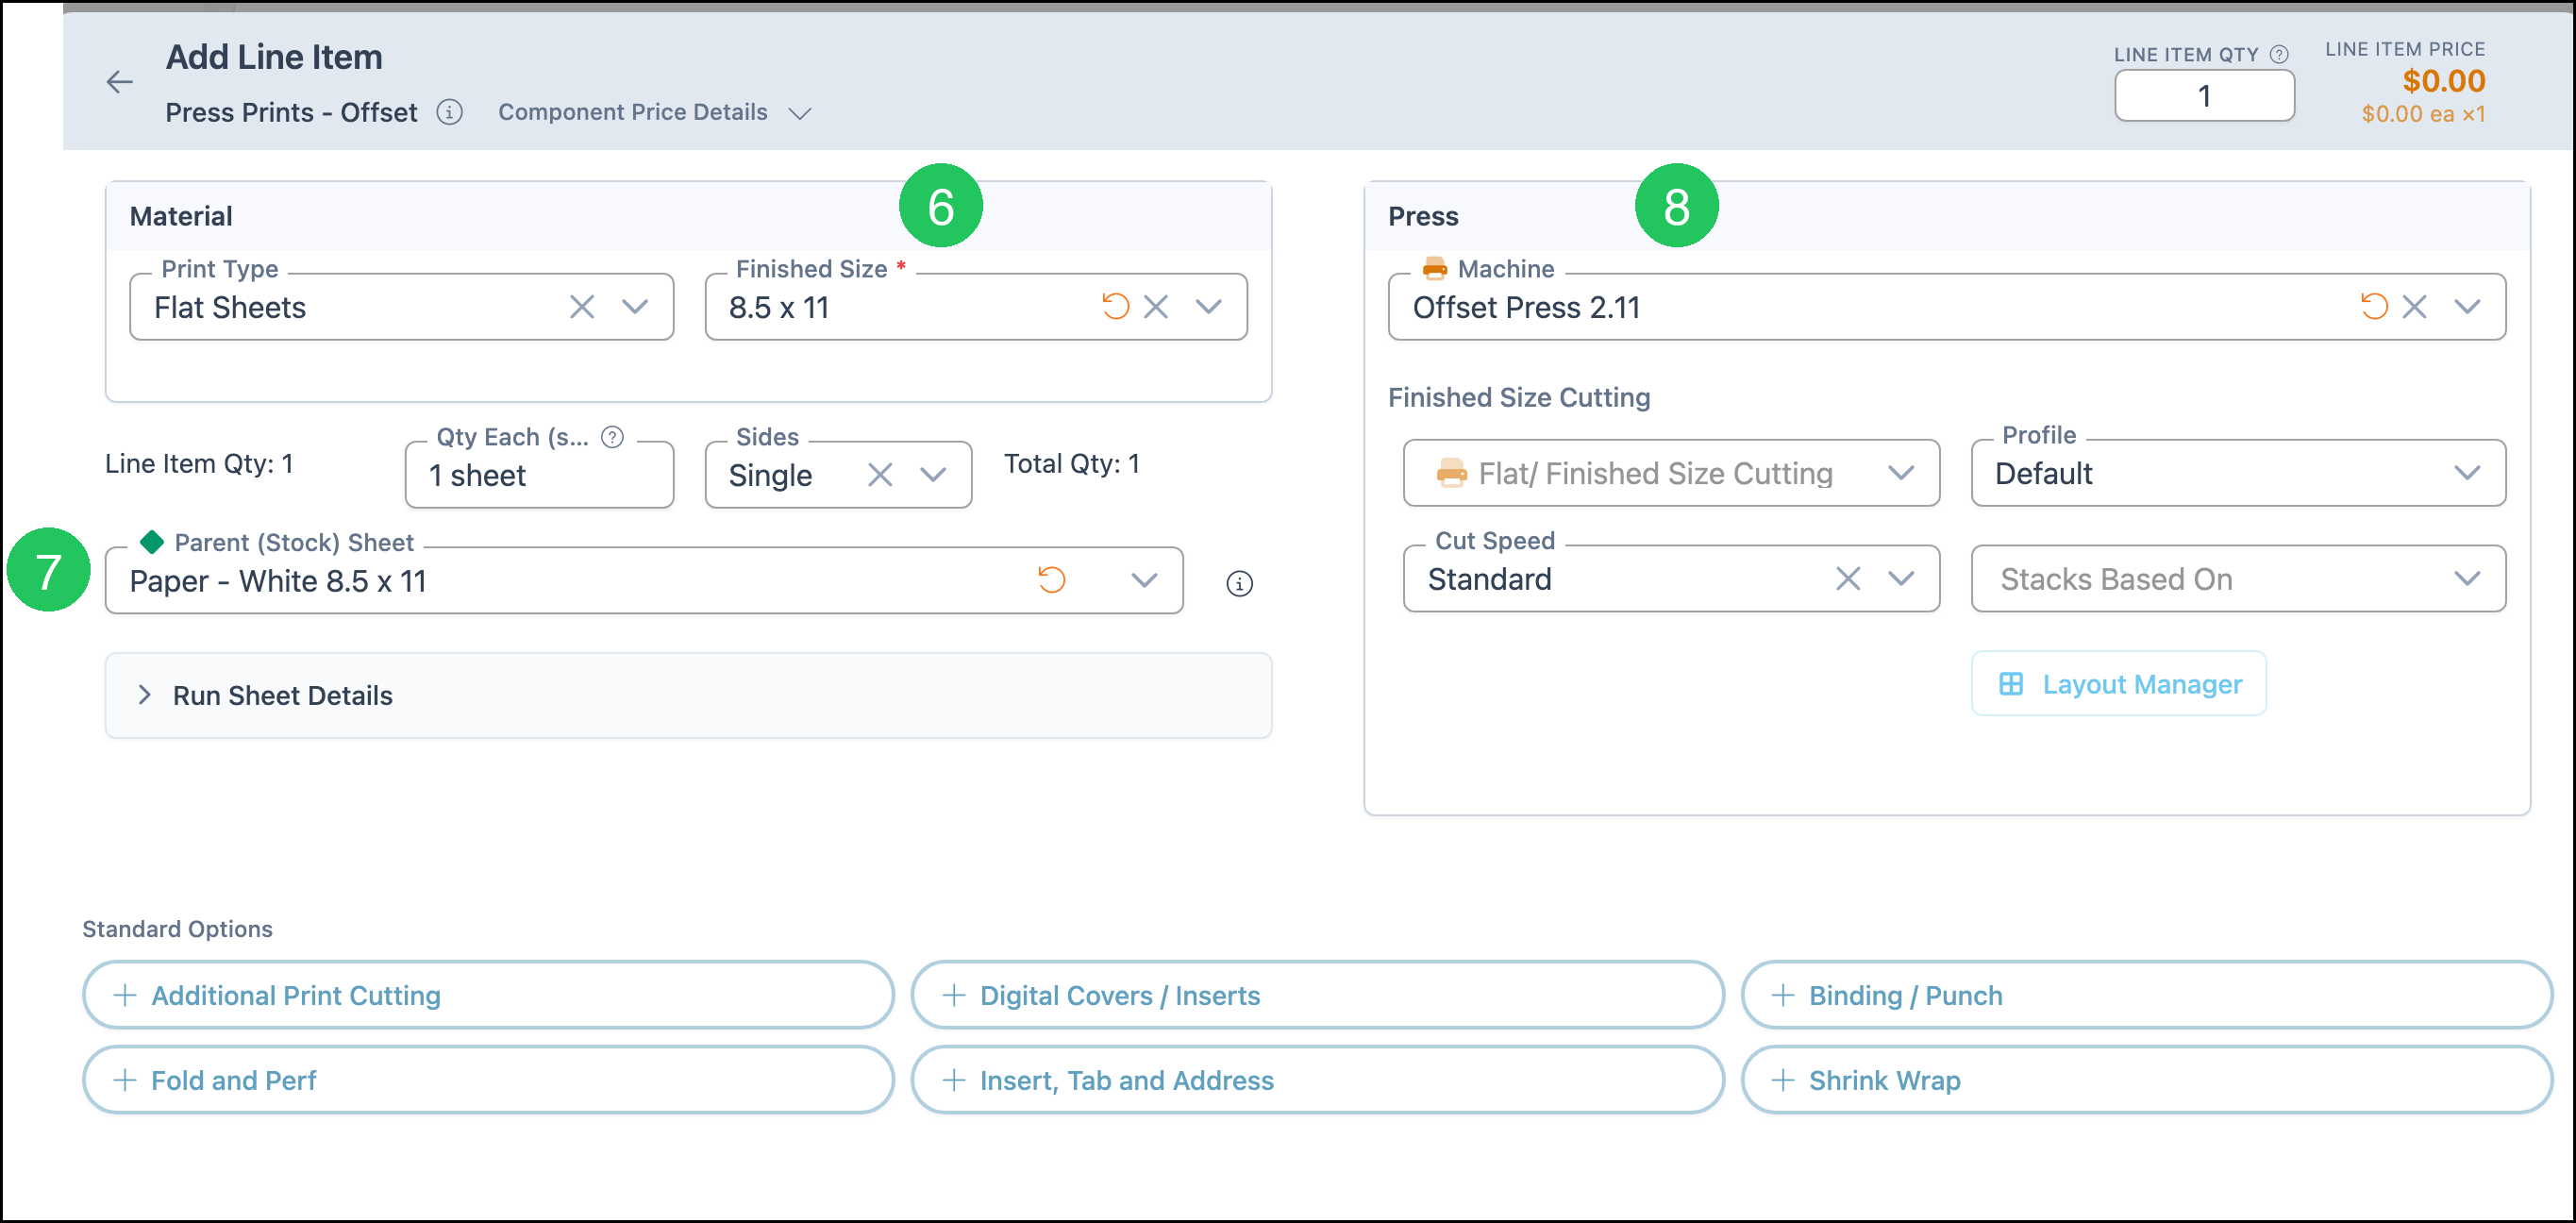
6. Select Finished Size. This example uses 8.5 x 11. Print Type is Flat Sheets.
7. Select Parent (Stock) Sheet. This example uses Paper - White 8.5 x 11.
8. Select Machine. This example uses Offset Press 2.11.
9. Click Save Changes. Line Item Price in this example is $35.34.

Frequently Asked Questions
1. What is the difference between Flat Sheets and Booklets?
Answer: Flat Sheets asks for Finished Size, Qty Each (sheet), Sides, and Parent (Stock) Sheet. Booklets adds Binding Type, page counts, Self Cover, Signature Size, and Sig Size to Image Size Layout.
2. Does Press Prints - Offset have to use Cost Plus - Markup?
Answer: No. Cost Plus - Markup is only the method saved on this product. Method on the Pricing card can be Cost Plus - Margin, Cost Plus - Markup, Market - Product, Market - Component, or Custom. Calculate uses the method that is saved.
3. Why does Machine appear on the Sales Form?
Answer: Hide Machine From Standard Order Entry is off, and Include Machine is on. Offset Press 2.11 is the machine on this product, so the Sales Form shows it.
Related Articles
Adding Products During Estimate or Order Entry